


The trick in learning software is to learn the fundamentals well and gain confidence that you are using the right tool for the right task. In this article we are therefore looking at one of the basics. Adding vertices in Blender.
To create an object containing a single vertex without needing add-ons in Blender, follow these steps:
In the rest of this article, we will discuss how we can add vertices in particular locations. Namely, at intersections, in the middle of a face or to an edge.
Let's dive in.
We just covered how to add an object and collapse its mesh into a single vertex. In the example we used a cube, but we can use several other meshes. However, keep in mind that a cube works great if you want the vertex to collapse at the same position as the object's origin.
Related content: How to center objects, origins and pivot points in Blender
If we instead use a cone the vertex ends up below the origin in its default configuration and if we use the monkey mesh, we will get three vertices. This is because each mesh island is collapsed into a vertex and the eyes in the monkey mesh aren't connected to the rest of the geometry.
We can also add a single vertex into an existing object. Follow these steps:
You can learn more about the 3D cursor in this article:
Related content: How to use the 3D cursor in Blender
Note that we follow a similar procedure. The difference is that we first tab into edit mode and place the 3D cursor there. After we add an object in edit mode, Blender also deselects everything else and selects the newly added geometry automatically.
This is why we can directly just collapse the mesh without changing our selection.
Related content: How selecting works in Blender
Another alternative is to use an add-on. There is one add-on built into Blender that we simply need to activate. It is called Extra objects. Note that there are two extra objects add-ons. One for curves and one for mesh. We want the one for mesh.
You can also read more about this add-on in this article to learn more about all it's features.
Related content: Blender add-on overview: Extra objects mesh
You can learn about managing and activating add-ons here:
Related content: 30 Blender addons (install, manage, free and paid)
Once we have activated the extra objects add-on, follow these steps to add a single vertex:
For edit mode, go directly to Single vert->Add single vert.
For instance, if we have two edges that meet but they are not connected with a vertex at the intersection. How do we add it?
Blender has something called an auto merge feature. You can find it in the active tool and workspace settings in the properties panel. This is the top most icon tab. In this pannel we expand the options section and check auto merge.
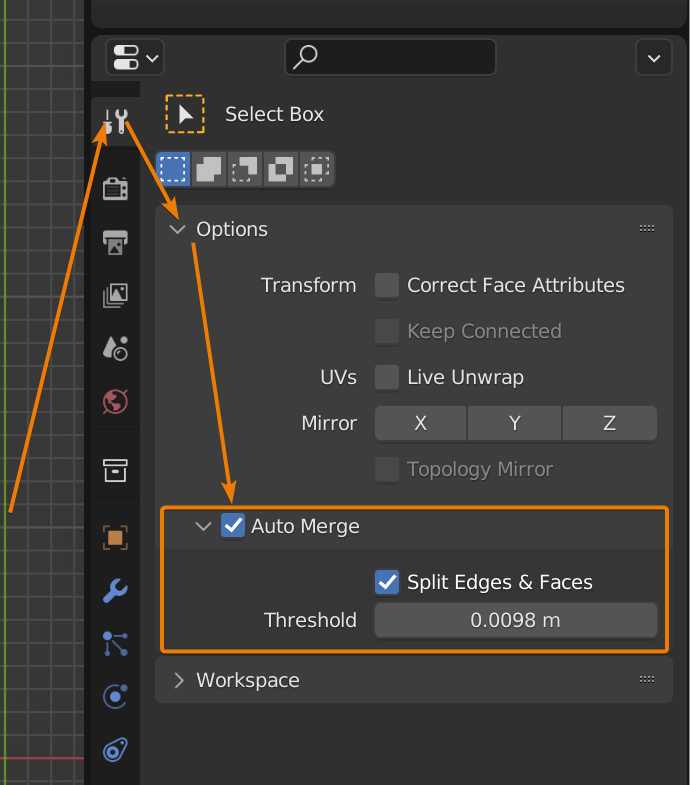
Auto merge has its own subsection with two settings. "Split edges & faces" and a threshold value.
Auto merge by itself only merge vertices. But if we check "split edges & faces" we can now have Blender check for intersecting mesh and create vertices there for us and have it create new vertices at intersections for us.
The threshold value is the max distance between edges that will get merged.
If you already have a geometry that looks something like this you can turn on auto merge and split edges and faces then select one of the vertices at either end of the selected edge, press G and then left click to confirm the move command without actually moving it.
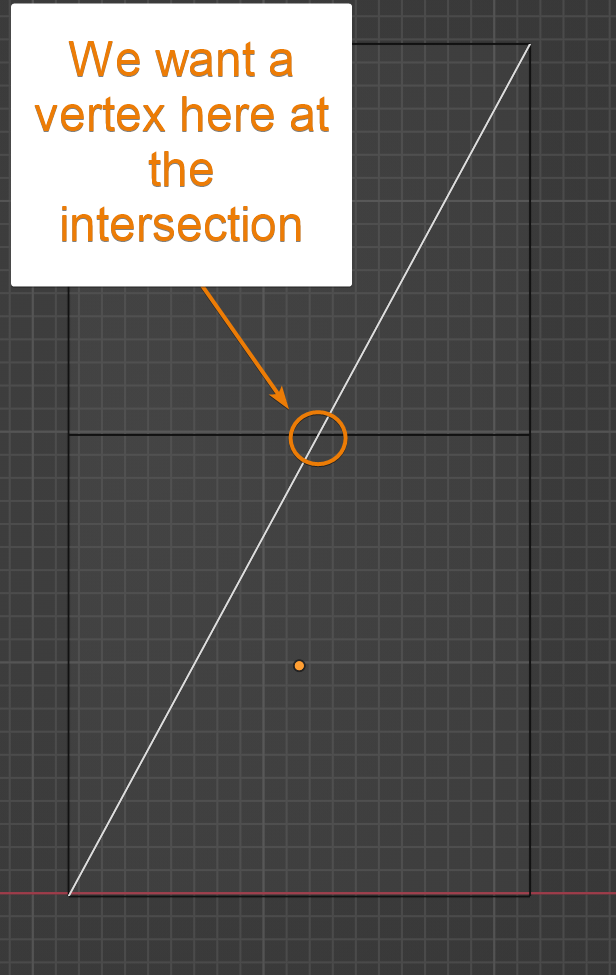
After the move command the result looked like the image below with a vertex created at the intersection. If the vertex is not created it is likely because the edges you want to merge are too far away from each other. In this case if the edges wouldn't lie on the same plane that would be enough to not have them merge. Even if it looks alright from this angle they could be miles appart in the Z direction.
If this is the case, we can increase the threshold so that intersections are created within a larger distance.

If you do the move command and have the edges merge and an intersection created but you slightly moved the vertex unintentionally, you can access the operator panel by pressing F9 or expanding the bottom left panel in the 3D viewport. In this panel, set the move X, Y and Z all to 0 to place the vertex at it's original position.
The added vertex at the new intersection is just a bi-product of the move command. But a move command without any movement is stilla move command and the intersection can still happen.
To add a vertex to the middle of a face with an edge connected each of the faces' original vertices follow these steps.
If you expand the operator panel in the bottom left corner of the 3D viewport or by pressing F9, you can also give the poke an offset. There is also a poke center setting that you can change to have Blender determine what the center of a face is and therefore where the vertex will be created for this operation.
If we want to to add a new vertex on an edge we can use the subdivide tool. In edit mode, press two on your number row to go into edge select mode.
next select an edge, right click and choose subdivide. This will split the edge in two with a vertex in the middle. This works both if the edge has connected faces or not. Since we only select the edge, the faces around won't be affected except that they will get an extra edge.
Therefore this is also a great way to turn triangles into quads or quads into n-gons.
Related content: Triangles vs Quads in Blender
Related content: Blender N-gon guide
If you have an edge that is not connected to any quad face, you can also press Ctrl+R and use the loop cut tool. The loop cut tool only cuts through faces that are quads. Likewise, if your edge has no connected faces, it works just as well.
Related content: How the loop cut tool works in Blender
Adding vertices when and where we need them in a quick way is essential for a fast paced 3D modeling workflow. If we commit these seemingly rudimentary tasks to our muscle memory we are far better of since we don't need to think about every command we are performing as we are modeling. Instead we can keep the end result in mind and the modeling can flow naturally without thinking of every detail.
Thanks for your time.
