


We can use curve objects in Blender to create round and more organic shapes and surfaces. Curve objects work differently from regular mesh objects and we can use them both as helper objects to shape something else or generate geometry from them.
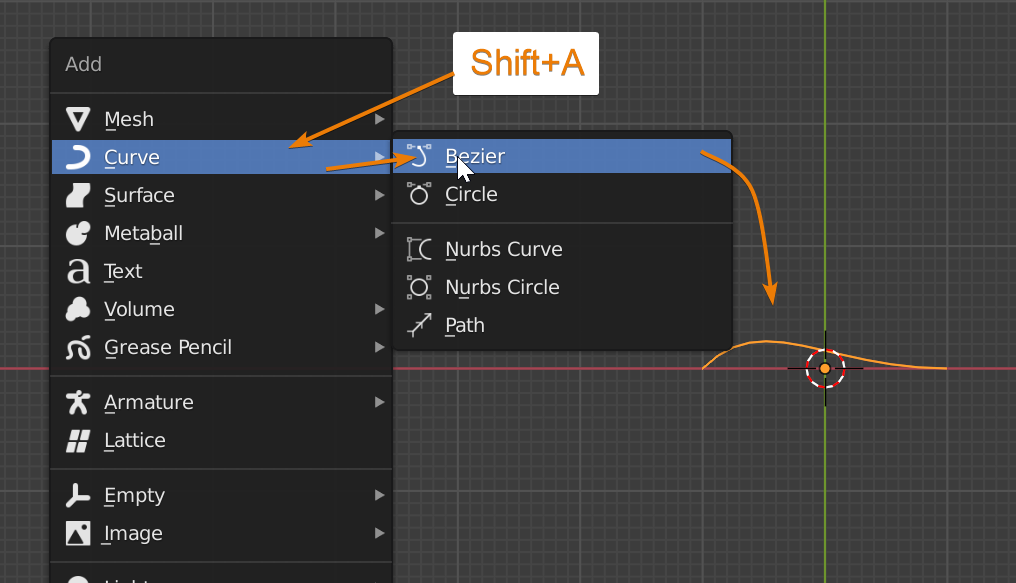
To create a curve object, click Shift+A and go to the curves menu. There are Bezier, Nurbs and paths. You can transform your curve object in object and edit mode. Access the Object Data Properties to adjust extrusion, beveling and other properties.
In this article, we will explore the different ways that you can use a curve object in your Blender project. Various settings and properties that you can adjust with your curve object in order to create more interesting shapes.
In Blender, a curve object is based on a mathematical formula and we use handles or control points in order to manipulate the curve object.
There are 3 types of curve objects; bezier, which is the most common type, nurbs and paths. For bezier curves, they work a little different. The curves go through the control points to create the final result while nurbs and paths do not touch the control points. With bezier curves, you are also able to move around handles along with the control points.
For nurbs, the curves don’t go through the control points, but the line is influenced by them. Paths are much like nurbs, however they stretch to the last control point. Generally paths are used for animations, to create smooth motions.
You can create a curve object by clicking Shift+A and clicking on curves in the menu. There is also something called curve surfaces, however we will not be covering that topic in this article.
There are many instances in which you would want to use a curve object, such as for creating curved surfaces, deforming a mesh object with the curve modifier, and creating profiles for other curve objects.
Some real world examples would be creating pipes or skirting for architecture visualizations. But we can also animate along a path using a curve or create a profile object with a curve and have it projected along a second curve.
Related content: How to animate the camera in Blender?
Curve objects will allow you to have more control in some cases than mesh objects. This is because we don't need to deform or change the mesh itself. Instead we can use the control points on a curve and the mesh will follow.
Through moving around the control points and handles, you can easily create the curve shape you want instead of managing the topology of a mesh object directly. Very similarly to how we can use a lattice object to deform mesh.
Related content: How to set up and use a lattice in Blender
Curves can also be used together with modifiers to deform mesh objects or they have some options to add geometry based on the shape of the curve.
Related content: Top 10 Blender modifiers and how they work
Recently, custom bevels where added as a new feature for curves so that we can create profiles for curve objects using a curve graph.

To use a curve, you can edit it through both object and edit mode. Through object mode, you can move, scale and rotate your curve, however, to edit the control points and handles of the curve themselves you will need to use edit mode.
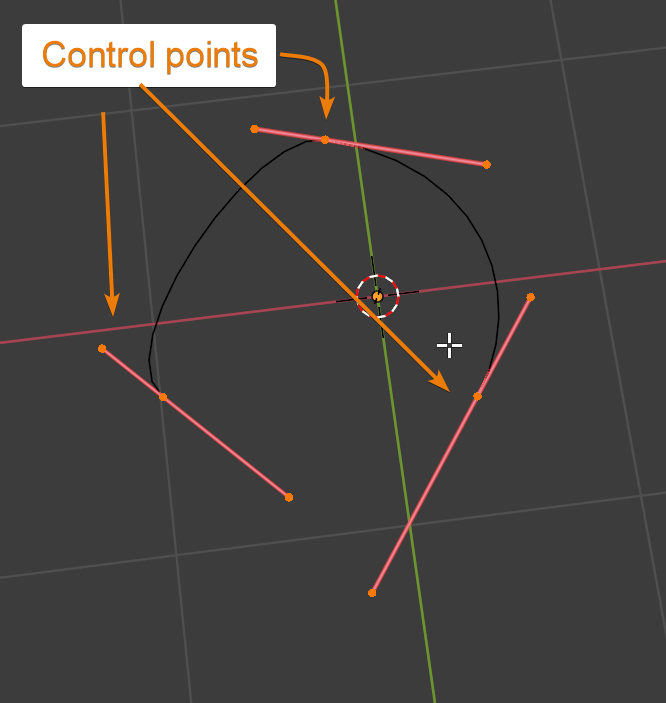
After clicking Tab and changing to edit mode, you will be able to see the control points of the curve object. For each curve object; bezier, nurb and path, the control points work a little differently when deforming, but use the same principle.
You can use the regular select and transform tools to deform the curve, and extrude new control points by clicking E.
In the Object Data Properties of the curve object, there are many different properties and settings that you are able to change and adjust. What I would like to point out are the settings that lie under Geometry. You can adjust the shape of your curve object by moving around the Offset and Extrude sliders, which would come in handy when creating any kinds of curved surfaces.
Under Geometry, you can also adjust the bevel of your curve object. There are 3 settings for beveling your curve object:
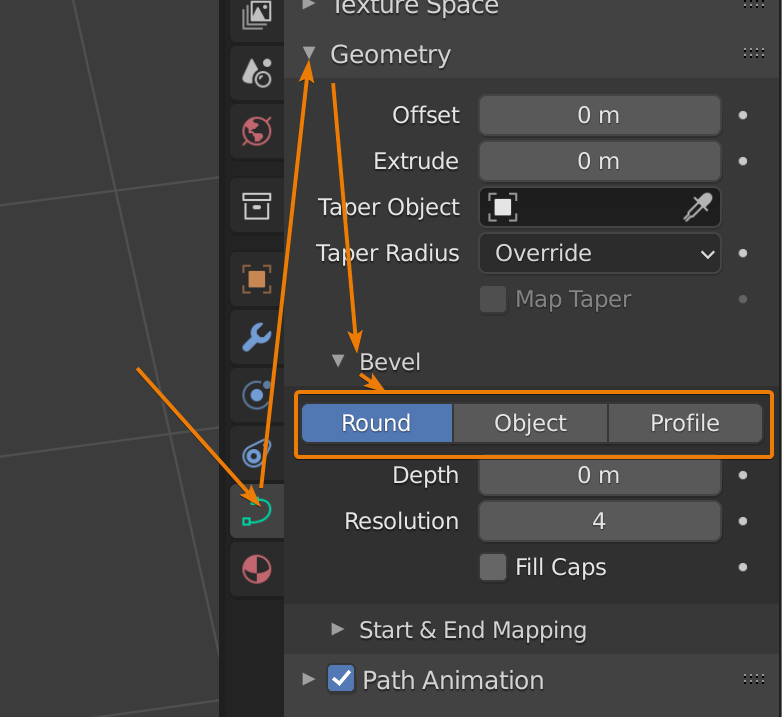
Round: This would turn your curve into a round tube-like object. You can then adjust the resolution/smoothness of the bevel. Clicking Fill Caps will seal the ends of your curve.
Object: Allows you to extrude your curve based on another curve object that you select.
Profile: This would also turn your curve into a tube-like object, but allows you to define the profile of your bevel by adjusting the line on the widget window. This could be helpful when creating more intricate curve details.
The bevel settings allow a lot of different customizations for your curve object. You can also use modifiers with your curve object, just as any other object. Have fun and experiment with the different curve bevels and modifiers that you can add to see how they can be useful to you.
To convert a curve into a mesh, you can right-click your curve object and select ‘Convert to Mesh’. Or under the Object menu, select Convert to > Mesh. Converting your curve object into a mesh will apply all the changes you’ve made through the curve object data property settings, and allow you to have more control over the object by unlocking the geometry.
You can also convert a mesh into a curve by going to the Object menu, select Convert to > Curve. However, this will not always work the way you expect it to, since only edges without any faces will be converted into a curve. Therefore, converting from mesh to curve is best with low poly and flat mesh objects.
Converting your mesh object into a curve can be useful in a few different situations when you would like to access the object data properties of a curve object.
For any curve object, you can close your curve into a circle by clicking Alt+C to Toggle Cyclic. Clicking Alt+C again would reopen your curve object. This could be helpful for any situation where you would want to create a closed curve. You could then add a round bevel and it would turn into a donut-like shape.
In this article, we learnt about how to create and use curve objects, and looked at the different settings and properties of the curve object that we could adjust to change its shape and make it more useful.
There are many different ways that you could use curve objects to increase the efficiency of your workflow. Have fun and experiment with using curve objects to see how they can benefit your project!
Thank you for reading.
