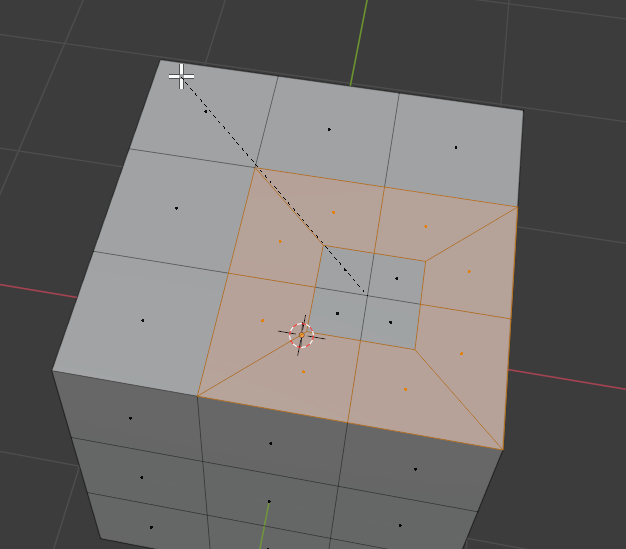
The inset tool is one of the standard edit mode modeling tools in Blender. Personally, I think that if you only used five modeling tools for your modeling projects, the inset tool would be one of them.
To use the inset tool in Blender, press tab to enter edit mode, select some faces, and hit I on your keyboard to start the inset operation. Move the mouse cursor to adjust and left click to confirm. Press F9 to bring up the operator panel for additional adjustments.
In the rest of this article, we will dive into the inset tool and learn all about its settings, use cases and how to avoid certain problems that may occur as we use it.
The inset is one of the most common modeling tools in Blender. According to the Cambridge dictionary it is “something positioned within a larger object”.
And that is exactly what it does in Blender. As we inset something, we create additional geometry as a perimeter around our selection and push the selection inwards. By default, we do this without changing the shape of the object. We just add more geometry.
There are several variations and options to this accessed through the operator panel found in the bottom left corner of the 3D viewport right after we have confirmed the inset operation. We can also press F9 to bring up the operator panel as a floating window at the cursor position.
Another common modeling tool is the extrude tool. You can read more about that here:
Related content: Extrude in Blender: Basics, along curve, circles, manifold and more
There are two ways we can inset in Blender, the first is by following the instructions already laid out earlier. Namely:
The second option is to use the inset tool from the toolbar. Now this is slightly different. Once we are in edit mode and we have our selection ready, press the inset tool on the toolbar.

You notice that a widget appears in the 3D viewport. Press the yellow circle, hold it, and move the mouse to adjust. Then we confirm the operation by releasing the mouse instead of clicking.
The inset tool is not affected by the control options located in the header of the 3D viewport, such as snapping, proportional editing or transform pivot point. Instead, the inset tool depends on its own settings only.
While the shortcut key for the inset tool is I, we have several modifier keys we can also use while we are adjusting the inset and before we confirm.
These modifiers access some features otherwise accessible through the operator panel once the operation is confirmed. But using the shortcut keys can help speed up the modeling process.
After you press I to inset, you can see that in the 3D viewport just below the header there is some information displayed. This is information about how we can adjust the inset tool behavior.

Keep in mind that the toolbar is there as a help for many tools in Blender.
Here are the shortcuts and their explanation available during the operation:
| Shortcut key | Operation description |
|---|---|
| Hold CTRL | Push the selection inwards and outwards, creating an extrusion or moving the geometry inwards. |
| Hold Shift | Move the inset one tenth of the speed for finer adjustments |
| O | Outset: Change the inset tool to an outset tool, making the new geometry around the selection expand outwards. |
| B | Boundary: If an edge is open, meaning that it doesn't have an adjacent face on one side and we press B to turn off boundaries, The faces at the edge won't be inset. |
| I | Individual: Pressing I again will inset each face individually as opposed to insetting the whole selection as a single element. |
Apart from that we can also use the number pad or number row to specify the exact amount of inset. For instance, typing 0.1 will set the inset to 0.1 meters by default.
You can change this unit and unit scale by going to the scene properties tab in the properties panel and expanding the units section. Here you will find unit scale and unit system.
We can access all these settings in the operator panel, but there are also some other settings there worth mentioning.
First, offset even is turned on by default. This scales the newly created geometry around the inset so that it becomes more even all around. This is turned on by default and should be kept on in most cases.
Next, offset relative. Without offset relative, each edge connected to the inset will be the same length, but if we turn this on the thickness will be relative to the surrounding geometry.
The function of Edge rail is to keep edges straight along the surrounding geometry instead of following the inner geometry normals that can otherwise bend those edges.
The select outer option will change the selection so that the newly created geometry around the inset is selected instead of the part that is being inset.
The last setting is interpolate. This will try to adjust any vertex data such as UV maps, vertex colors and vertex weights to the newly added geometry.
Related content: How to use vertex groups in Blender
The inset tool is just one among many and it has its limitation. The most frequent problem to run into is that the inset overlaps itself as there is no clamping option. This happens if we inset too much, and the geometry moves across the other side of the inset.
To avoid this, we need to carefully check the entire inset so that it does not overlap. It is most common when insetting irregular shapes that may have varying thickness. It could be an irregular n-gon or a group of faces.
The same problem may occur if we use inset on individual faces with different shapes. Here, we may want to inset faces that are too different from each other with individual operations or in groups.
If your object is such that you can't see all faces you want to inset at once. You could try to use Shift+Z to view the object in wireframe mode as you inset the faces.
Related content: Blender viewport shading guide
You can read more about the inset face tool in the Blender manual here:
Related content: Blender manual inset face
We have covered the inset tool extensively, giving you a complete rundown of the settings and how to use it. From detailed settings, such as boundary and edge railing to more common options such as insetting individual faces or using shift and control to finer adjustment and move the inset.
I hope you learned something and as always, thanks for your time.