


There are many times in Blender where we may just want to draw. Whether we're looking to take notes, make quick sketches, or create entire pieces of 2D artwork. So can we draw with Blender?
Yes, you can draw in both 3D and 2D in Blender. There are two types of drawing. Annotations and Grease Pencil. Annotations is a simple tool primarily for taking notes and creating simple drawings while grease pencil is the fully fleshed out drawing system for art creation in Blender.
Also note that appart from drawing tools there are also plenty of painting tools. For instance, for simple 2D painting, texture painting, and vertex color painting. But in this article we focus on drawing.
In the rest of this article we'll go over some general details about both of these tools to help get an idea of where everything is and generally how to get started.
If you are interested in working with line art in Blender, perhaps the freestyle renderer is what you need.
Related content: A guide to Blender freestyle rendering with Eevee and Cycles
We will start by covering the Grease pencil basics before moving over to the annotation tools.

To get started drawing using the Grease pencil tools in Blender, we first we'll need to add a grease pencil object to the scene. Follow these steps:
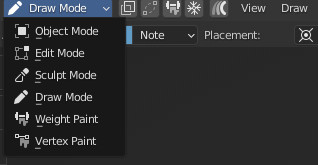
To switch to draw mode you can also press Ctrl+Tab in the 3D viewport to access the mode switch pie menu. The draw mode is in the 12'o clock position when a Grease Pencil object is selected.
When drawing in Blender using Grease pencil we get all the benefits of navigation in 3D space. This means that we can orbit around our drawing, draw from different angles and on different planes.
Related content: How to move the camera in Blender
We can also move the different parts of our drawing back and forth, rotate, scale and so on. Another benefit is that we can also use the camera in perspective mode making things that we place further away shrink in size according to the camera settings. Something that is quite unique in digital drawing.
Related content: 5 cool camera tricks in Blender
Since this also introduces some additional complexities when drawing let's explore how we can draw on different planes first, since that is probably the most notable difference between Grease Pencil in Blender and most traditional 2D drawing applications.
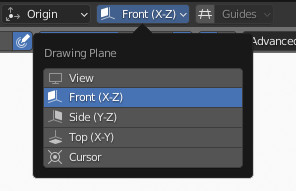
In the top center of the 3D viewport you can find the drawing plane menu while in Draw mode.
With the stroke placement and drawing plane settings we can adjust how Blender orients and places the strokes in our scene.
The drawing plane sets the orientation of the plane that the strokes are drawn relative to.
We can also adjust the stroke placement. These options allow us to either set our strokes to be created at the specified setting or we can have the stroke snap to a surface or to another stroke.
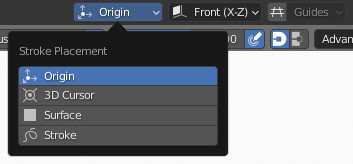
Note that some Drawing Plane and Stroke Placement settings don't work very well together. The Front, Side, and Top Drawing Planes don't work as well with Surface and Stroke snapping for example.
If we're snapping our strokes to a surface or stroke it's best to use the view drawing plane.
For Surface stroke placement we can also adjust how far off the surface the stroke is in the stroke placement panel. By default, the offset is high so if your strokes are way above the surface check the offset.
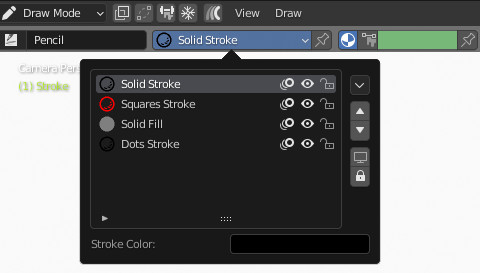
We can adjust the color of our strokes in a few different ways. Strokes can either use vertex color or materials.
Materials have either a stroke or a fill or both. You can access the materials present in your scene from the header bar. But if you want to change or create new materials you need to go to the material tab in the properties panel.

Add a new material and in the surface section, check either box to activate the stroke and fill for the material and adjust your settings.
The lines you draw using Grease pencil are vector graphics and are made up of points along the stroke. To color the strokes, we can therefore also use vertex color. To color with vertex color you need to leave Draw mode and go to vertex color mode instead.
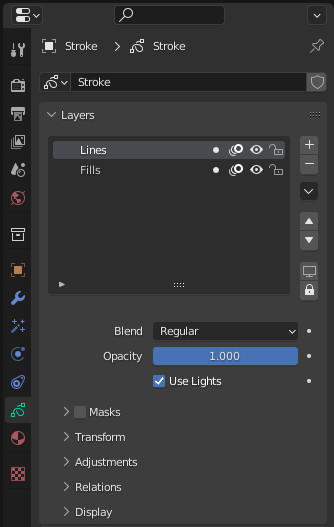
We can access layers a few ways, the first is to go to the Dopesheet and set the context to grease pencil, in the stroke tab we can see all the different layers.
The other way to view our layers is by selecting our Stroke object then going to the properties tab > stroke
Now we know where to find materials and layers as well as how to orient our stroke in the scene. Let's now move along to see what object mode can do for us when using Grease pencil.
Object mode is mainly for adjusting the position of the overall stroke object. We can use object mode to layout where we want our stroke objects to go.
Edit mode can be used to manually tweak each curve used for a stroke and adjust the control points. Edit Mode for grease pencil makes it much easier to do precise adjustments of the vertices making up the strokes.
We can use more 3D modeling like tools to move the individual vertices or groups of them. We can also use proportional editing to make adjustments with a falloff.
Related content: How to use proportional editing in Blender
Sculpt mode is great for making adjustments to multiple curves in a stroke object or making smoothed out adjustments. It's similar to sculpting an object in that its less precise but makes it easier to make larger adjustments.
Vertex Paint mode allows us to adjust the color of each individual point in a stroke.
Weight Paint mode allows us to adjust the weight of each individual point and configure weight maps. Weight maps are usually used as parameters when adding effects to a stroke.
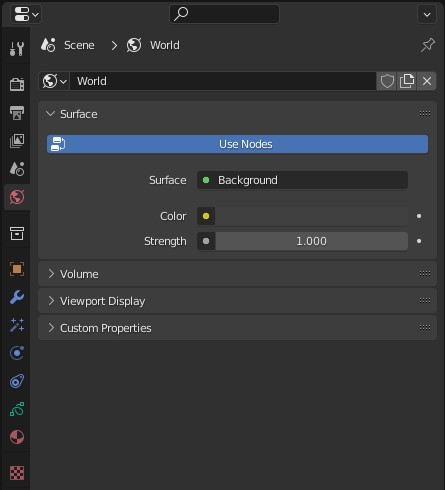
We can also change the background of our scene through the world material.
In the properties panel go to the world tab and there you should see the surface tab. We can click on the color selector and then adjust to whatever color we want the background to be.
To animate with grease pencil we will be using auto keying. With auto keying enabled we can set the active frame to where we want our animation to start, draw, and then move the active frame forwards or backwards and draw the next frame and Blender will automatically do the keyframing.

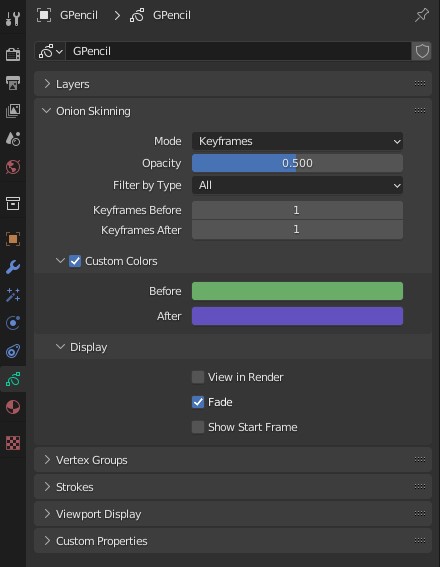
One very useful effect that we likely won't have by default is onion skinning. Onion skinning lets us see the previous and next frame.
Most of the settings are already in place for onion skinning to work but we will need to go to overlay and enable the onion skinning options.

We can also adjust the onion skinning settings in Properties > Gpencil > Onion Skinning.
We can adjust the before and after colors as well as how many keyframes before and after to include in the onion skin effect.
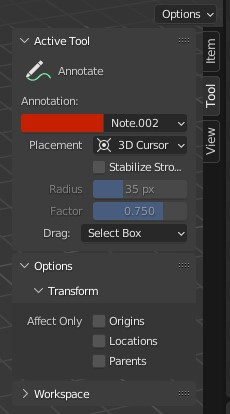
Blender's annotation tools allow us to take notes and draw simple sketches. Annotations are supported in multiple different editor types meaning we can take notes in the Shading, UV, Modeling, Composting editors etc. This makes annotations a very useful tool for notes.
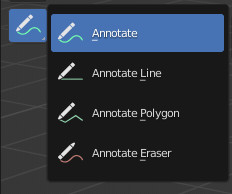
By clicking and holding on the annotation tab we can bring up a sidebar with the different annotation modes. Through the annotation tool options tab we can access erase mode as well as accessing the line and polygon tools.
Note that if we're trying to remove annotations we can also use layers to completely remove the annotations and their associated layer.

In any window press N or press the small arrow at the top right to bring up the side panel and then go to view and drop down the annotations panel.
Any annotations we've made will show up here, we can remove annotations and adjust their settings as well as having the option to hide annotation layers and adjust their color.

another way of adjusting the annotation settings is through the tools tab.
Layers are available by clicking on the drop down next to the annotation color and we can also adjust the settings used for annotation drawing. These options are also available at the top left of the 3D Viewport.
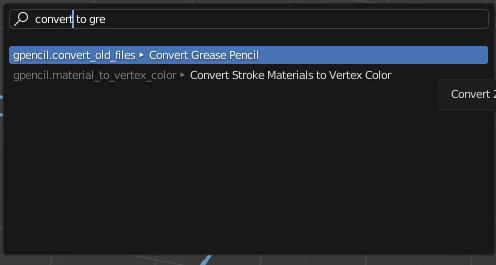
We may also want to convert our annotations to grease pencil objects. While we're in annotation mode we can press F3 and search for convert to grease pencil. This will allow us to manipulate our annotations as objects as well as use all the grease pencil options.
Grease Pencil is a great tool for creating 2D artwork and animations and can also be helpful when we want to give our objects and renders a bit more of a handmade look.
Annotations are a very powerful way to provide notes with our blender files as well as concepting while modeling and just getting a general idea of what we want to create.
Thanks for your time.
