


The camera composition is crucial to create an aesthetically pleasing render, and aspect ratio is one of the numerous factors which can alter the way elements within a scene are arranged and shown. Aspect ratios can, for example, be used to achieve a more realistic feel to the render.
So how do you actually change the aspect ratio?
To change the camera aspect ratio in Blender, to go the properties panel and click the output properties tab, indicated by the white printer icon, third from the top. Next find the format section at the top and change the X and Y pixel count. You can also find presets by clicking the list icon just above the resolution settings.
Let's now go into some more detail about aspect ratios and which ones to use.
Related content: How to change the active camera in Blender?
Related content: 5 cool camera tricks in Blender

The two most famous aspect ratios for digital content are 4:3 and 16:9 formats. There is widespread debate about which of these two is the better option, but in general this is entirely dependent on the type of content or the purpose of the display screen. While many modern-day phones, HD TVs, and computer screens use 16:9, the 4:3 format is used more for online content, classic televisions, etc.
Aside from these, other common aspect ratios include 16:10 (mostly used in productivity-centred laptops or computer displays), 21:9 (used in certain television screens), and 3:2 for certain DSLR cameras and smartphone models.
But what does this aspect ratio mean? These numbers show a ratio between the number of pixels per row of a screen (horizontally) and the number of pixels per column (vertically). This means that a screen with an aspect ratio of, for example, 16:9 can have any number of pixels such that there are 16/9 = 1.78 times as many pixels horizontally as there are vertically.
There also exist common pixel counts for most of these ratios. For 16:9 screens, the most common pixel resolution is 1080p, meaning there are 1920 by 1080 pixels spanning the screen. This is also known as a high definition (HD) resolution.
A 4k resolution (3840 x 2160p) is 4 times the pixel count of an HD display. While even higher resolutions exist, they become uncommon for most day-to-day digital media.
For a 4:3 aspect ratio, the most common screen resolution is 720p (960 x 720 pixels), although the use of this resolution has also reduced in recent times.
Blender has certain preset options built in for different purposes. This can be accessed in the Format section in the Output Properties (denoted by a white printer icon, third from the top) in the Properties panel. The preset options in Blender are:
In case you require frequent use of your own custom aspect ratio, or you would like to use one not natively included within Blender, simply change the resolution and aspect ratio settings to your preference, open the preset list, and click on "New Preset" to save your current settings.
This will change the button into a text data field, where you can now enter any name for your preset and press on the + icon to its right to add it to the list. It will be added to the list in alphabetical order.
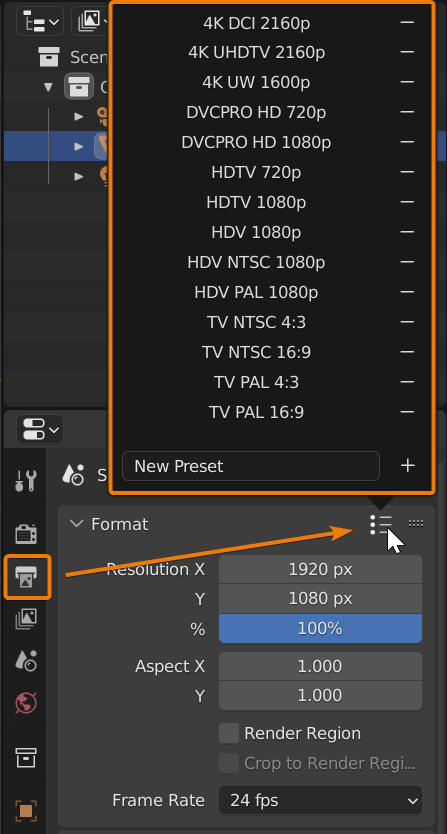
To use your custom aspect ratio preset in the future, you can just head back to the same preset list and select your own option. To remove a preset, click on the minus (-) sign next to it to delete it. Note that removing a preset cannot be undone.
Related content: How to aim the camera at an object in Blender
The primary difference between the resolution of a screen and its aspect ratio is that the first one describes the actual number of pixels on the screen, whereas the aspect ratio can stretch or compress the pixels to fit on the screen.
Older televisions are known to have non-square pixels, generally shorter on the horizontal axis than the vertical. This means that for an exported render to look 'normal' on such a screen, the aspect ratio must be changed such that the pixels on the horizontal axis are naturally stretched. While this may look irregular on the machine the content is rendered on, it counters the non-square pixels of a TV screen and hence goes back to looking square on the final display.
For other cases, changing the aspect ratio while keeping the pixel resolution constant can also be used to achieve a unique and interesting look, perhaps to achieve a certain art style for a render.
Generally speaking, it's always best to consider the output device and adjust both values accordingly. In case the output format is not included as a preset within Blender, there exist free third-party addons to import a larger variety of output preset options.
Related content: Snap camera to view in Blender
It's always best to set the aspect ratio of your cameras before rendering, as this can be much more efficient than needing to crop out renders for export to different social media platforms or programs. And as we've seen here, it's easy enough to change with just a couple clicks!
Thanks for reading and get composing!
