


One of the newer features in Blender is a built-in Asset Browser that helps us organize and manage our assets. The asset browser makes it much easier to access premade models, materials, worlds and animations. Making the process of adding assets to our scene as simple as dragging and dropping them in.
Here is how to add assets to the asset browser and to your scene:
Through this article, we will cover the Asset Browser extensively. Adding assets of different object types, organizing, and managing our assets and more.
We will start by looking at the basic operations like opening the asset browser, adding and removing assets and adding assets from the asset browser to the scene. Then we will continue and cover the more advanced features like asset libraries and using multiple files to store and work with assets.
An important thing to keep in mind is that you need to open the blend file that a certain asset originates from to make changes to that asset. More on this when we cover asset libraries.
If you're looking for a guide on how to manage assets in Blender prior to version 3.0, check out this article.
Related content: How to do Asset management in Blender
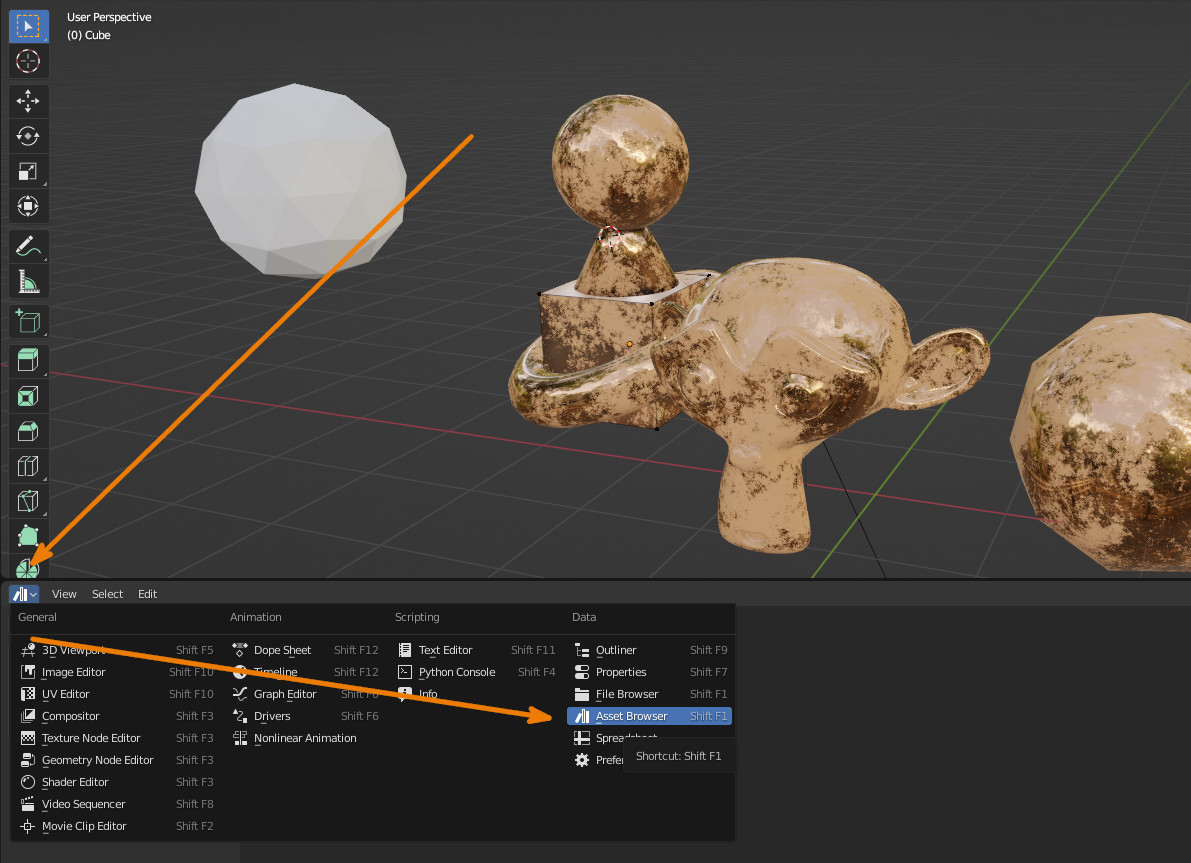
The asset browser is an editor in Blender. To open it, we can either turn an existing editor into the asset browser or open a new one. The easiest is to turn an existing editor into the asset browser. For instance, the timeline in the layout workspace.
To open the asset browser, follow these steps:
You can also hover your mouse over an editor and hold Shift while pressing F1 once or twice. Some editors turn into the file browser editor when pressing F1 once but pressing F1 multiple times while holding shift will toggle the editor between the file browser and asset browser.
Now that we have the asset browser open, we can start adding and removing assets.
First, if our open blend file contains multiple scenes, we would want to go to the scene containing the assets we would like to add as assets into the asset browser.
Now follow these steps to add an asset to the asset browser.
Notice how the object gets a book icon in the outliner. The object should also populate the asset browser. If you can't see it, press the "All" catalog with the house icon in the asset browser and all assets should be visible.
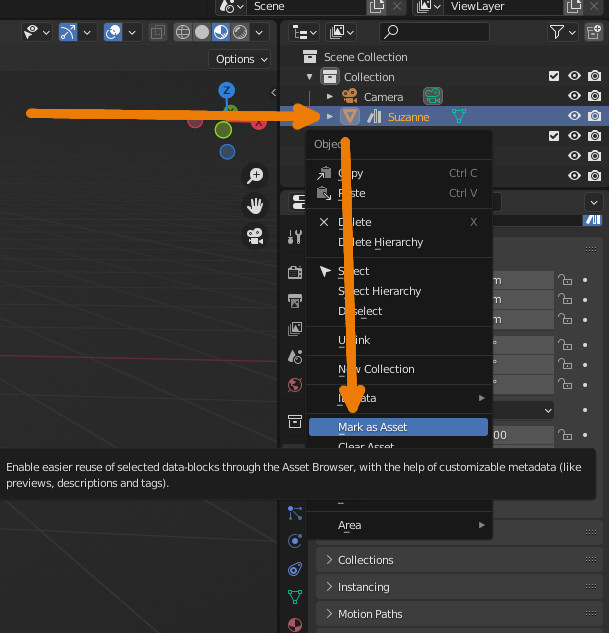
You can add multiple assets at once simply by selecting multiple objects, right click and choose mark as asset.
To select multiple objects in the outliner, click and drag with box select or use Shift + Click to select an entire range or hold CTRL and click to single out multiple assets.
For other kinds of data-blocks like materials it can be slightly trickier since we can't easily select multiple materials without also selecting the objects that use them. But we can change the outliner view to make it possible.
Go to the display mode drop down and set it to blend file.
Expand the materials folder and select the materials you want to become assets. Right click and choose "mark as asset".
We can add any kind of asset through the outliner, just expand the collections and objects to drill down to the asset you want.
For example, to add a material from the outliner, expand the collection containing an object using the material, expand the object and the mesh data and you will find the material. Right click and choose "mark as asset".
For materials we can also add them from the material tab. In the materials panel right click on the material and select Mark as Asset.
For Poses, Actions, and animations we can navigate to the NLA Editor, right click on the animation name at the top of the window and select Mark as Asset.
The types of objects that are currently compatible with the Asset Browser are:
Keep in mind that objects aren't just mesh objects. It can be lamps, cameras, curves and collection instances for example. Objects can then contain a lot of different data. But things like images, video and sound files are still missing. We will have to use the file browser editor for that.
If the asset you're looking to add isn't on this list note that as of writing this article the Asset Browser is still early in its development, more asset types will be supported in the future.
To remove an asset from an asset library, follow these steps:
We can also clear assets from the outliner. Right click the asset you want to clear and choose "clear asset". This will remove the meta data attached to the data-block that makes it an asset as opposed to a regular data-block.
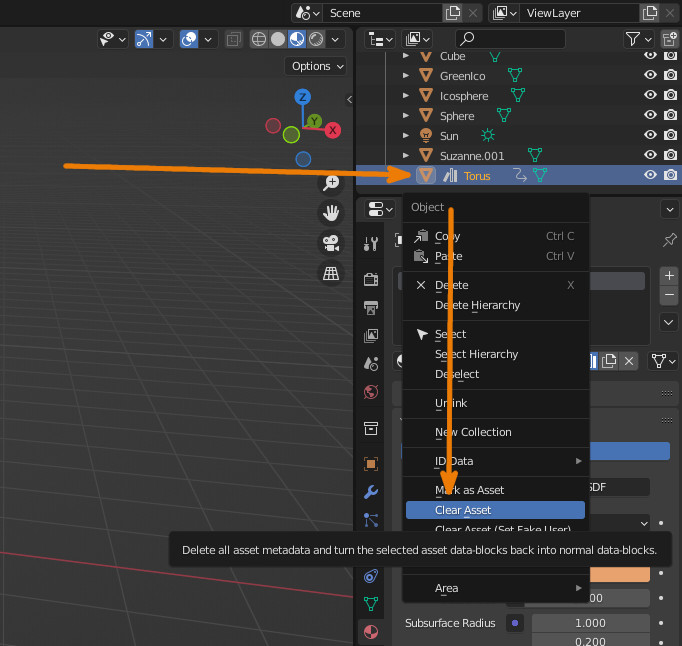
Note that you also have the option to clear asset and set fake user at the same time. This means that Blender will save the data in the blend file even if it isn't used.
Fake user isn't applicable to objects themselves but is applicable to data contained in objects as well as some other data-blocks in Blender. For instance, sculpt brushes, paint brushes and images.
Data contained inside objects are also data-blocks that we can assign a fake user to. Such as materials and the mesh itself.
Fake user is simply a state telling Blender that the data is in use and won't be deleted when the file closes. Otherwise, Blender will clean up any unused data when closed. For instance, materials that isn't used on any objects in the scene.
If you need to find out what data is safe or not, go to the outliner, set the display mode to orphan data and Blender will list all data-blocks without a user. Press the shield icon to keep the data in the file on exit.
To remove multiple assets at once we need to use the outliner. The file browser can currently only remove one asset at a time.
Just like when adding multiple assets, we can use box select, hold CTRL or Shift to select multiple data-blocks in the outliner. Right click and choose clear asset or clear asset (set fake user)
We can add assets from the asset browser by clicking on an asset and dragging it into the scene, objects also have the ability to be snapped while we're dragging them into our scene.
Related content: How to use snapping tools in Blender
Materials can be dropped onto objects, and world materials can be dropped onto the background to instantly apply them.
However, we can do the same directly from the outliner. Click and drag an object icon from the outliner to the 3D viewport for the exact same behavior. In fact, the outliner is currently even better because we can drag-and-drop the mesh data, represented by the green triangle icon contained in an object to create an instance of the object containing this data instead of creating a full copy.

The benefit of the asset browser though, is that we can append and link assets from an asset library.
We will cover how to use and setup asset libraries later in this article. But for now, let's just look at our options when we are pulling in assets that are stored in an asset library rather than in the local file.

When we're adding assets from the Asset Browser that is stored in a separate Blend file, we have the option to either append or link the asset or append with reuse data.
Appending will create a separate copy of the model that does not link back to the original while link will create an instance of the model. Changes to the original model located in the library file will propagate to all its instances. But we cannot make changes to an individual instance without first converting it to a full copy or creating library overrides.
The Append (reuse data) is new and specific for the asset browser. When an asset is brought into the scene, Blender keeps track of it and if we bring it in again it will reuse the data from the first time we brought in the asset and reuse mesh data and any applied materials in case of an object.
For a material, Blender will not create another copy of the material, instead it is smart enough to reuse the same material even if we have pulled it in from the asset browser before.
The asset browser allows us to tap into other blend files that together can form an asset library.
By default, Blender will create a User Library with a path to your Documents/Blender/Assets. You may need to go into your documents folder and create these folders first if Blender doesn't do it automatically.
Any Blend file that is stored in this folder is part of the asset library. Blender will look at all of them and add all objects, materials, poses and world materials that is marked as an asset to the asset browser of any opened Blend file.
We can change where this asset library is located on the hard drive. We can also add more asset libraries or remove existing ones, including the default. Follow these steps.
You can also press X in front of any existing asset library to remove it. The data stored in the library is maintained. It is only the link to use that folder as an asset library that is removed.
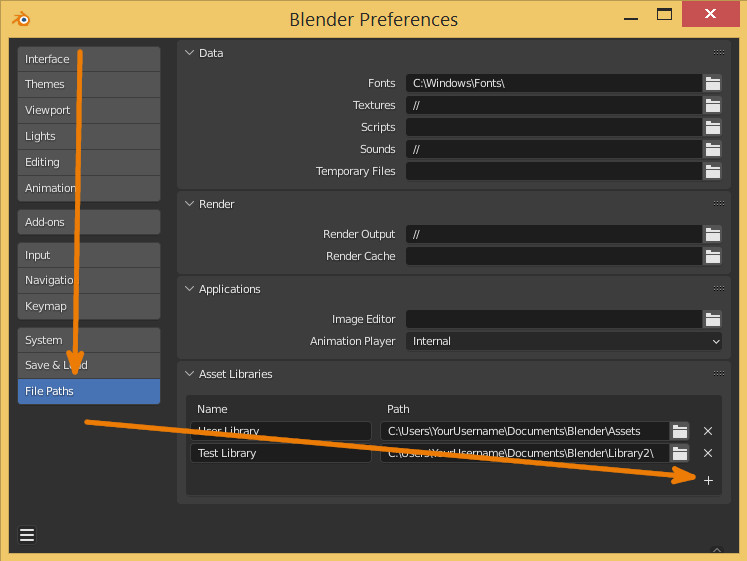
Note that Blender does not share assets across Asset Libraries, each one will have its assets managed separately.
In terms of sorting the actual Blend files the Asset Browser will include sub folders in the Asset Library but will not actually show those in the asset browser, instead, just showing all the assets, this means we can keep all our blend files categorized if we'd like instead of having one big unorganized folder of Blend files.
In the asset browser we then use catalogs to sort our individual assets.
Back in the asset browser we can press T and N to toggle the left and right-side tool bar. On the left side we have the browsing features for our asset libraries and on the right side is the settings and information related to the currently selected asset.
Let's begin on the left side with managing asset libraries.
At the top we have a dropdown. Here we can select if we want to see assets from the current file or any of our added asset libraries.

We can only view one asset library at a time.
Below the asset library is the contents of the selected asset library starting with an "all" catalog where we can see all assets in the library.
After that are all the catalogs, we have added to the asset library and at the very end are all unassigned assets that doesn't belong to a catalog yet.
To create a catalog, move your mouse over the All section and click on the + Icon. You can give the catalog a name by double clicking on in and renaming it.
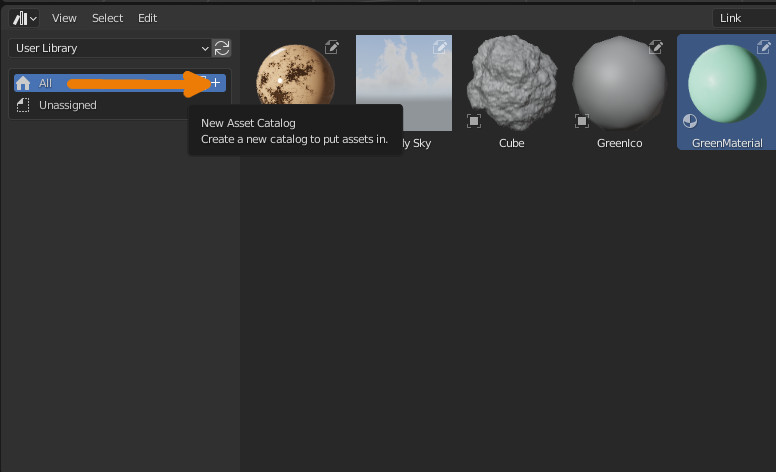
There will also be a star next to the name. This shows that the catalog is not saved. We need to save the current Blend file before saving catalogs. You can either just save the file from the file menu or by pressing Ctrl+S. Once the file is saved you can save categories without saving the blend file again by pressing the icon next to the "All" category.
The data about catalogs is saved in each asset library folder in a file called blender_assets.cats.txt. You can use Blender's text editor or any external text editor to open the file and read the contents.
Catalogs can be changed from any Blend file as long as that Blend file is saved to also save any catalog changes.
You can also nest catalogs to create sub catalogs. You can hover any created catalog to have a plus sign appear next to it to create a sub catalog.
We can also drag and drop catalogs into each other to move them around. To move a catalog to the topmost level, drag and drop it on the all catalog.
Right clicking a category will also bring up a menu allowing you to create additional categories, rename or delete.
Once the asset libraries and catalogs are all setup, we can start to organize our assets.
Simply click and drag an asset into a catalog. You can box-select multiple to move them all at once. You can also press A and Alt+A to select all and deselect all. Then drag and drop.
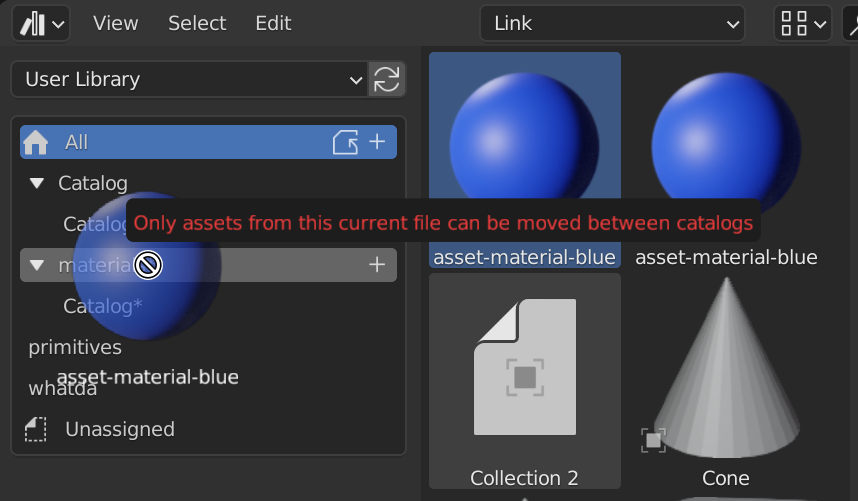
If you see a message that says, "Only assets from the current file can be moved between catalogs" you can right click an asset and choose "Open Blend file" to open the blend file, the asset belongs to and move it there.
The same is true for most operations we do with assets. We need to work in the blend file that the asset originates from.
For instance, if we want to make changes to an asset, we need to open the original blend file. Also, if we want to add assets to a specific asset library, we need to do so in a blend file that belongs to that asset library.
A blend file belongs to an asset library if it is inside the folder on your hard drive that you setup as an asset library in your preferences.
A good idea can be to match your blend files to your catalogs or a set of catalogs and keep the number of blend files low enough so that they don't become too hard to manage. At the same time, don't store too much data in too few blend files so that they take too long to open when you need it.
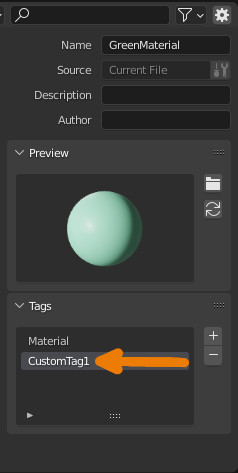
Another feature we can take advantage of when sorting our assets is an asset's tags. You can add whatever tags you'd like to an object and then type that tag into the search bar and be able to quickly find any objects with those tags.
Tags can be added to the selected asset by pressing N or the cogwheel in the top right corner of the asset browser and finding the tags window.
You can then use the search bar to search for tags as well as asset names to find your assets.
We can change the thumbnail of any asset into a custom one by following these steps:
Keep in mind that you can currently only set the thumbnails for assets in the current Blend file, if you'd like to modify an asset from another Blend file, you'll need to open that Blend file first.
Blender can also generate thumbnails for some asset types.
What thumbnail is generated depends on the kind of asset we are working with. Let's explore materials, mesh objects, and world environment materials for now.
For materials, Blender will make a render of the selected preview and use as the thumbnail. By default, this is a sphere. We can change it by going into the material tab and expanding the preview section. Then changing the preview from a sphere to any of the other available options.

Next go back to the asset browser, select the material asset and press N or the cogwheel and expand the preview. Press the refresh button to have blender regenerate the thumbnail.
For the world material I haven't found a way to change the thumbnail from the original flat render of a portion of the sky, so let's continue with mesh objects.
With mesh objects, we get a preview of the object. But we can change the colors by adjusting the viewport display settings of the applied materials.
Select the object and go to the material tab in the properties panel. Select the material you want to change the preview color for and expand the viewport display.
Set the color, metallic and roughness.
Next refresh the thumbnail in the asset browser.
The mesh object is rendered from an angle coming from the local front right side. So, if you want to change the angle of the thumbnail, you can rotate the object in edit mode to rotate it on its local axis.

You can also press Ctrl+period to toggle origin transformation in object mode and rotate the origin. Don't forget to press Ctrl+period again or go to the top right corner of the 3D viewport where you find options and uncheck origins.
In Blender's asset management there is also something called asset bundles. An asset bundle is a blend file with assets that is designed to be integrated into an asset library. It allows us to create blend files that we can then easily share.
The special thing about an asset bundle is that when we open it in Blender and go into the asset browser, there will be a button labeled "Copy bundle to asset library". This will automatically copy the blend file into the selected asset library in the asset browser and be ready to use.
To create an asset bundle there are two requirements.
If these requirements are met, the "copy bundle to asset library" will be visible in the left side panel of the asset browser.
Related content: Blender pack external files: How, Why When?
Let's say that you sell 3D models to Blender artists, in that case they will appreciate it if they can easily add the assets to their existing library.
Related content: How to sell 3D models using Blender
The Asset Browser is a great tool for managing assets, it allows us to manage a wide variety of assets in a convenient and effortless way, allowing for a much more streamlined scene building process as well as making it easier to find and access whatever assets we want to use.
In the future, the asset browser will also develop further and having our asset library organized in the asset browser will make it easy for us to quickly start using new features added to the asset browser in the future.
Thank you for your time.
