


We have several types of assets to manage in Blender. Everything from textures to 3D models, hdri images and reference material just to name the most common. In this article I will show you how you can manage all this on a local or shared hard drive without add-ons in Blender.
We can do asset management in Blenders file browser easily using drag-and-drop to append or link files. Thumbnails for Blend files are generated automatically and there are plenty of shortcuts and filters to help finding what you need quickly. The real challenge is to store your assets in a consistent way.
For a guide on how to use the asset brwoser in Blender 3.0 and later you can check out this article:
Related content: How to use the asset browser in Blender
We will start by setting up a workspace in Blender and the library. From there we will look at the features that allow us to manage assets in Blender without asset management add-ons.
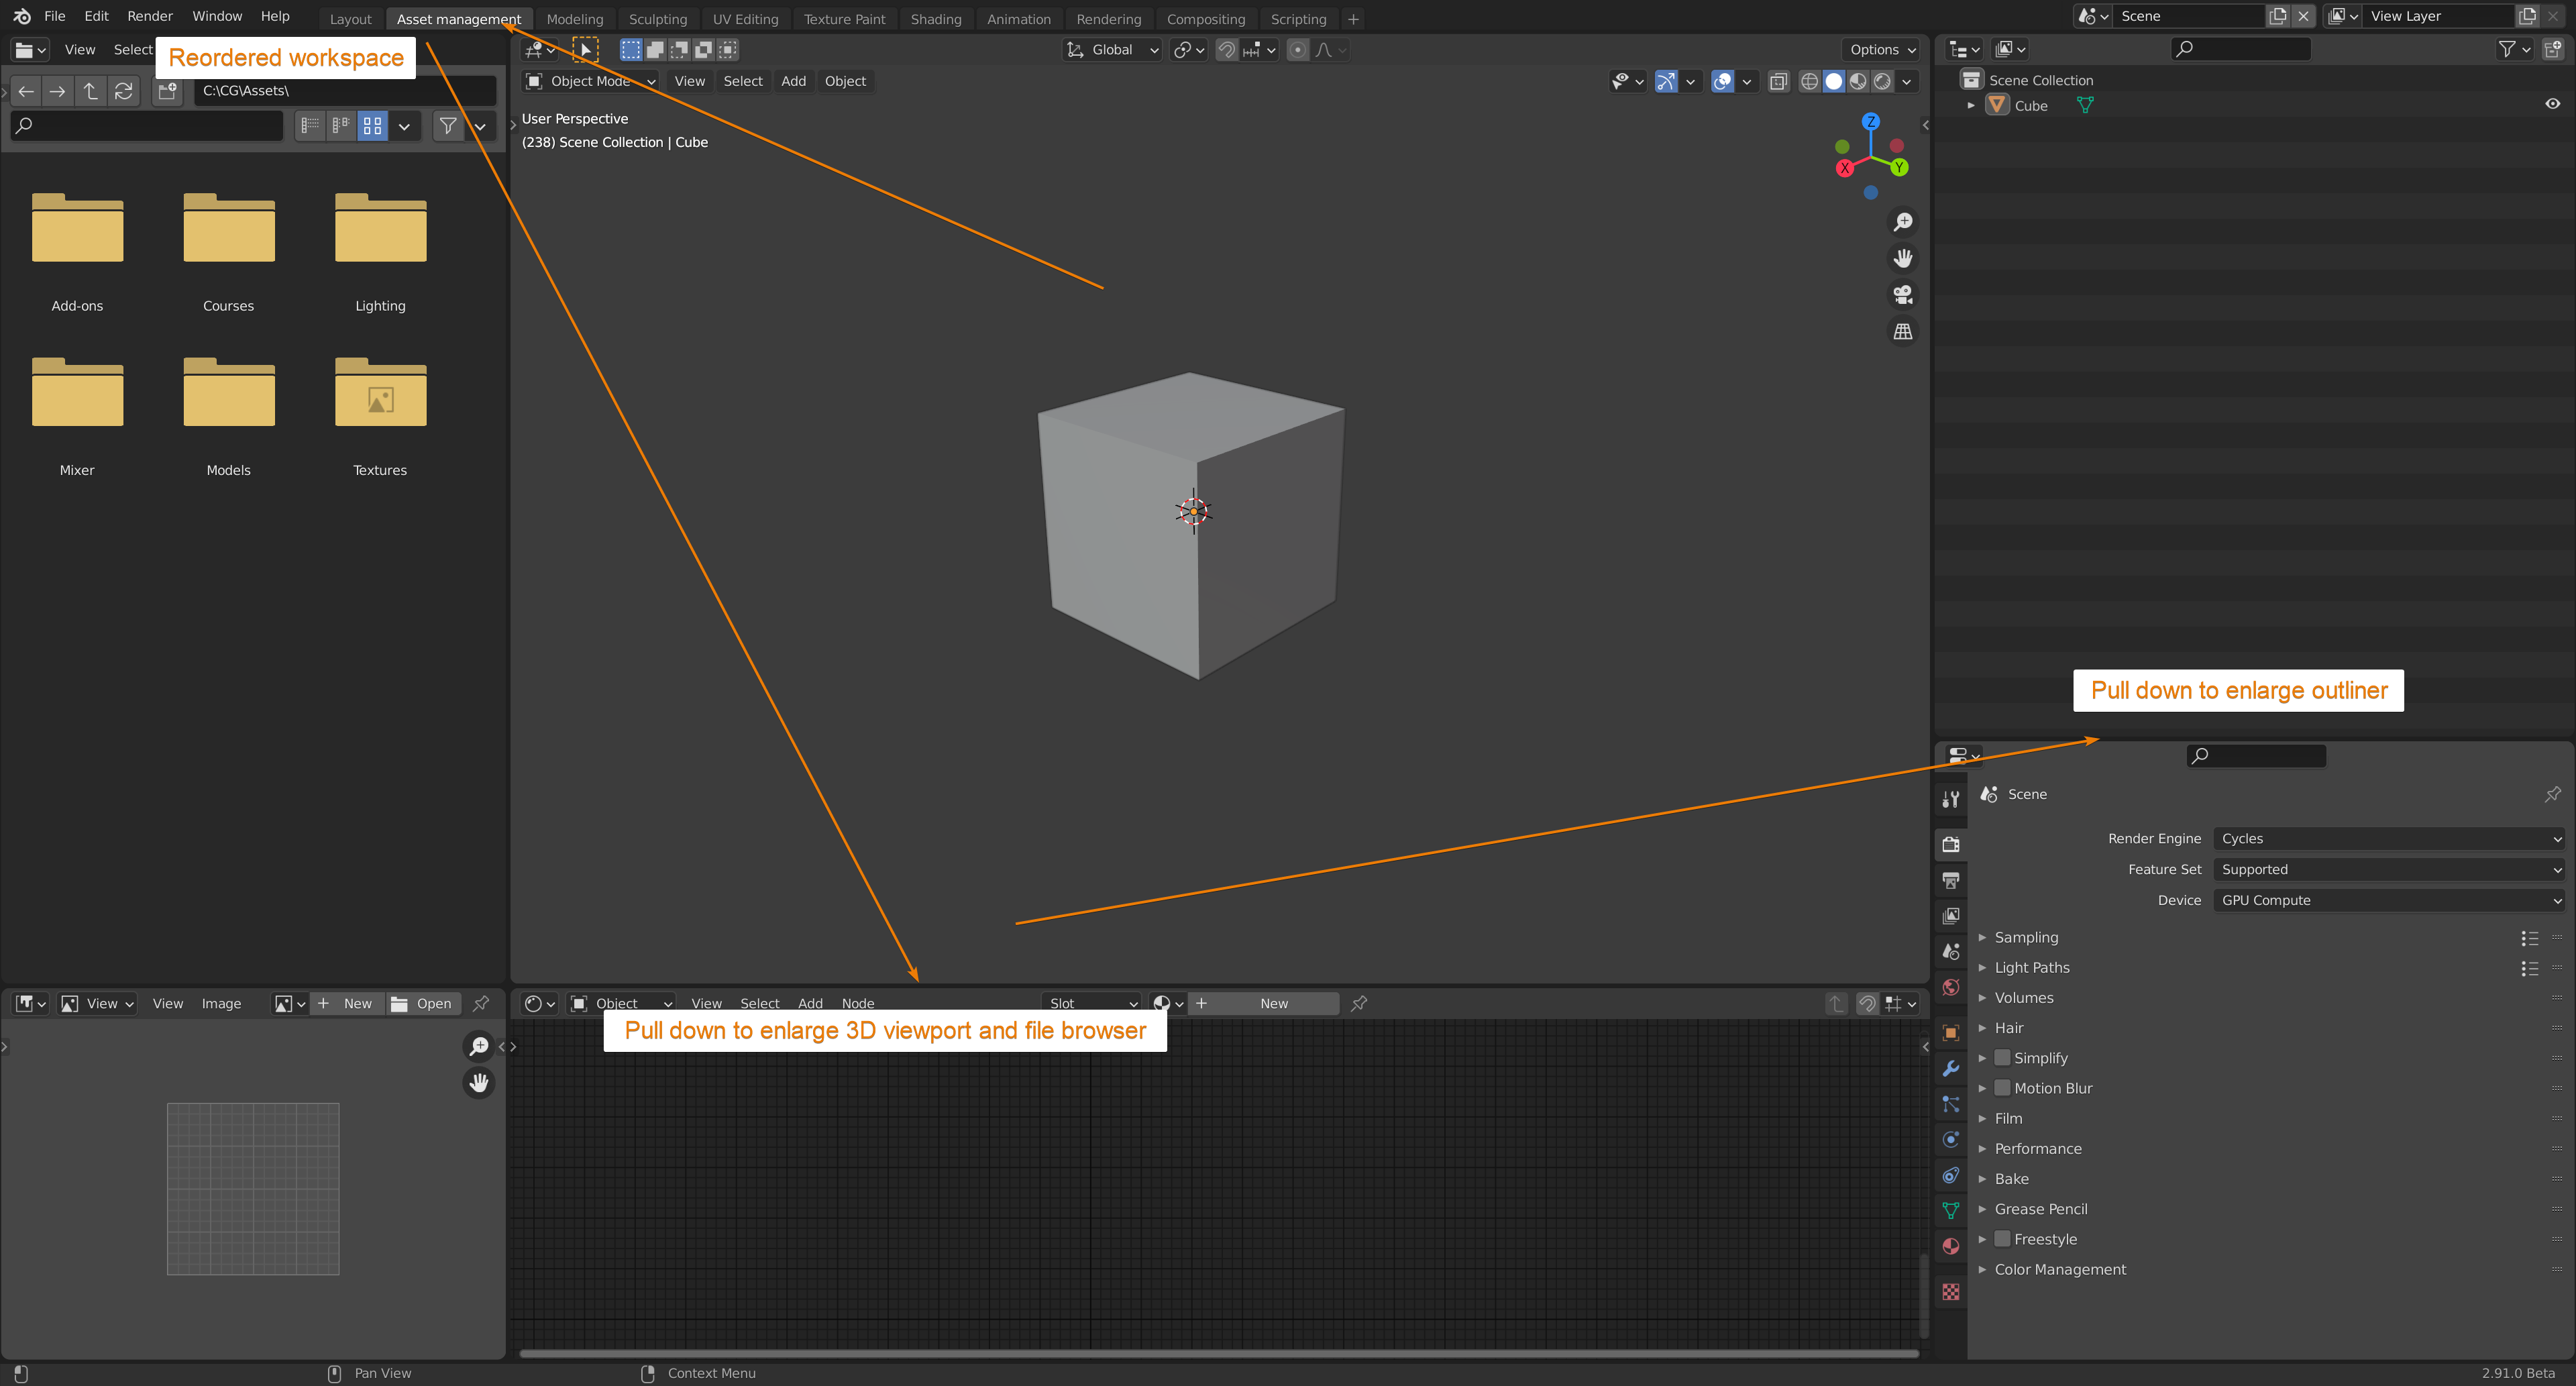
Start by adding a new shader workspace. Click the plus icon to the right of the right most workspace in Blenders header. Then go to general and press Shading. The shading workspace is close to how we want the interface setup.
Double click on the new workspace name to rename it. I call mine, "Asset management".
Change the 3D viewport shading to solid so that Blender doesn't have to load textures every time we switch to this workspace. After that I hover my mouse between the 3D viewport and the shader editor to enlarge the area for both the file browser and the 3D viewport. Then I do the same for the outliner so that it gets more screen space.
Related content: Blender viewport shading guide
If you want to move your workspace tab in the header, you can right click on the workspaces and choose "reorder to front" or "reorder to back". Reordering workspaces is a bit cumbersome but with a few moves you can get the order you want.
From here we need to setup the file browser. Hover your mouse over the file browser and press T to bring up the navigation panel.
If you haven't already, decide on a location where you intend to store your assets. It is important that you can keep this location the same and not move it around in the long run. But for now, you can set this to any folder. We will discuss why it is important to keep it intact in the next part.
Now, browse for the location then press the plus in the favorites section to add it to the list of shortcuts. If you for some reason end up in a different location in your file browser, you can use this shortcut to get back to your asset library.
If you also have a folder where you keep all your projects, add it as well.
You could setup multiple libraries, but I would advise against it. For instance, for a long time, I used both an asset library on my NAS (Network attached storage) as well as in a local folder. But this becomes twice as hard to manage after a while since you must check both locations when you are trying to find assets.
Next, I recommend that you get and setup an add-on called "Empty to image plane". This add-on allows us to convert an image that is dragged-and-dropped into the 3D viewport as a reference image to a mesh plane and sets up the image texture as a material. You can find the add-on here:
External content: Github, Empty-to-image-plane add-on
If you need help installing the add-on you can check out this article:
Related content: 30 Blender addons (install, manage, free and paid)
You can skip this if you think you never need to pull in an image as a plane. An alternative is to use the import images as plane add-on that comes bundled with Blender, but this is much quicker.
After that, we should save our startup file so that we don't have to recreate this workspace every time we start Blender. Go to file->Defaults->Save Startup file.
Just remember that the current state of Blender will be saved so any other changes you made will also stay for the next time you start Blender.
Next, we will look at how we can setup the actual asset library. Then we will explore how we can use this setup as an asset manager.
Whether we use an asset manager add-on or this approach we still need a folder structure to store our assets. With an add-on the folder structure within the library is often fixed. But we don't really need fancy tools to manage our assets unless we are a large team or have specific needs.
For the most part, we are good if we can keep our assets somewhat organized.
Personally, I use assets with different licensing as well as assets I made myself. I found that it is a good idea to store your assets in folders divided by license type or where they come from since different providers may have different licensing.
I also want to separate distinct types of assets such as textures, 3D models, hdri images and reference material.
Last, I want to have some kind of categorization. This can be either by style or by the kind of asset. This is a tricky one and a tagging system could be good to have here. For instance, I may want to tag an asset as "wood texture" and "stylized" or "realistic". But unfortunately, we are limited to the folder structure of the operating system.
So, what I suggest is that you organize your library like this.
Asset-library\Asset-type\Provider\Category\The asset-library represents the folder where we choose to store the asset library on disk. The asset type could be things like, textures, 3D models, HDRIs, IES profiles etc.
The provider could be something like hdrihaven for hdris or cc0textures.com for textures. Just so that we can easily see where an asset comes from and if there are license restrictions we need to follow.
Related content: Top 10 material libraries for Blender artists
If I had a few assets that belong to a distinct style that is separate from the style most of my assets are in, I would just make a separate library with the same folder structure for those assets sitting next to my primary library in the folder structure. Then make a new favorite shortcut in Blenders file browser.
Before you start to use your asset library in your Blender projects, make sure that you know that whatever file path your library is located at works even when your library grows.
If you must move your library, all your projects will lose the connection to the files referenced there, so this is crucial if you want to be able to go back, explore and use older projects.
Another consideration is if you want to store your library on a NAS, Cloud storage or just as a local library on your hard drive.
All have advantages and disadvantages. A NAS may be a good solution if you use multiple computers at one location.
For a limited budget, a local copy might be good enough. It is also the fastest to access.
Personally, I use OneDrive. I find it easy to browse the online cloud drive and download just the assets I need. The assets I keep using over and over then end up on the hard drive while the rest can still fit in the same hierarchy. The files are just not downloaded and does not use local space.
The downside is that I must wait for slower downloads when I need an asset that isn't already synchronized.
In either case, I suggest that you keep a backup since losing data is never a fun experience. Personally I use Duplicati. A relatively simple open source backup solution.
External content: Duplicati
To use the file browser as an asset manager we need to know its features. So let's start going over them.
In the header we have the back, forward, up and refresh buttons. These are your standard file manager navigation buttons. Together with the Create new directory and address bar we can start to setup our asset library file structure and generally navigate around.
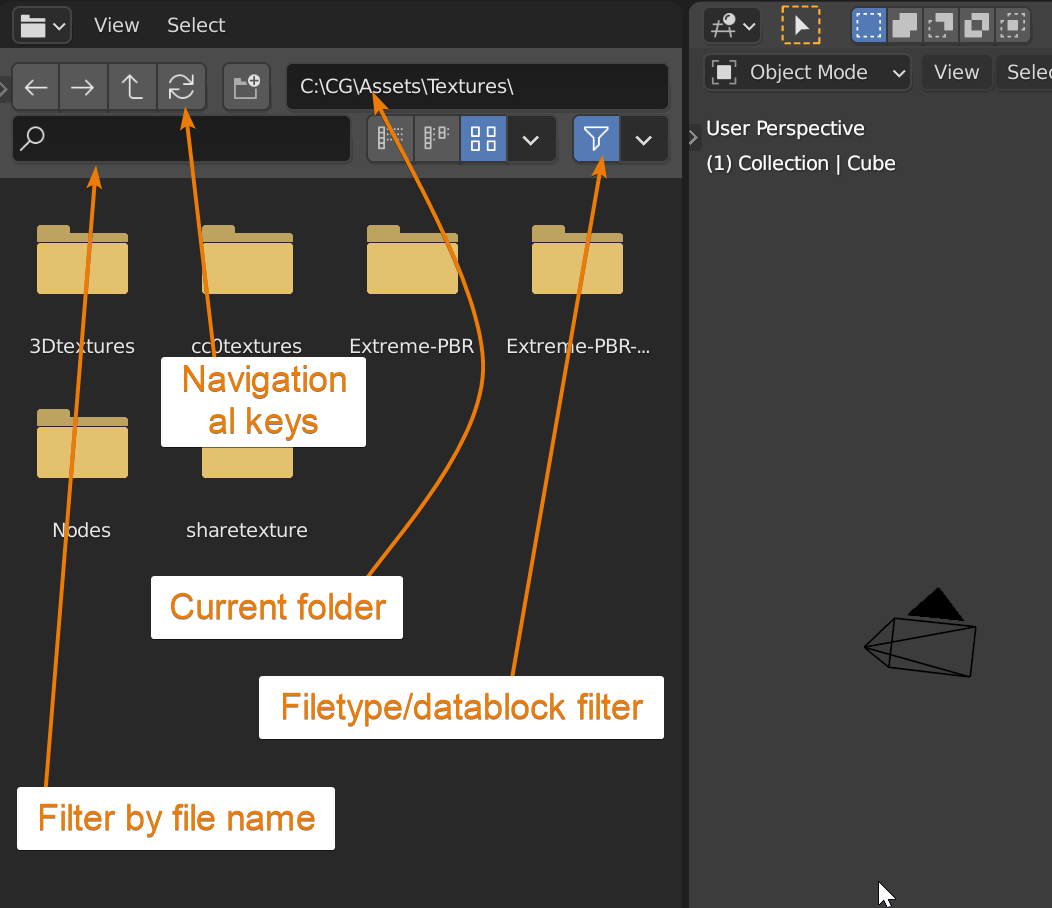
The search windows is actually a filter that will filter your files and folders by name in your current location.
Next, we have the display modes. For asset management we will primarily want to use thumbnails.
In the drop-down menu attached to the display modes we can choose the sorting method. Set this to name so that we can find what we are looking for by scanning alphabetically. Personally I also prefer to set the thumbnail size to small.
Recursion is an especially useful feature. It allows us to view the contents of subfolders several layers down into our asset library. We can choose between one, two and three levels. This can be good to have in consideration when you decide how you want to structure your library.
Together with the filter feature we can then filter in several layers of subfolders at once.
If we use the asset library structure proposed earlier, we can then filter through multiple asset providers at once. For instance, we can type "wood" and find all mentions of wood in subfolders 1-3 layers deep.
The last feature in the header is a file type filter. I usually set this to filtering for folders, images, and blend files. So, if I am looking for these kinds of assets, I won't be bothered by other filetypes.
Keep in mind though that if you have 3D models stored in filetypes other than .blend files they won't show up in the file browser. In this case just disable the filter.
If you press T on your keyboard, you bring up the folder panel. It can be handy to use the favorites section here to quickly get to your asset library.
These are the tools we use to sort, filter, and find assets in our library.
The reason we want an asset library in the first place is so that we can easily find, store, and retrieve and change our assets.
To find our assets, thumbnails is a big deal. Starting with images and textures. Thumbnails for these are created automatically.
We can setup a scene to render a preview to store in the texture folders but personally I find this too cumbersome. I usually just preview texture sets the way they are.
For blend files, Blender will show a preview of your scene camera as the thumbnail. This is usually enough together with the name of the blend file. Just make sure that you name your blend files appropriately and that you angle the camera in a sensible way to get a decent thumbnail before you save your file.
The last feature we have that I think is heavily underutilized by most artists is blenders ability to generate data-block thumbnails. You can generate thumbnails for data inside a blend file by first opening blender, then go to file->data previews->Batch generate previews. Then browse for the blend file you want to generate previews for.
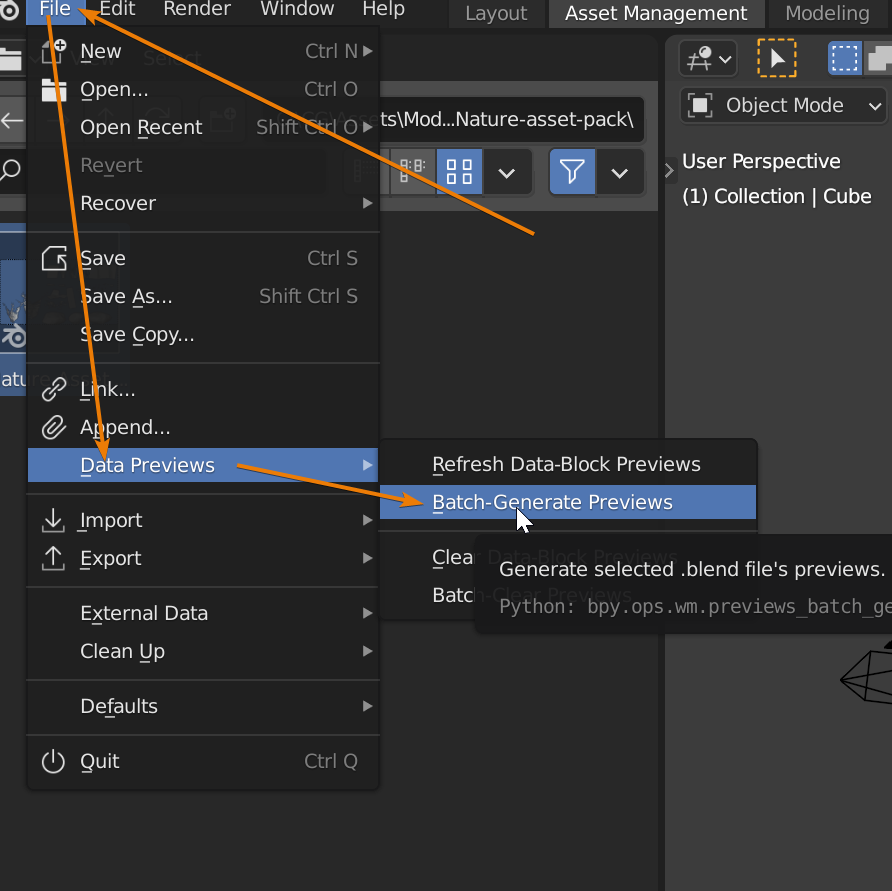
Blender will generate previews for things like objects, materials These are examples generated from CGGeeks nature asset pack. You can check it out here if you are interested.
External content: Blender market CG Geek Nature asset pack
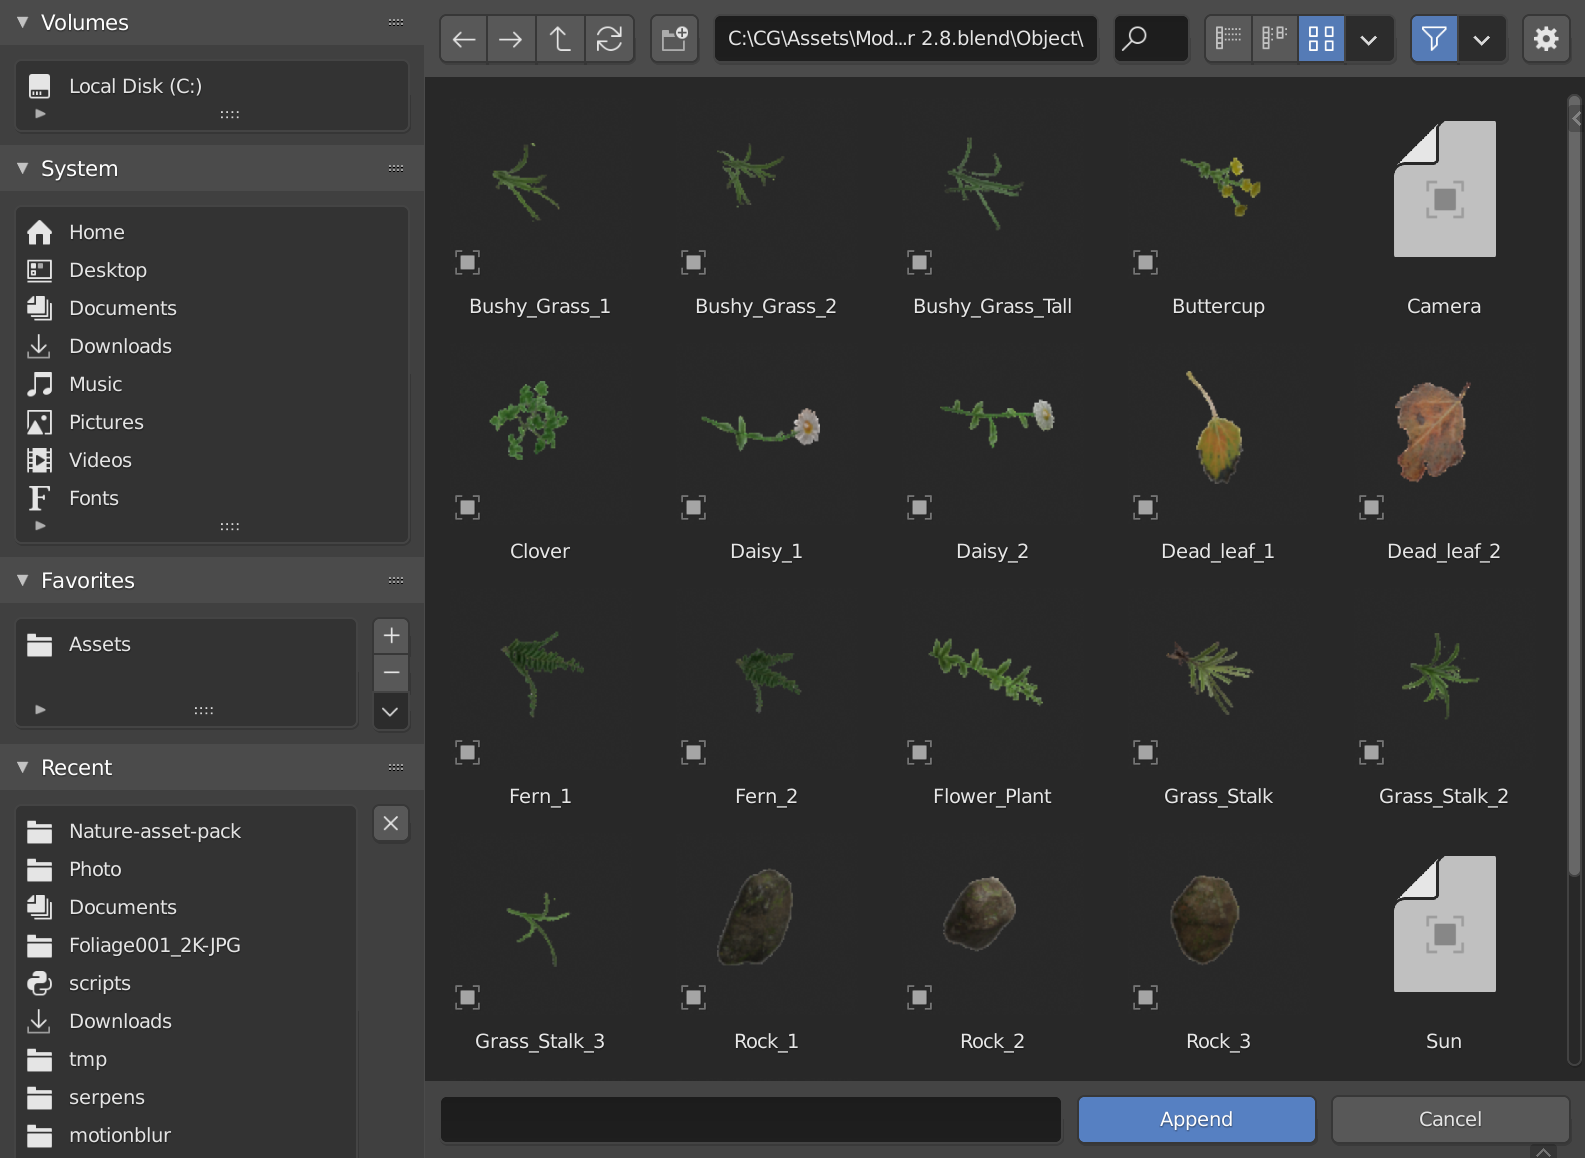

As you can see, we get a surprisingly good idea what kind of assets we are dealing with. Now the quality of the images may not be the absolute best, but given how easy these thumbnails are to generate I think it is a pass.
Speaking of passes, if interested, learn more about them here:
Related content: Render passes in Blender Cycles: Complete guide
The real problem with thumbnails comes when you deal with external file types such as .fbx, .obj, .gltf, etc. For these file types we need to manually generate thumbnails in some way.
The best way I have found to do this is, once you have the asset in Blender or some other 3D program, use ShareX to take a screenshot. ShareX is a free utility software that is excellent for taking screenshots, making simple adjustments, and storing them.
External content: GetShareX.com
Setup ShareX to take region screenshots with the Print Screen key. When you press Print screen you can then drag a box around the area of your screen that you want to capture. This can be a viewport preview render in Blender.
Then you can edit the screenshot if you want, cropping, adding text etc. When done, store the screenshot in the same folder as your external file type asset and give it the same name, just keep the file extension different.
This way you can quickly create and store an image as the thumbnail next to the asset.
Now we know how to setup blender, the library, navigate and create decent thumbnails with minimal effort. We now need to get the assets into Blender, and we do this with drag-and drop from the file browser window.
When we drag-and-drop an asset into Blender, Blender checks to see what kind of asset it is and where we dropped it.
If we look at images first, this can be textures, alphas, reference images, hdri, or images mapped to a mesh plane.
We can drag-and-drop the image to several places, but no matter where we drop it, the image will be linked and available everywhere in Blender.
Where we drop it just determines what Blender initially does to the image. For instance, dropping the image into the image editor will give us a preview and we can start to paint on the image quickly. But dropping it into the shader editor will create an image texture node and source the image.
A quick note on bringing in imagee textures into the shader editor. If you try to drag-and-drop an hdri image to be used as the world material, switch over from object to world material but drop the image into the image editor. Then add an environment texture node and select the hdri.
Dropping an image texture into the shader editor will always create an image texture node, but we need an environment texture node for the world material, and this may cause some confusion.
If we drop an image into the 3D viewport, an empty object is created, adding the image so that we can set it up as a background or reference image in the 3D viewport.
Related content: How to import images into Blender
If we then want to import an image as a mapped plane, drop the image into the 3D viewport, press Alt+R and Alt+G to reset rotation and move the image to the center. Then use the empty to image plane add-on mentioned earlier to convert the reference image to a mesh object.
In case we want to use the image as a brush alpha or texture, we can drop the image into the image editor, go to the brush settings and search for the image and it will be available within the whole blend file.
This can be any kind of data-block. For instance, objects, rigs, particle systems, materials etc.
First, find the blend file in your asset library that contains your data-block. Then drag-and-drop the blend file from the file browser to any other editor.
If you have a project open, just be careful so that you don't accidently open the dropped blend file. If you do Blender will close the current file and open the dropped blend file instead. Luckily, we get an extra warning before this happens.
You will get a choice between linking or appending from the blend file.
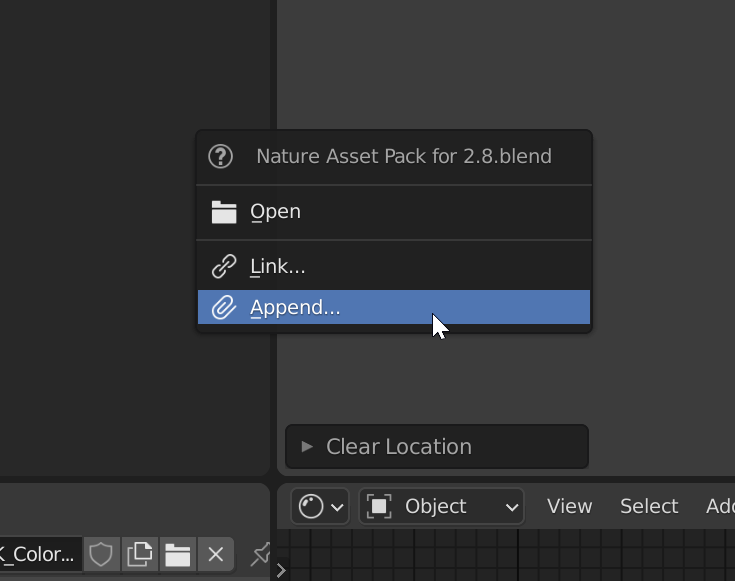
If you want to make changes to the data, choose to append. If you want to use the assets as they are you can choose to link the asset. Just keep in mind that linked assets are sourced from the source blend file, so if Blender can't find it, Blender can't import the asset. This is where it becomes important to keep your asset library paths intact.
But the same is true when bringing in images. You can learn more about correctly sourcing assets in this article:
Related content: Pink textures in Blender and how to avoid them
When you press link or append a new file browser pop-up. This file browser browses the external Blend file.
Blend files are data-containers, quite like a regular archive such as a zip file. The file structure of a blend file is fixed, and content is stored by type.

We can filter the folders and search just like in any file browser editor window. This means that we can recursively filter the entire blend file by name at once.
We can also just browse for the data we need. For instance, materials are in the material folder, objects in the object folder etc.
Just keep in mind that all images are in the image folder. Even textures. The texture folder refers to texture data-blocks. This can be brush textures, particle system textures or displacement textures for instance.
If you want to import a simulation or particle system you need to append the object that contains the simulation or particle system data. Just also keep in mind that there may be external cache data associated with a particle system or simulation.
Just like with thumbnails, external file types are a bit different. We can't drag-and-drop these since Blender needs to convert them into Blender data.
Different file types have a range of settings that need to be set, telling Blender how to import the data.
To import these, we first need to have an add-on enabled for the given file type that enables us to import the asset. You can find out more about working with add-ons in this guide:
Related content: 30 Blender addons (install, manage, free and paid)
To import an asset, go to File->Import to see all the file types Blender can currently import.
More add-ons come with Blender that are disabled by default, so continue by checking if there is an add-on already in Blender but deactivated if you can't find your file type here.
If not, you must turn to the web and start to search for third-party addons to see if someone made an add-on to import your particular file type.
If you can't find one, chases are that you can convert from your file type to a more common file type before finally importing it into Blender. But at this point, we are coming close to the end of the road of what we can import.
There is currently an ongoing project about asset management in Blender. You can find out more about it here:
External content: Blender development blog: asset management
You can also download and test this functionality in the experimental branch here:
External content: Experimental Blender builds
Look for the asset browser branch.
This project aims to bring more features for better asset management such as repositories, version management and overall a better editor to work with.
Even if there is an ongoing project to bring a solution for asset management into Blender, many of the features already exist and we can do most of what we need for smaller projects.
The fact that an asset management solution is currently being developed is simply good news for everybody. Today we bring in assets from all sorts of places. Every add-on that provides assets has its own little interface together with every add-on that tries to solve an overall asset management problem.
Personally, I think that sticking to what is in Blender right now is a perfectly workable solution. We then just complement missing features with other tools such as an online cloud storage or ShareX to help create thumbnails for external assets we get an asset library that is easy to manage.
The real problem, no matter what solution you opt for is to keep consistent in how you store assets.
Thanks for your time.
