


Render passes are a remarkably interesting thing that we can use in many ways. For any larger project they can save a huge amount of time and we have access to a lot of them in Blender with Cycles.
Render passes are different channels that each can hold a separate kind of data that is produced for our image as we render. Like how images contain a red, green, and blue channel, we can divide up a 3D render into different channels such as direct or indirect diffuse light, ambient occlusion or by material to name a few examples.
In Cycles there are over thirty different render passes available, depending on how you count. That is a lot of information that we can use in post-processing to bring the best from our renders.
To explain what render passes are, I want to compare them with a regular image. In a regular image we have different channels. One for each primary color. Red, green, and blue. In some cases, we also have an alpha channel, providing transparency.
A render pass can be thought of as a channel, just like in a regular image. But instead of carrying color data, each channel carries some other kind of information.
Now, in images, we have very compressed information, or only the bare minimum. We need all information together to present an image as it is supposed to be presented.
With render passes, the information we have access to is different. It is not meant for viewing directly. Instead, it is more like a raw format photo that carry information meant to be post-processed.
During the rendering process we shoot light rays through the scene. These light rays are of several types and depending on the type of ray, how, and what they hit, they write data to different passes.
When we combine all of these passes, we get the final image. But we can also access this data separately and manipulate the render after it has finished by doing post-processing effects to a subset of data rather than the image as a whole.
There are many different render passes available in Blender and there are two different sets for Eevee and Cycles, respectively. Cycles having the larger set.
We can find the render passes by going to the view layer properties in the properties panel. Here we have a section called passes. Here we find all passes we can access except two. These are the freestyle pass and the noisy image.

The noisy image pass is added automatically if we use denoising. In this case the combined pass will include the denoising data while the noisy image output will be the raw combined output without denoising.
In most cases when we enable a render pass, we enable a single output for the render layer node in the compositor. But this is not always the case. For instance, the denoising data pass adds several outputs depending on what kind of denoiser we use as well as the settings for that denoiser.
Likewise, cryptomatte also add several passes when enabled.
Render passes are divided into categories depending on the kind of data they contain. These are the categories.
In this article we focus on render passes in Cycles and here is the list. First is the name that you see in the passes section, then the names of the output socket we get from the render layer node in the compositor.
Data render passes:
| Data pass name | Render Layer node output names |
|---|---|
| Combined | Image, Alpha, Noisy image (These are always available) |
| Z | Depth |
| Mist | Mist |
| Normal | Normal |
| Vector | Vector |
| UV | UV |
| Denoising data | Denoising normal, Denoising Albedo, Denoising Depth, Denoising Shadowing, (NLM only) Denoising Variance, (NLM only) Denoising Intensity, (NLM only) Denoising Clean (NLM only) |
| Object index | IndexOB |
| Material index | IndexMA |
| Render time | Debug Render Time |
| Sample count | Debug Sample Count |
Light render passes:
| Light pass name | Render Layer node output names |
|---|---|
| Diffuse Direct | DiffDir |
| Diffuse Indirect | DiffInd |
| Diffuse Color | DiffCol |
| Glossy Direct | GlossDir |
| Glossy Indirect | GlossInd |
| Glossy Color | GlossCol |
| Transmission Direct | TransDir |
| Transmission Indirect | TransInd |
| Transmission Color | TransCol |
| Volume Direct | VolumeDir |
| Volume Indirect | VolumeInd |
| Emission | Emit |
| Environment | Env |
| Shadow | Shadow |
| Ambient Occlusion | AO |
Cryptomatte passes:
| Cryptomatte pass name | Render Layer node output names |
|---|---|
| Object | CryptoObject00, CryptoObject01, CryptoObject02 |
| Material | CryptoMaterial00, CryptoMaterial01, CryptoMaterial02 |
| Asset | CryptoAsset00, CryptoAsset01, CryptoAsset02 |
Shader AOV:
Custom names
Freestyle:
| Freestyle pass name | Render Layer node output name |
|---|---|
| As Render Pass | Freestyle (Found in freestyle section in view layer properties) |
Asking what we can do with render passes is like asking what we can do with color, light, or math. There is an infinite number of possibilities.
Instead, what it boils down to is what kind of information we can separate and post-process independently. It is a kind of categorization of data or masking if you will. Not only by telling what pixel is included or not but partial data that contribute to a pixel's final color.
For instance, we can boost or tone down only the diffuse direct light contribution to a pixel while letting the glossy components contribute as normal.
We can also use passes to make special effects, such as mist or denoising an image.
The data category contains complementary information. Things like depth pass, mist pass, denoising data and material indexes are a few examples.
The light passes are the most comparable to images, just like the comparison with images above. But instead of carrying color data they carry light information.
Things like diffuse and glossy information. Volume, emission, shadow and so on.
Next, we have cryptomatte. Just the name can make you shiver. Sounds so advanced. Anyway, it is a filter system allowing you to mask out objects, materials, or assets very easily. Assets simply meaning, groups of objects in cryptomatte terminology.
I have covered cryptomatte in a separate article here, but we also look at it later in this article, just not as thoroughly.
Related content: How to use cryptomatte for masking in Blender
The last group is Shader AOV. AOV stands for Arbitrary Output Variables. Here we can add custom passes that we can use to capture part of a material and use as a pass while post-processing.
We can capture single values, color, or vector data through the AOV output node in world or object materials. This is most common in NPR, non-photoreal rendering.
There is one more render pass that does not fit into any category. That is freestyle render lines. Freestyle is a complementary render engine that renders stylized lines on top of a Cycles or Eevee render.
You can read more about freestyle in this article.
Related content: A guide to Blender freestyle rendering with Eevee and Cycles
Just as a last note in this section. Don't make the compositor the place you fix everything that should really have been taken care of in an earlier part of the pipeline.
Make sure that the modeling is what it is supposed to be, your texturing is as good as you can make it and the lighting is setup the way you intended it.
Don't move the work that should be done at a different stage in your project to the post-processing stage. But by all means, also take full advantage of the compositor.
There are primarily two ways to use render passes. Either in the compositor by accessing a render layer through the layer node or by exporting.
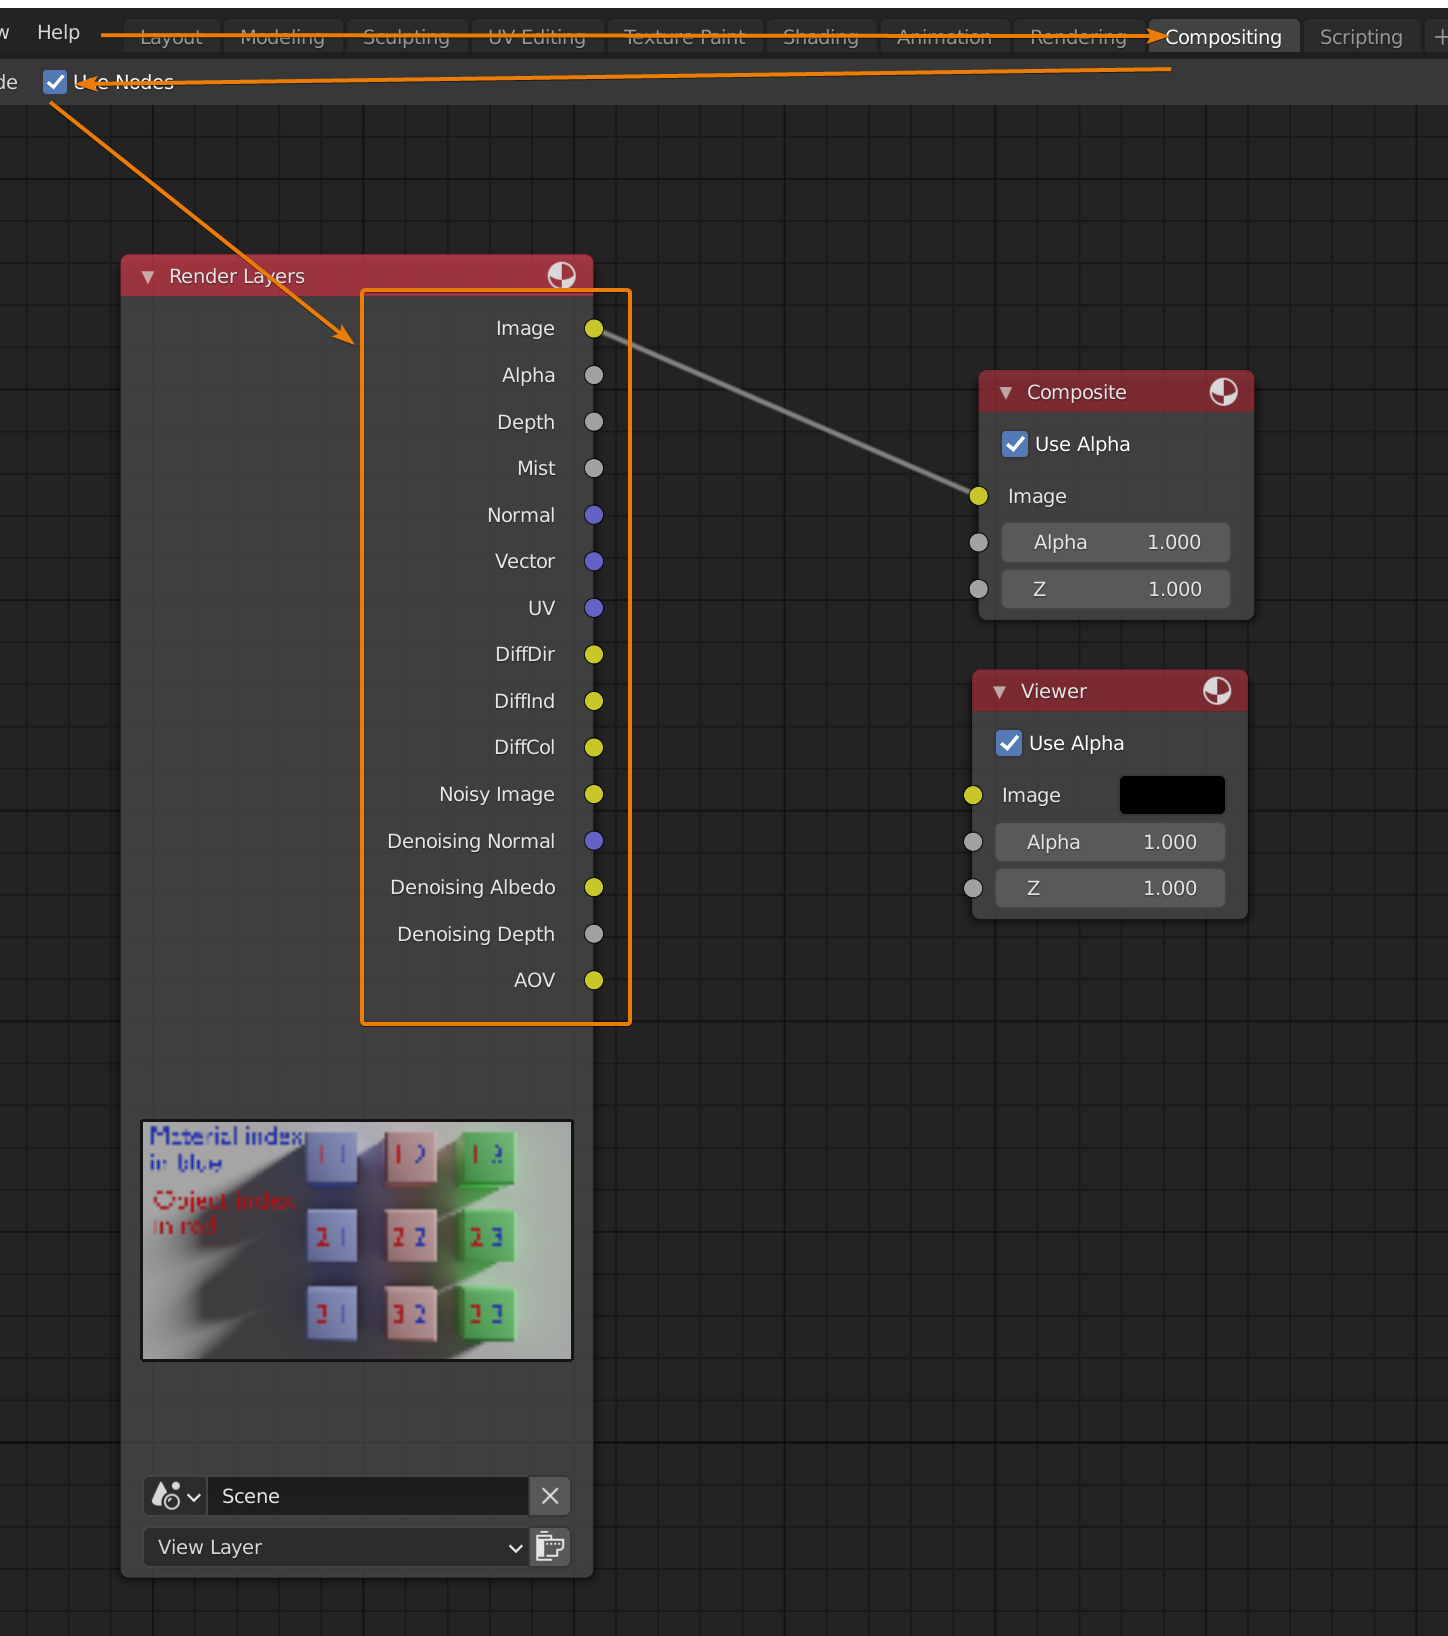
If we start to look at the compositor, we can find it by going to the compositing workspace at the top bar in Blender.
The compositor is a place for post-processing images. Combining passes and tweaking the data until we get the final result we want. We can color correct, add effects, and tweak certain aspects of our render by combining different nodes. Here, individual passes are a big part of the process.
We check use nodes in the compositing editors' header and two nodes will appear in the grid layout below. A render layer node and a composite node.

The render layer node can take a render from a scene and view layer as input. This is the output from when we hit F12 to render an image. Or it can be a sequence of images for animations.
In case of animations, each image in the animation is processed separately though the compositor node tree before it is output and put back in the sequence of images making up the animation.
For each activated render pass from the passes section in the view layer settings, one or more sockets is added to the render layer node. We can use the compositing nodes to post-process the render result based on the individual passes or just pass the combined pass to the compositing node and output the render result directly as is the case by default.
Just remember that any pass you may want to use needs to be activated before you start the render process.
In the compositor, make sure that the backdrop button in the top right corner is activated, then add a viewer node by going to the add menu->Output and select viewer. Put it above or below the composite node. Click and drag a socket to the viewer node to see the result in the background.
We can also access the add menu with Shift+A just like we add nodes and objects in most editors in Blender.
We can really combine passes in an infinite number of ways, but there are a handful of ways that are more useful than others.
As we explore the different passes below, we will walk through some common examples and go into more detail in using and combining specific passes.
Remember that this is a guide on passes, so anything that isn't directly related to passes, such as color correction won't be discussed.
If we choose to export, we most often use the OpenEXR format with multilayer support. This way each render pass is saved as its own layer and if we open the file in a 2D image manipulation program it will populate the layer stack in that program with our render passes.
I will use Affinity Photo as an example, but it works similar in GIMP, Photoshop and other 2D photo applications.
When you have activated the desired render passes, and rendered your image, press alt+s in the image editor, or go to Image->Save.
In the file browser on the right side, you can choose the file format you want to save as. If you don't see it, press N on your keyboard to bring forward the properties panel.
Choose OpenEXR Multilayer as your file format, browse for a suitable location to store your file, name it and hit save as image.
Open Affinity photo or your photo editor of choice and go to File->Open. Browse for the exr file that we previously saved and open.
When you view the layer stack, you will see that all passes you activated are now available as layers. The layers are named with the view layer name followed by the pass name.
In this part of the article, I want to start by exploring the light passes since they are part of Cycles core. We will follow this up with the data passes, cryptomatte and Shader AOV. Cryptomatte is covered in its own article here:
Related content: How to use cryptomatte for masking in Blender
But we will briefly look at it in this article as well for completions sake. But let's start with the light render passes.
When exploring the light passes, I can't help but drawing a parallel to the light path node in the shader editor. While the light path node deals with light rays, the light passes are the result of the light rays sampling the scene and storing the data on a per pixel basis.
Related content: How the light path node works in Blender
As we touched on before though, passes are made up of color values for each pixel. But in the light passes group, the data represents the light captured during rendering. This light can be categorized and divided into various kinds or light. Each light pass is such a group.
When all these passes are combined in the correct way, we get the final render output. Just as we get from the combined pass alone.
You find the combined pass in the data pass section.
So why would we want to separate all the various kinds of light just to combine it again in the compositor?
That is because if we can separate and combine the different kinds of light, we can also make changes to every kind individually. So instead of re-rendering an image or animation, we can do a lot of adjustments in the compositor, saving us a huge amount of time.
When we take the light rays shot into the scene during render time and categorize them by that kind of data they generate, we get these light render passes.
First, what are the diffuse, glossy transmission and volume?
These refer to data gathered through various kinds of light rays. A diffuse ray is contributing to the color of an object. The glossy contributes to reflections and transmission is any ray that travels through an object, such as glass.
Note though that subsurface scattering is considered a diffuse ray and not a transmission ray even if it travels through an object.
The difference here is that subsurface scattering scatters in random directions while glossy rays have a reflection angle that equals the angle of incidence.
A transmission ray is similar in the regard that it does not bounce randomly. Instead, most rays are shot in the same general direction.
The more scattered the rays are the less reflective the surface becomes. We control this with the roughness value in a shader.
For a scene with materials that use all these kinds of rays we need to combine all of them except shadow and ambient occlusion.
Related content: Ambient occlusion in Blender: Everything you need to know
The correct way to combine these is to add the direct and indirect pass of each and multiply with the color of the same type. Then add all of these together.
The emission and environment passes are added separately. This is how it looks in the compositor.
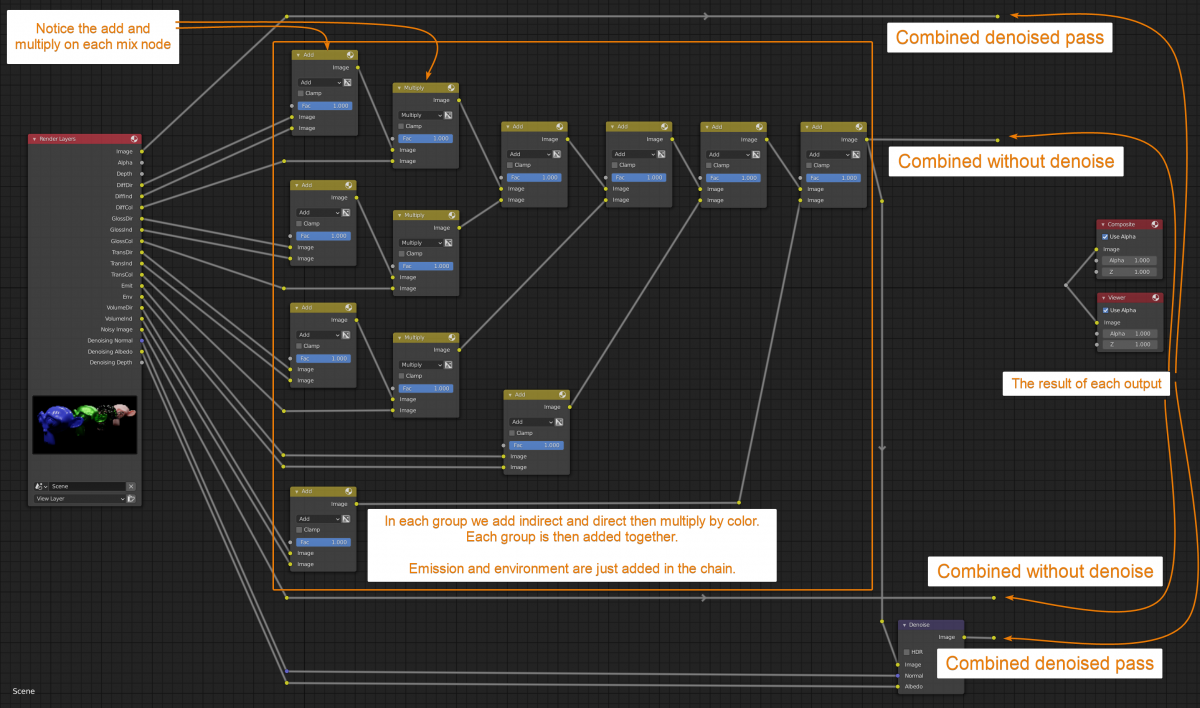
In short, we have these distinct groups that we add and multiply before we add each group together with another mix node set to add.
Together these passes give the same output as the combined image output.
As you can see in the image above, we must also take denoising into account when we are using it. The separated passes don't automatically denoise when combined. Only the combined image output is denoised.
To denoise the separated components, we need to use the denoise node. With the denoise node, we are limited to the Intel denoiser and cannot get the output from an Optix denoise since it is only available through the combined pass.
Related content: How to use Intel denoiser in Blender
With this setup we can use any node with any pass separately, or on a separate group of passes depending on how we combine them and how we input our adjustment nodes.
Here are a couple of simple examples.

In this case, I added a glare node for just the combined diffuse passes. This will give us a glow effect on the subsurface scatter monkey in the back as well as the blue monkey in the front. But no glare on the green monkey or the glass monkey.
Here is another example.
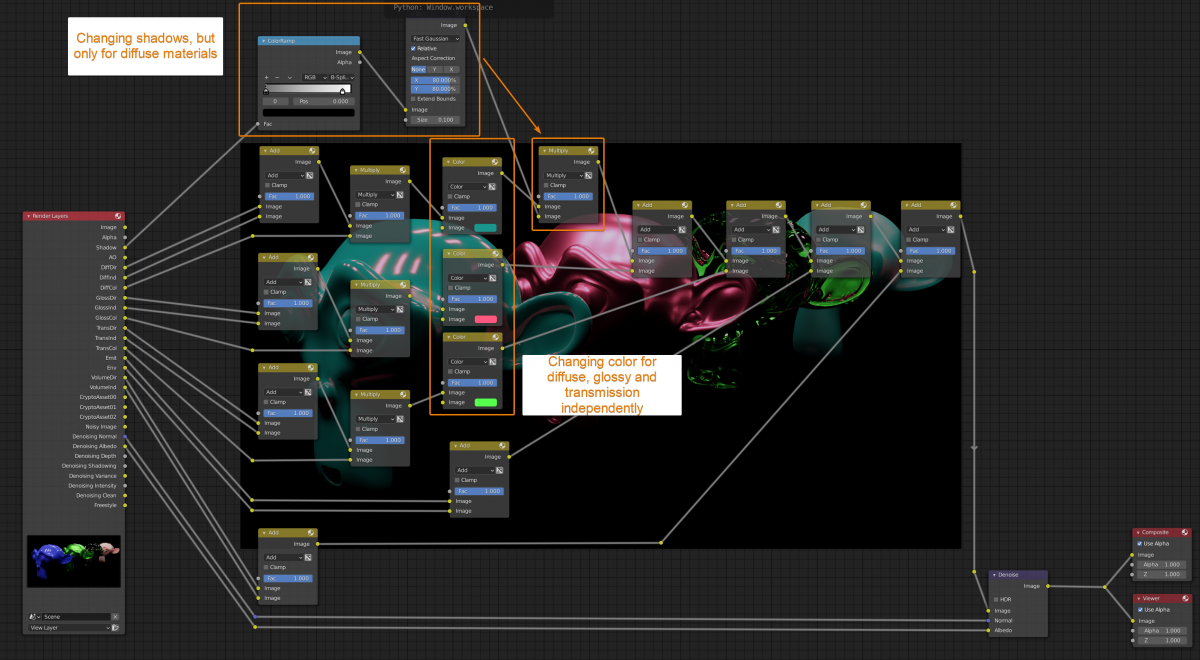
In this case I added a mix node set to color after each group. This changes the color of each group, the diffuse, glossy and transmission groups separately.
I also adjusted the shadows of the diffuse passes without affecting the glass or glossy monkey.
The reason I use a blur node on the shadow is that the shadow pass output will use flat shading when calculated. If we don't blur it, we will see the underlying geometry.
All of these changes break the physical accuracy of a scene. But in most cases beautiful is better than accurate. These tests is just examples and meant for you to get a few ideas on how you can get started working with passes in the compositor.
I learned about how to combine light passes from the Blender manual here.
External content: Blender manual combine passes
So far, we didn't cover environment and emission. The emission pass is like any other light pass. It outputs the part of a material that has an emission component from its material. This can be either from the emission shader or the Principled shader with emission turned on.
It is included in the examples above, together with the environment pass. But there is no emission shader present in the scene so in this case it doesn't have any effect.
The environment pass outputs any pixel that contains the background. An example separates from the one above is if we want to use a transparent background, but we still want access to the background.
In this case we can go into the Cycles render settings and turn on transparent in the film section to render the background as transparent. Then with the environment pass enabled we can composite the background back into the shot using this node setup.
Related content: Blender: A Cycles render settings guide
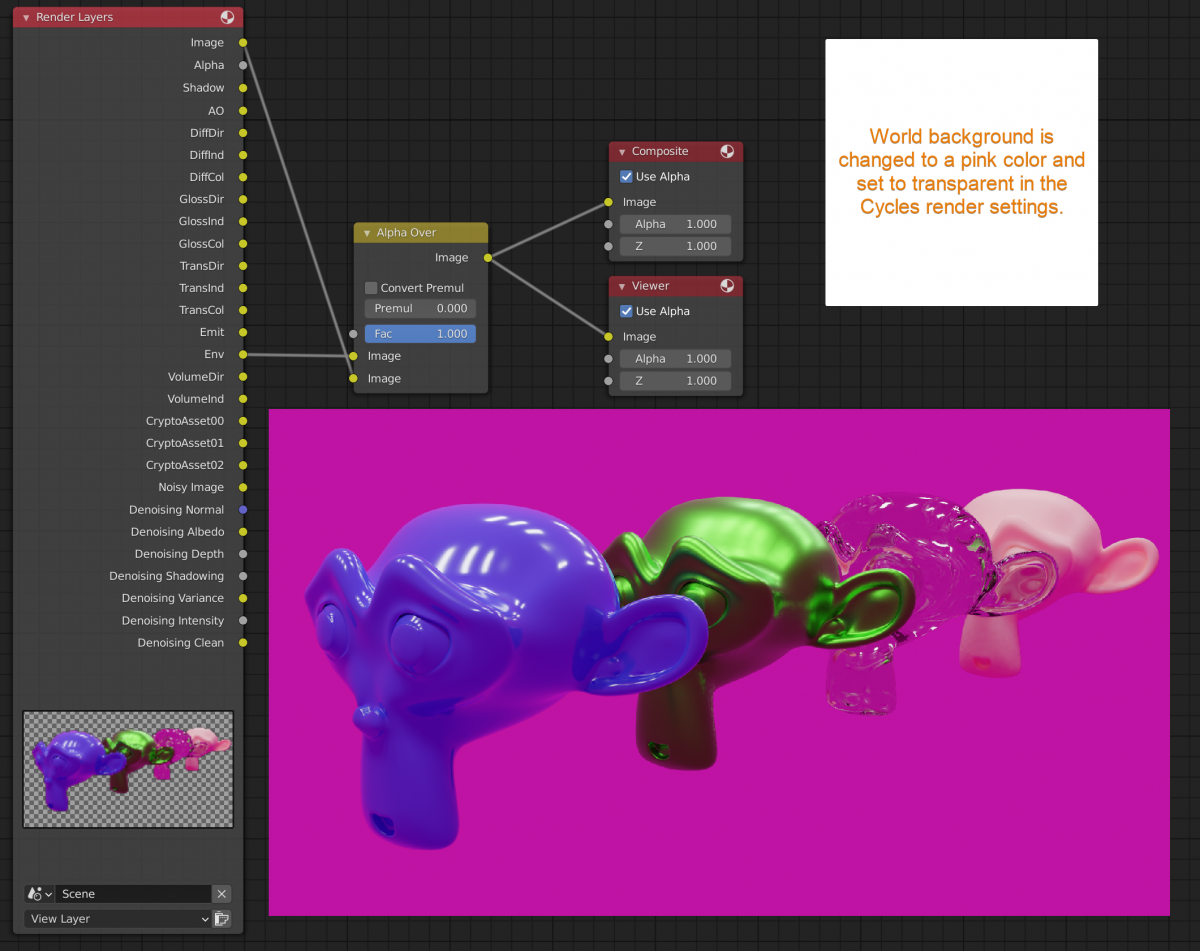
In this example I changed the background color to pink so that we can clearly see that it is there. With an alpha over node, we can connect the combined image pass to the bottom slot and the background to the top slot and composite the background back in even when the background is transparent in the combined image output.
The light passes are most used together to separate and insert changes in various parts of the finished render. The data passes on the other hand are often used more independently. Therefore, we will cover them one by one instead of trying to explain them as a group.
We have indirectly already covered the combined pass. It is equal to the correct combination of all the light passes discussed above and produces the final render without any post processing but allow us to insert changes for different parts of the render.
The combined render pass gives us the Image, Noisy image, and alpha outputs on the render layer node. But even if we uncheck the combined render pass, we still get these outputs. It appears as if we can't really disable them.
Anyway, even if you don't intend to use the combined pass, it is a good idea to keep it around since we can check our light passes setup against the combined image pass.
The Z, or depth pass is the second pass apart from the combined that is enabled by default. The most common use for the Z depth pass and the mist pass is to add post-process for to the scene.
The Z, depth pass will use a single sample to determine the distance from the camera for any object taking up the space in that pixel. It does not use anti-aliasing and will give jagged deges.
When you inspect the depth pass you will most likely see only a white image. This is because the value given for each pixel is the value in meters away from the camera. Since 1.0 is white in an image, every object further away than 1 meter will therefore be completely white in the compositor.
To get a sensible value, we can normalize the Z depth pass by plugging it into a normalize node before using it. The normalize node will take the values in the Z depth pass and map then into the 0.0-1.0 range making the pass visible for us.
Here are two examples of what we can do with the Z depth pass. First, we can use it to add mist. Here is one example nodoe setup using two mix nodes set to screen.
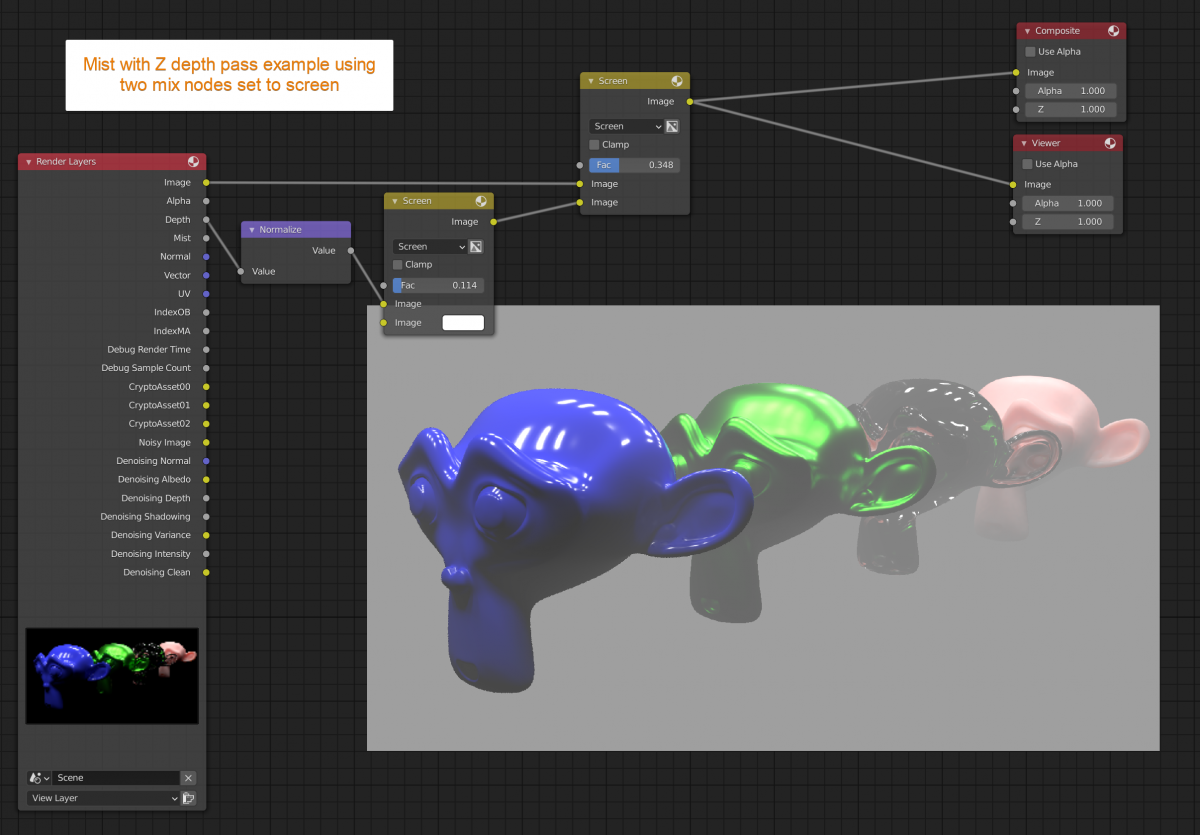
We first need to normalize the values so that they can be used together with color without blowing out our image. With the first mix node factor slider we can control how far from the camera the mist is and the second mix node slider can control the thickness.
If we change the white color the darker regions can be tinted, and we can input colorramp nodes for extra control.
Another example is to use the Z depth pass together with the defocus node to create a depth of field effect. Here is an example node setup.
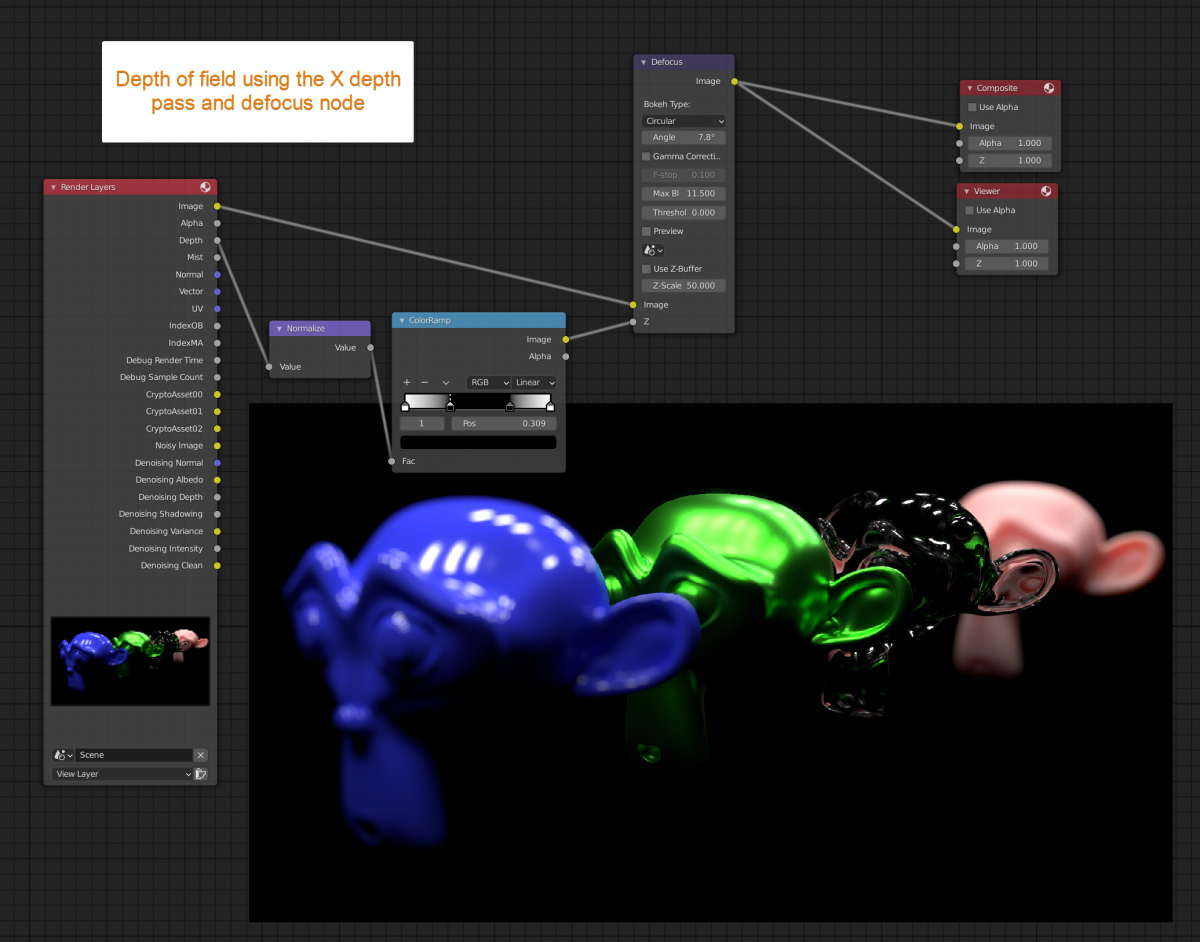
In this scare we use the colorramp to control what is in focus. The white flags at either end represents the point closest to the camera and the point furthest away. In between we have a black area that is in focus. We get complete control over this by adjusting the color ramp.
Keep in mind that this is not the only way to use a defocus node and we are not using it as it is meant to be used with a Z depth pass here. But I find this way to be the easiest to control.
The next pass is the mist pass. While the Z depth pass records the distance from the camera to an object, the mist pass has a few more artistic features.
The mist pass is mapped within the 0.0 to 1.0 range to begin with, but we can also choose where it starts and where it ends as well as the falloff.
In the world material settings, there is a mist pass section. Here we can set these settings:
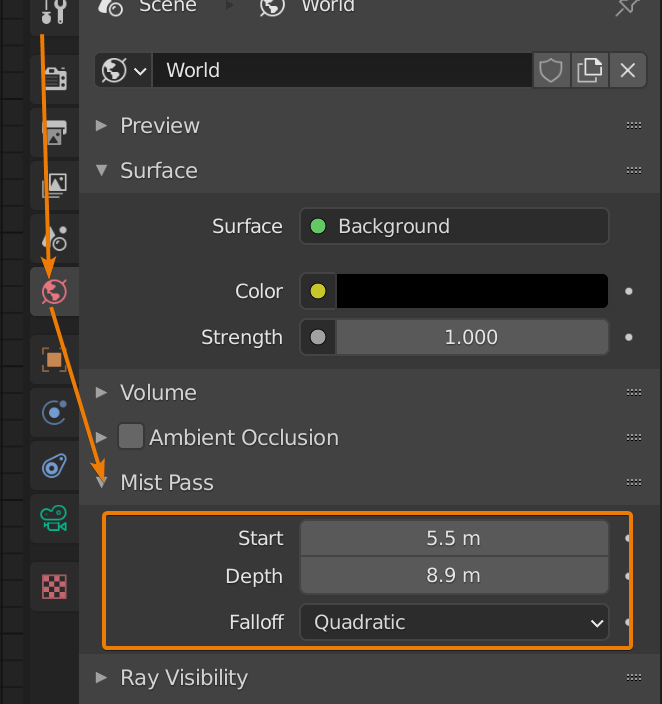
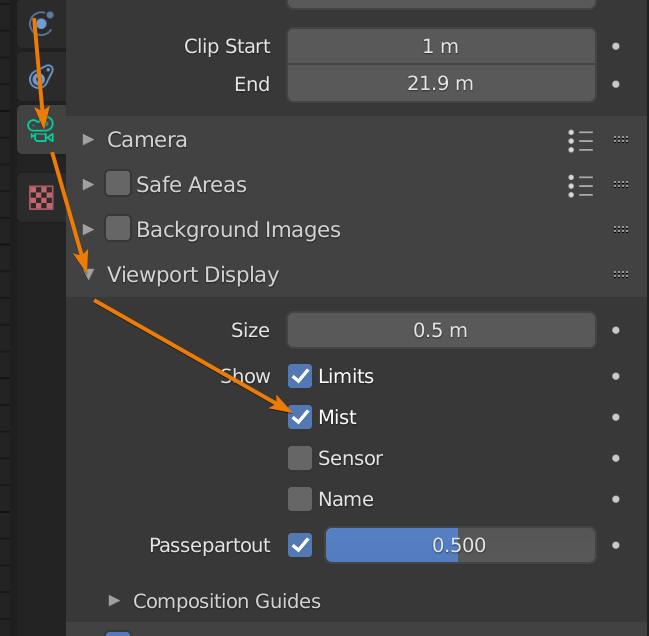
In the camera settings we can go to viewport display and enable mist. This gives us a visual representation of where the mist start and depth distances are in the scene.
The mist pass also has anti-aliasing giving us much smoother edges.
The Z depth pass and mist pass isn't that different even if they generate various kinds of data. The Z depth pass based on distance and the mist pass based on the distance parameters and falloff that we set.
In general, I would say that the mist pass is better for creating mist since it gives better control. But for use with the defocus node, stick to the Z depth pass because the mist pass can give artefacts thanks to its anti-aliasing.
Here is an example using the mist pass.

As you can see it is like using the Z depth pass. But it is slightly better because we get the benefit of anti-aliasing, making our edges smoother.
The normal pass will render the normals of everything in your scene in object space. If you need a normal map for your scene in tangent-normal space, I suggest that you do a viewport render of the normal matcap instead.
You can learn about viewport shading in this article:
Related content: Blender viewport shading guide
There are several ways we can do this. Here is one.
Since normal map data is angle data, we don't want to compress this file if we want to maintain the correct angles. Also, 16-bit is often preferred above 8-bit files to store normal maps for maximum accuracy.
Tangent-space normals are often way more useful than the object normal that we get from just the normal pass output.
With the vector render pass we can access data that can tell us the position difference of objects between frames. The primary use for this is to create depth of field. Shortened DOF.
To use it we must have frames before, after or both that are different from the currently rendered frame. Blender will then record the differences.
If we have movement in frames only before or only after the currently rendered frame, motion blur will only be drawn in that direction.
Here is a simple example setup.
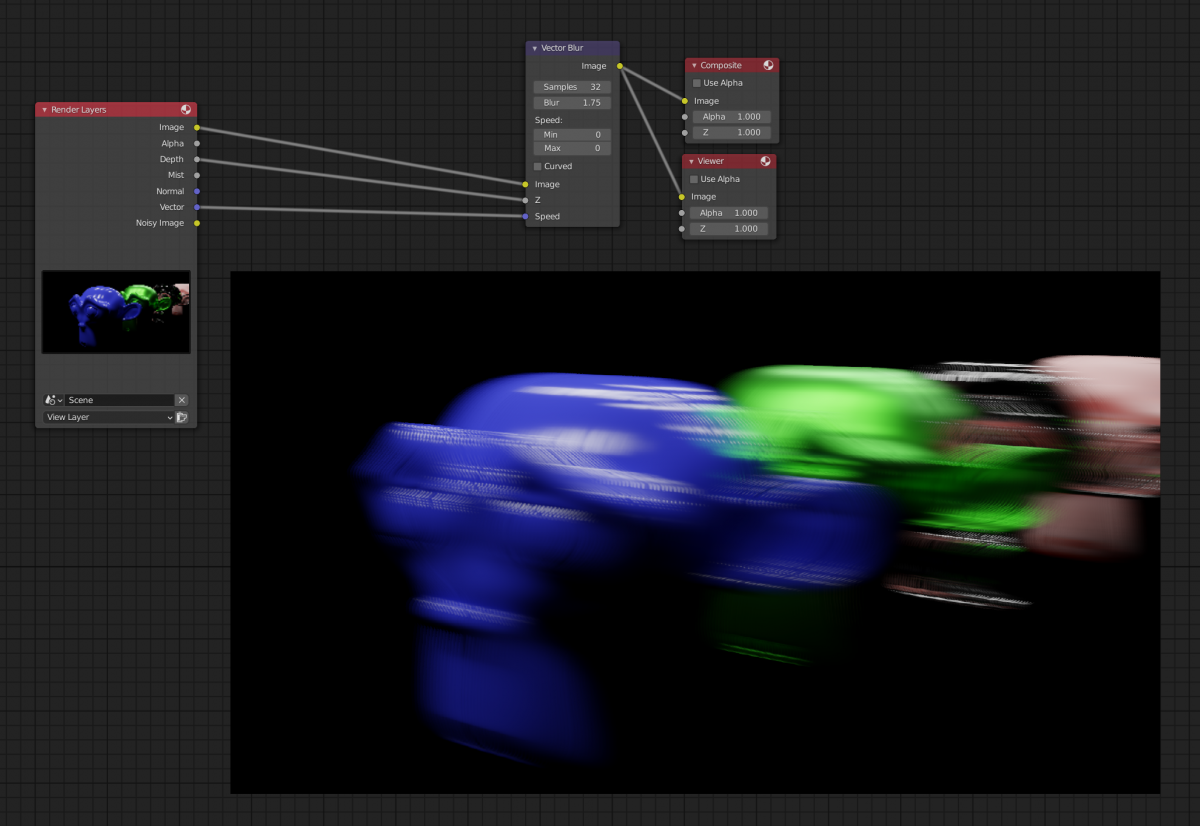
In this case I moved the objects to the right side of the camera viewport, added a location keyframe on frame one. Then changed to frame 30 and moved the objects to the left side and added another keyframe. Then I rendered frame twelve and setup these compositing nodes with the vector, Z depth and combined pass plugged into the vector blur node using the default settings on the node.
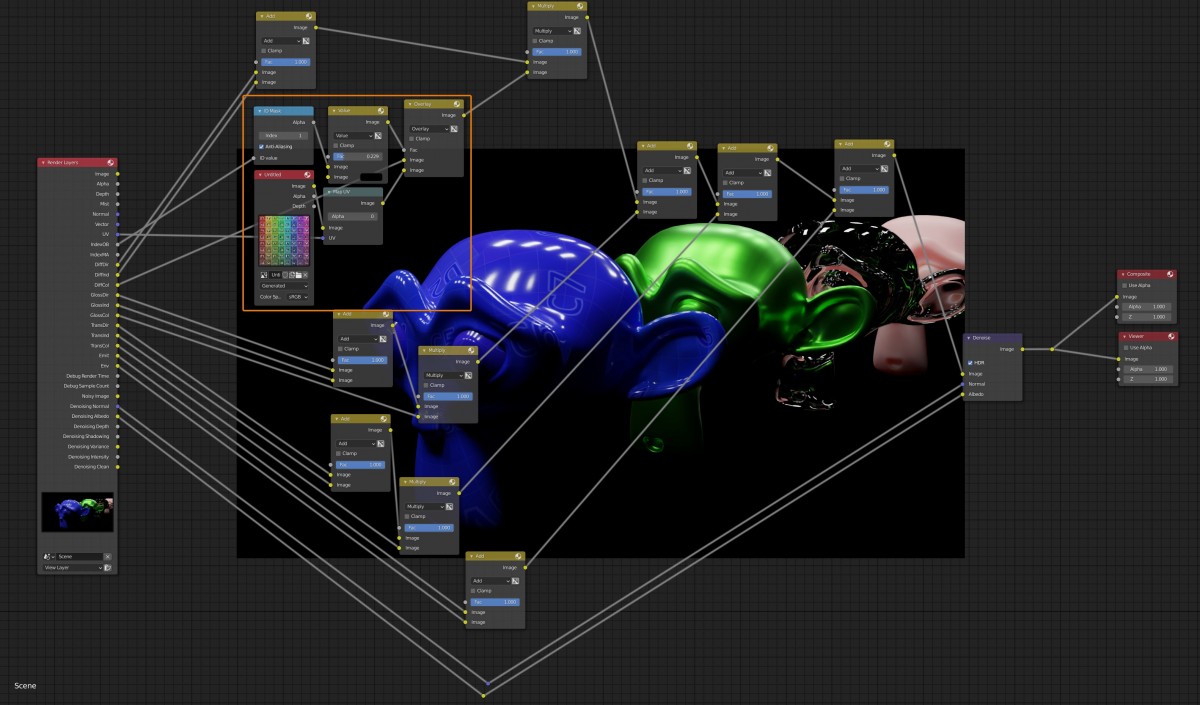
We can use the UV pass to re-texture an object after rendering. Cycles will read the angle data according to the default UV map for each object. If an object doesn't have a UV map, this pass doesn't record information.
We use the UV output with a Map UV node. For the image input we use the new texture we want to use. In the example below I choose to overlay the color grid image that you can generate in Blender with the existing material.

You can see it quite clearly in the blue and green monkey how the C7 part of the texture appears. I found that the overlay mode works best if you want to have a simple setup yet overlay a texture above an existing material.
We could also do something more advanced. For instance, we could use the light passes above to separate the combined pass. Then insert the texture as part of the diffuse color only so that the texture won't affect the glossy or transparent passes.
Here is the example:
I want to give attention to three things here, hoping that the web compression won't destroy the image completely.
You can see the UV mapping setup marked inside the orange box. But it is slightly different from the previous example. What I did here is that I used an object index mask, something that we cover just below. In this case I give the blue monkey an index and mask it from the rest, allowing me to only add the texture to this object alone instead of all of them.
Next, we overlayed this with the diffuse color pass instead of the combined image pass. We then combine this output as if it were the original diffuse color pass with the rest of the light passes through the mix node set to add with the diffuse direct and indirect.
It can be a bit hard to see in this case, but the glossy isn't affected by the texture and the texture is only present in the blue monkey.
There are three different denoisers available in Blender.
The NLM denoiser is a traditional denoiser while Optix and Open Image denoise are AI based. The Open Image denoiser and NLM can be used independent of your hardware while Optix requires a compatible Nvidia Graphics card.
Related content: How to use Intel denoiser in Blender
We also have a denoise data pass among the data passes.
We can set the denoiser in the Cycles render settings if we go to the sampling section and find the denoising subsection.
The denoiser we select for rendering will be used to generate the outputs we get when enabling the denoising data pass.
We can then use these passes together with the denoise node.
Both Optix and Open Image denoiser give us these outputs:
The NLM gives these additional outputs:
These outputs from the NLM denoiser do not currently have any use case.
We also don't use the denoising depth.
The denoise node is based on the Intel Open Image denoiser, so it will most likely work best with the outputs from this denoiser. However, I have found that the Optix denoiser outputs give comparable results in most cases.
This is how you setup denoising in the compositor.

In this case I have the Open Image denoiser set in the Cycles render settings.
An alternative to this that I commonly use is to set the Optix denoiser in the Cycles settings instead and enable the checkbox to also denoise at render time and then setup the same node setup as above.
This way We get a denoised image through the combined image pass, we can also access the noisy image through the noisy image pass and use the denoise outputs from Optix with the denoise node that is built on Open Image denoiser.
The only thing we don't get is Open Image denoise outputs for the denoise node. But it gives us many options to choose from without re-rendering.
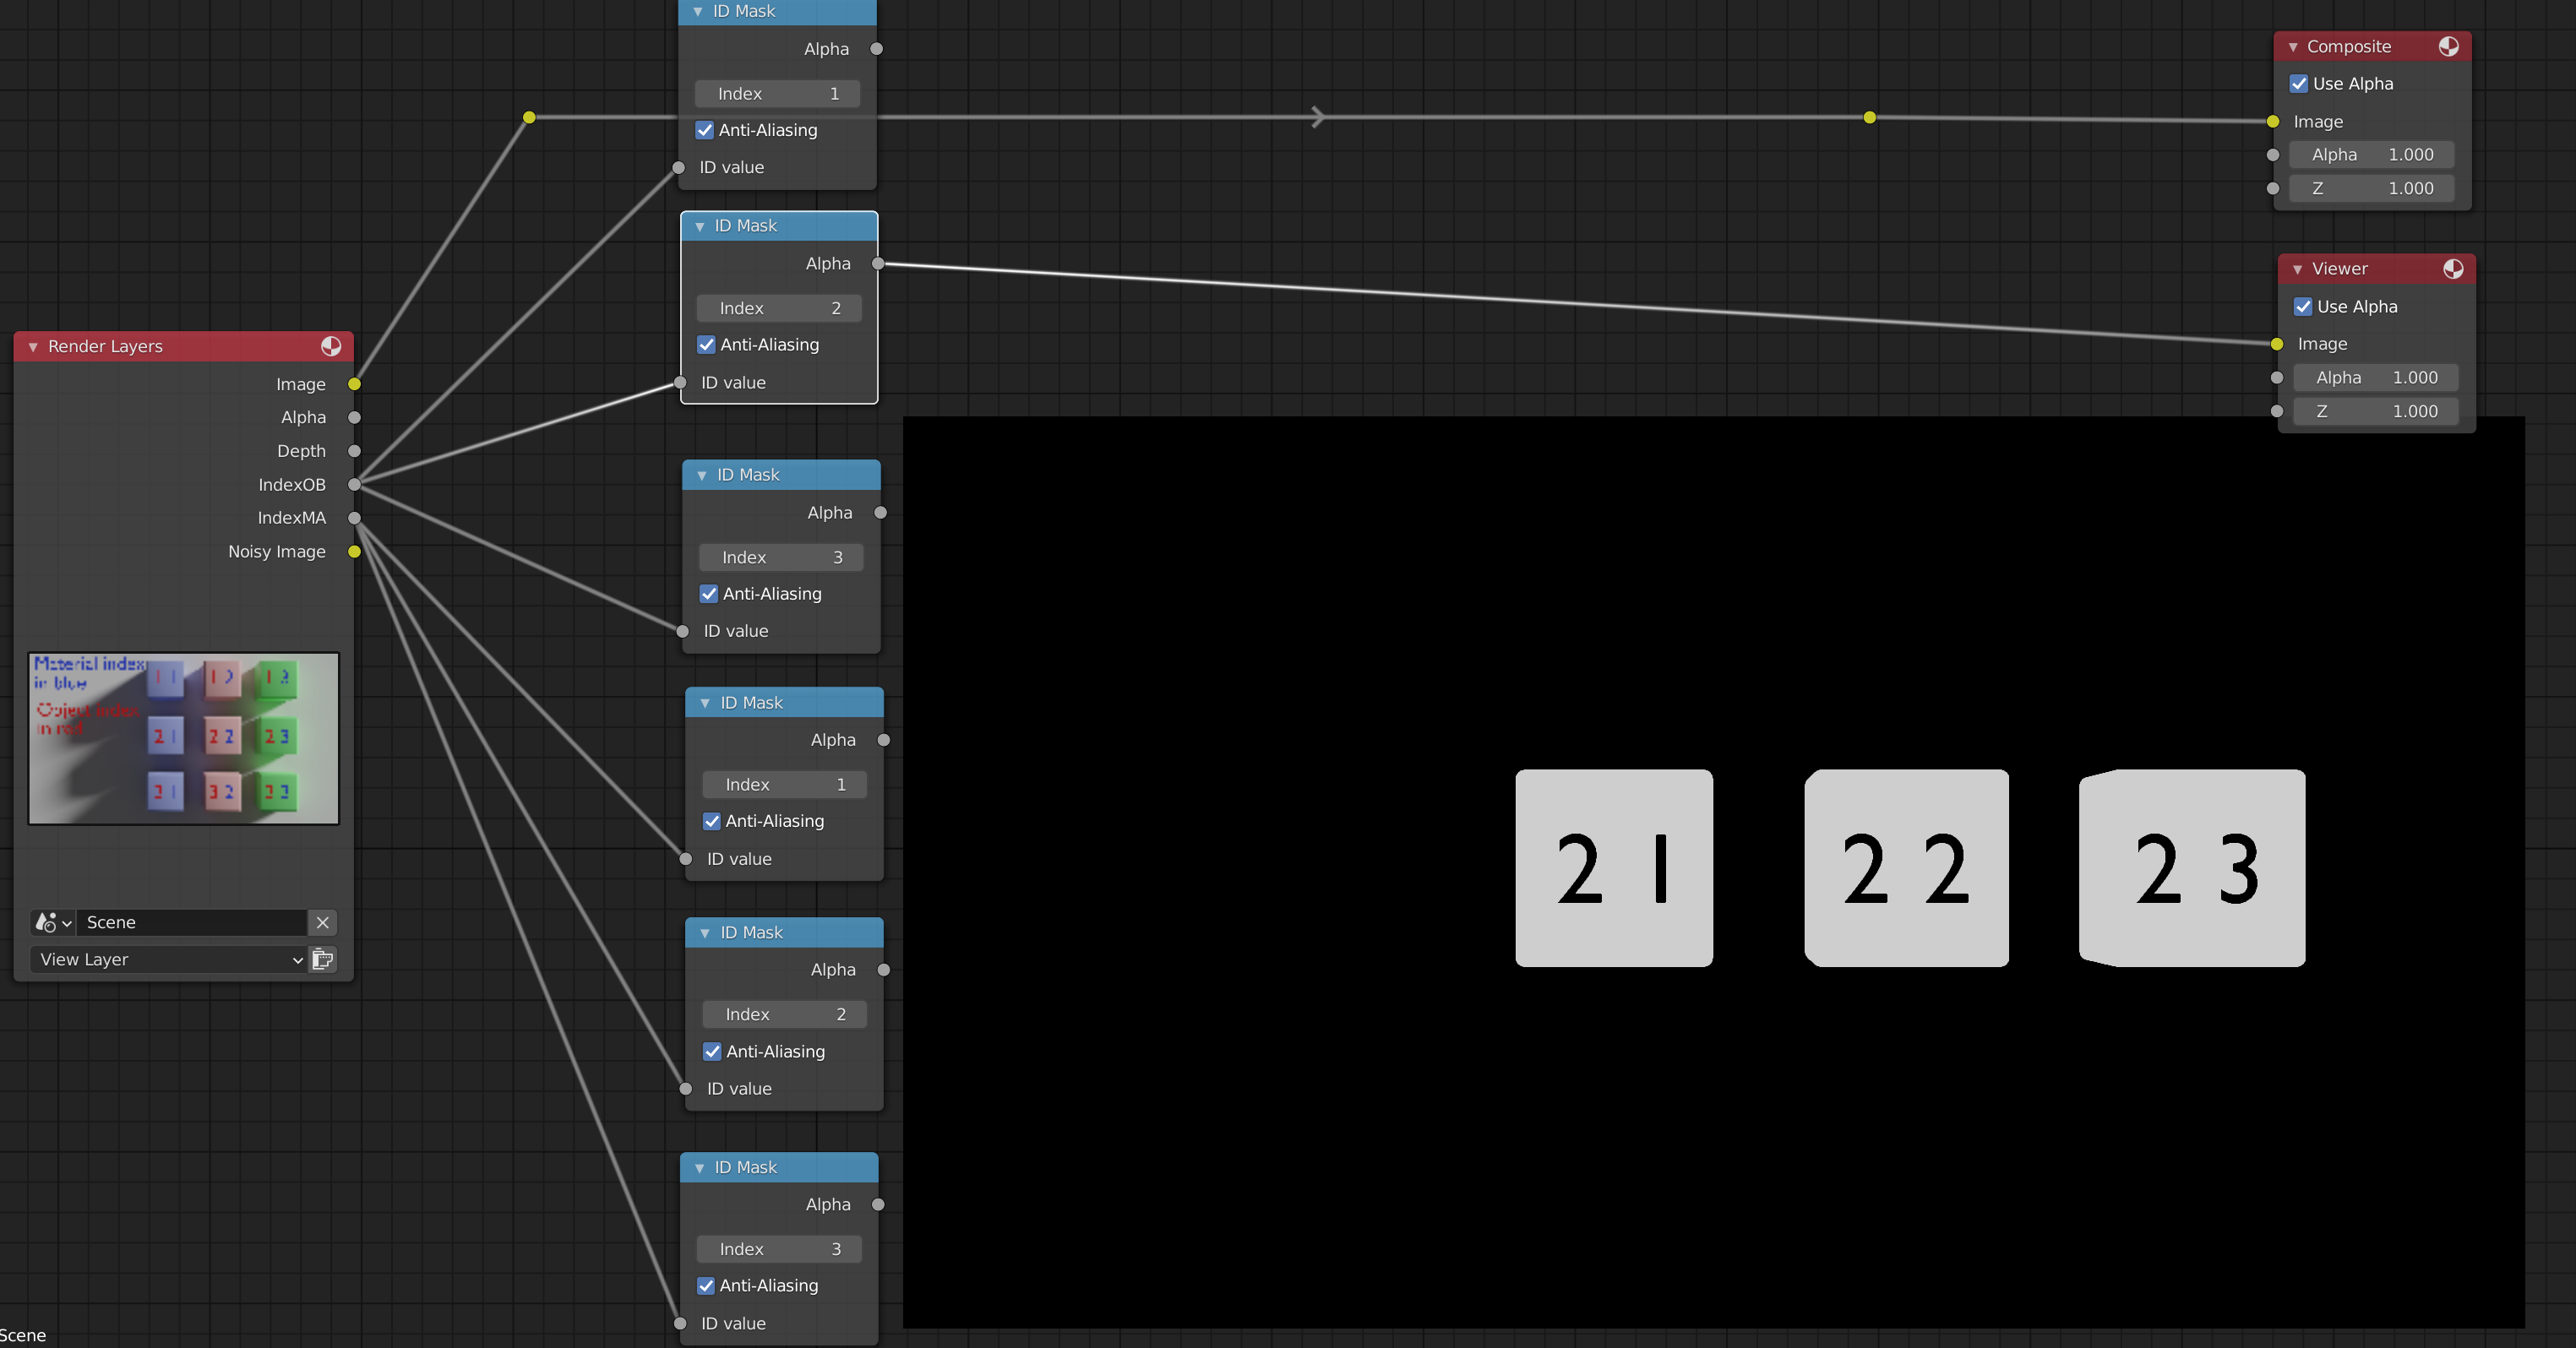
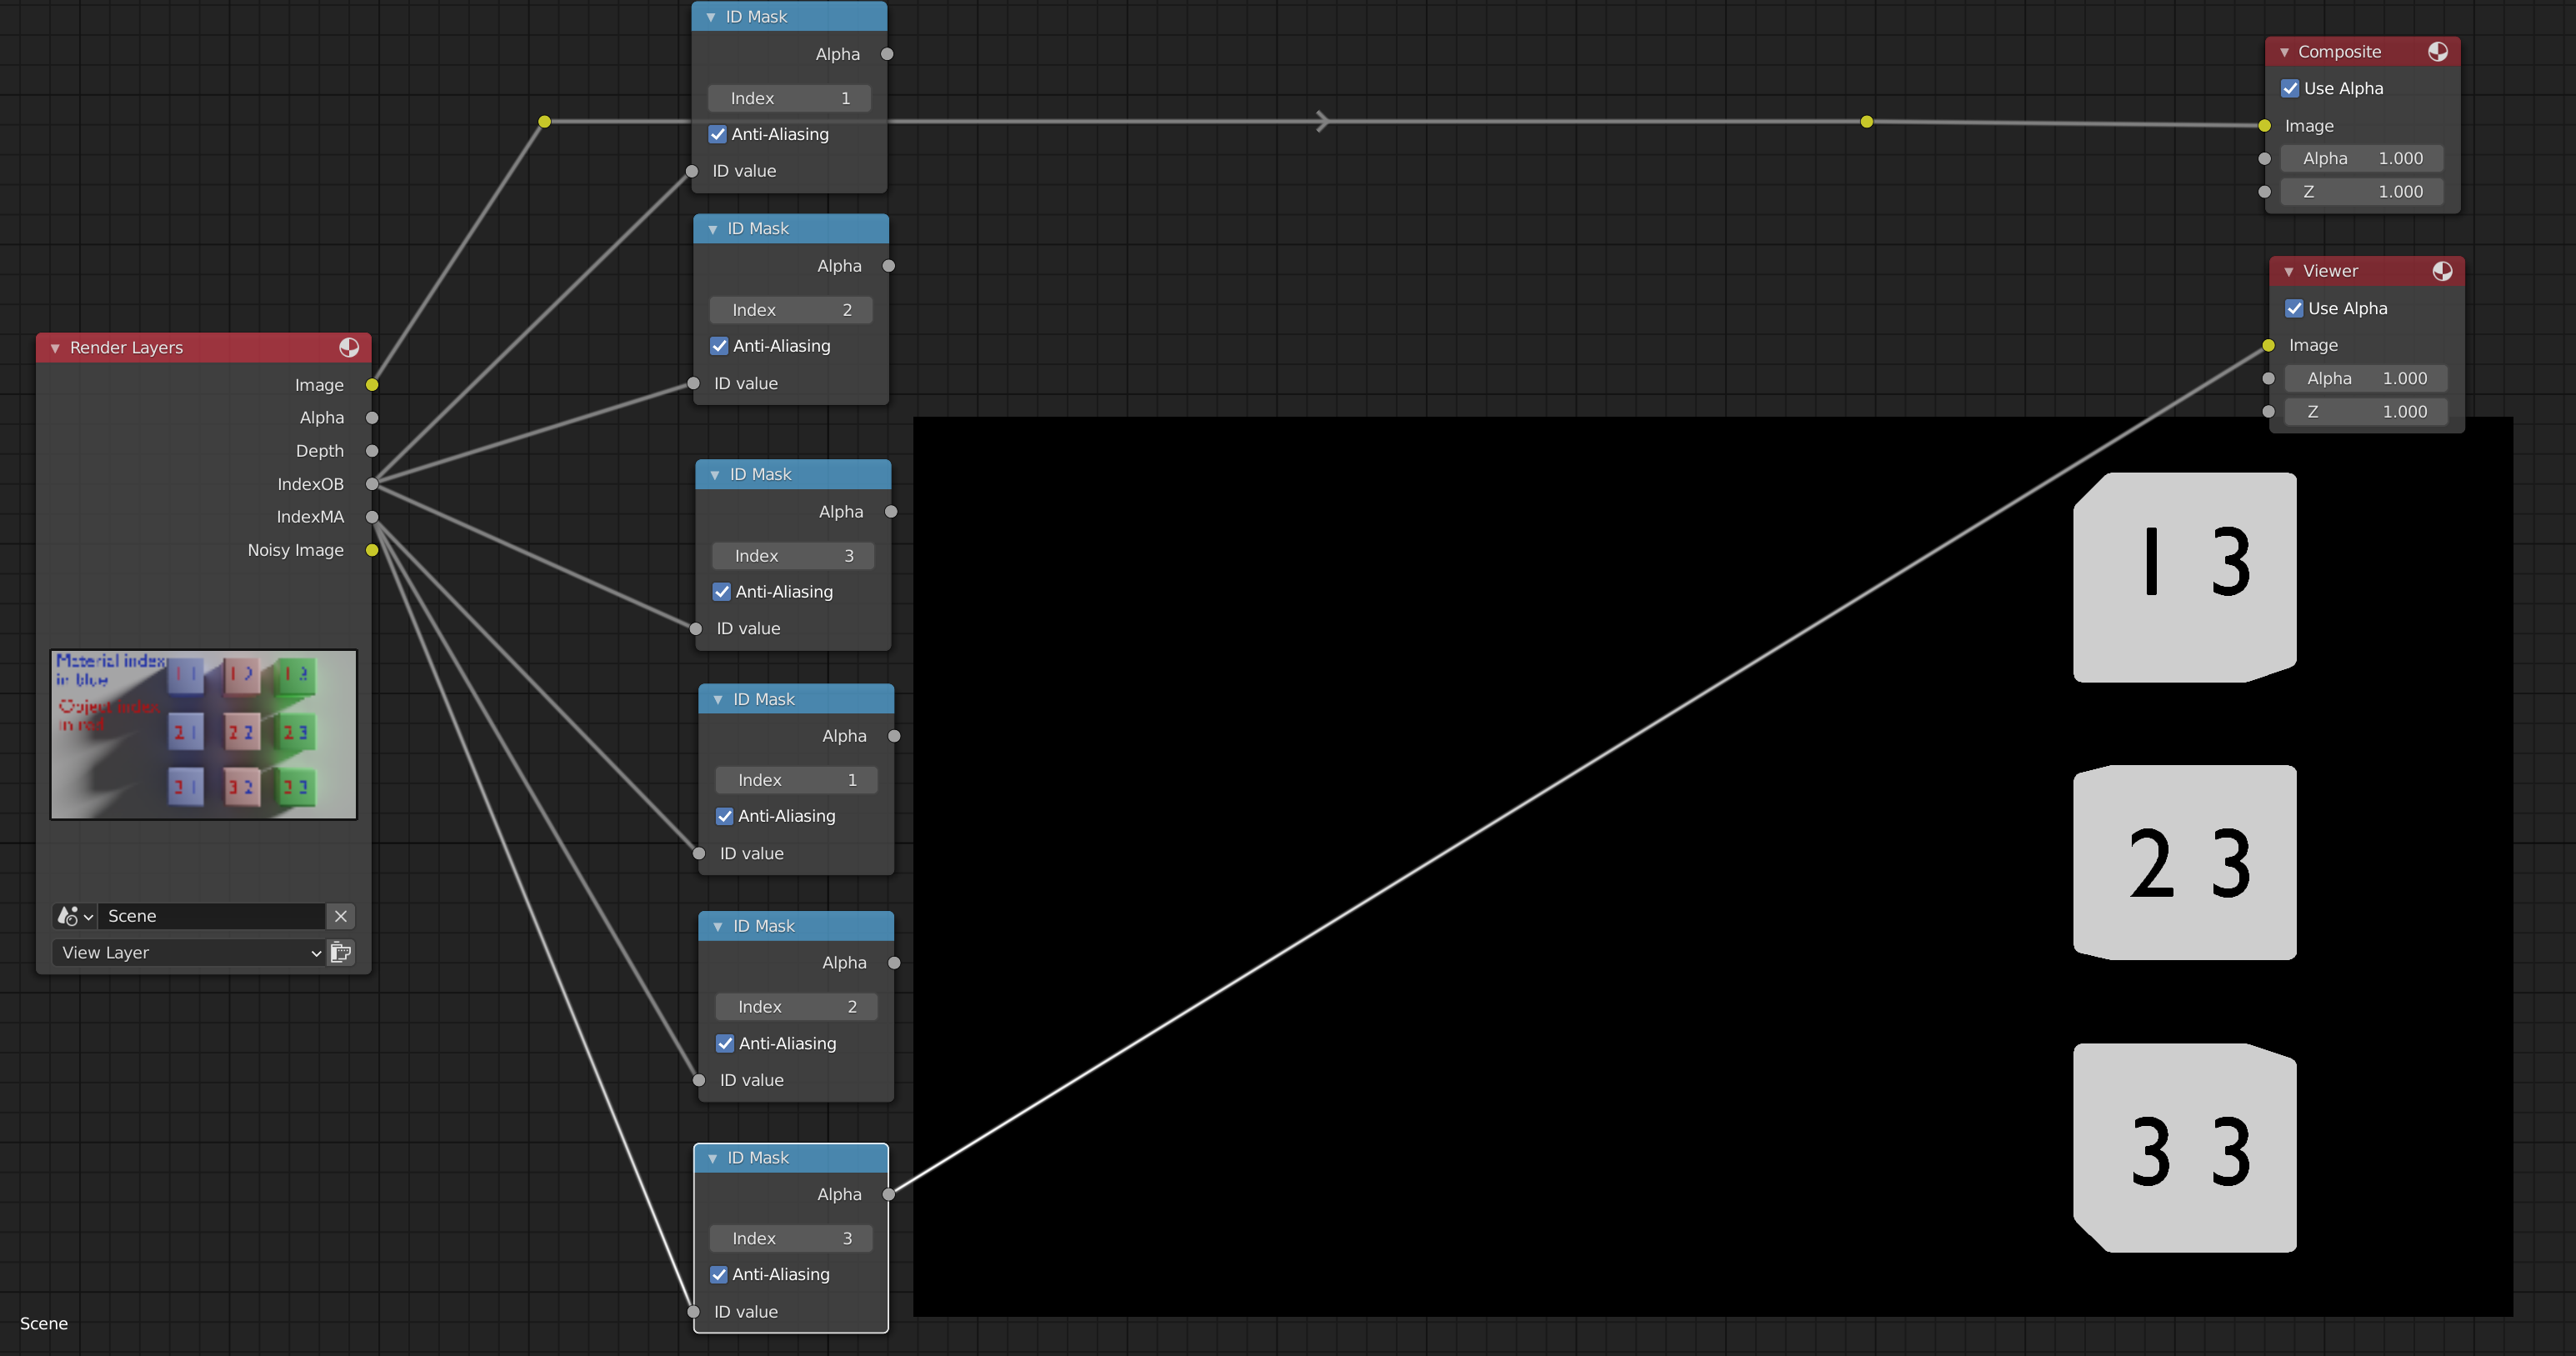
There are two kinds of index passes. Object pass and material pass. Both are used to create masks that we can use in the compositor.
We give a material or object an index and based on that index we can use the object and index passes together with the ID mask node.
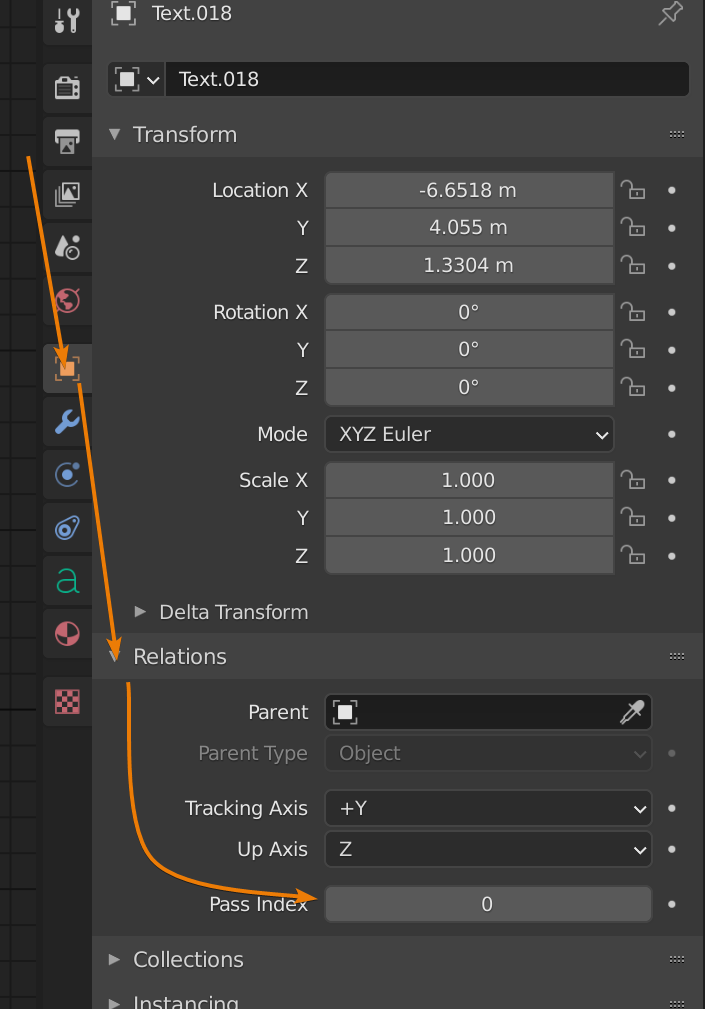
For objects, we go to the object properties and find the relations section. Here there is a setting called pass index. To enable passes for this object, give it an index number above 0.
We can either give a unique index number to each object we want to mask or group them together into the same mask by giving them the same number.
Same goes for material. We find the material pass index if we go to the material properties tab and find the settings section. Here we find pass index for the material.

Here is an example scene. I have given each cube a material with an index and made three index groups for the objects. The material index is labeled in blue and the object index in red.
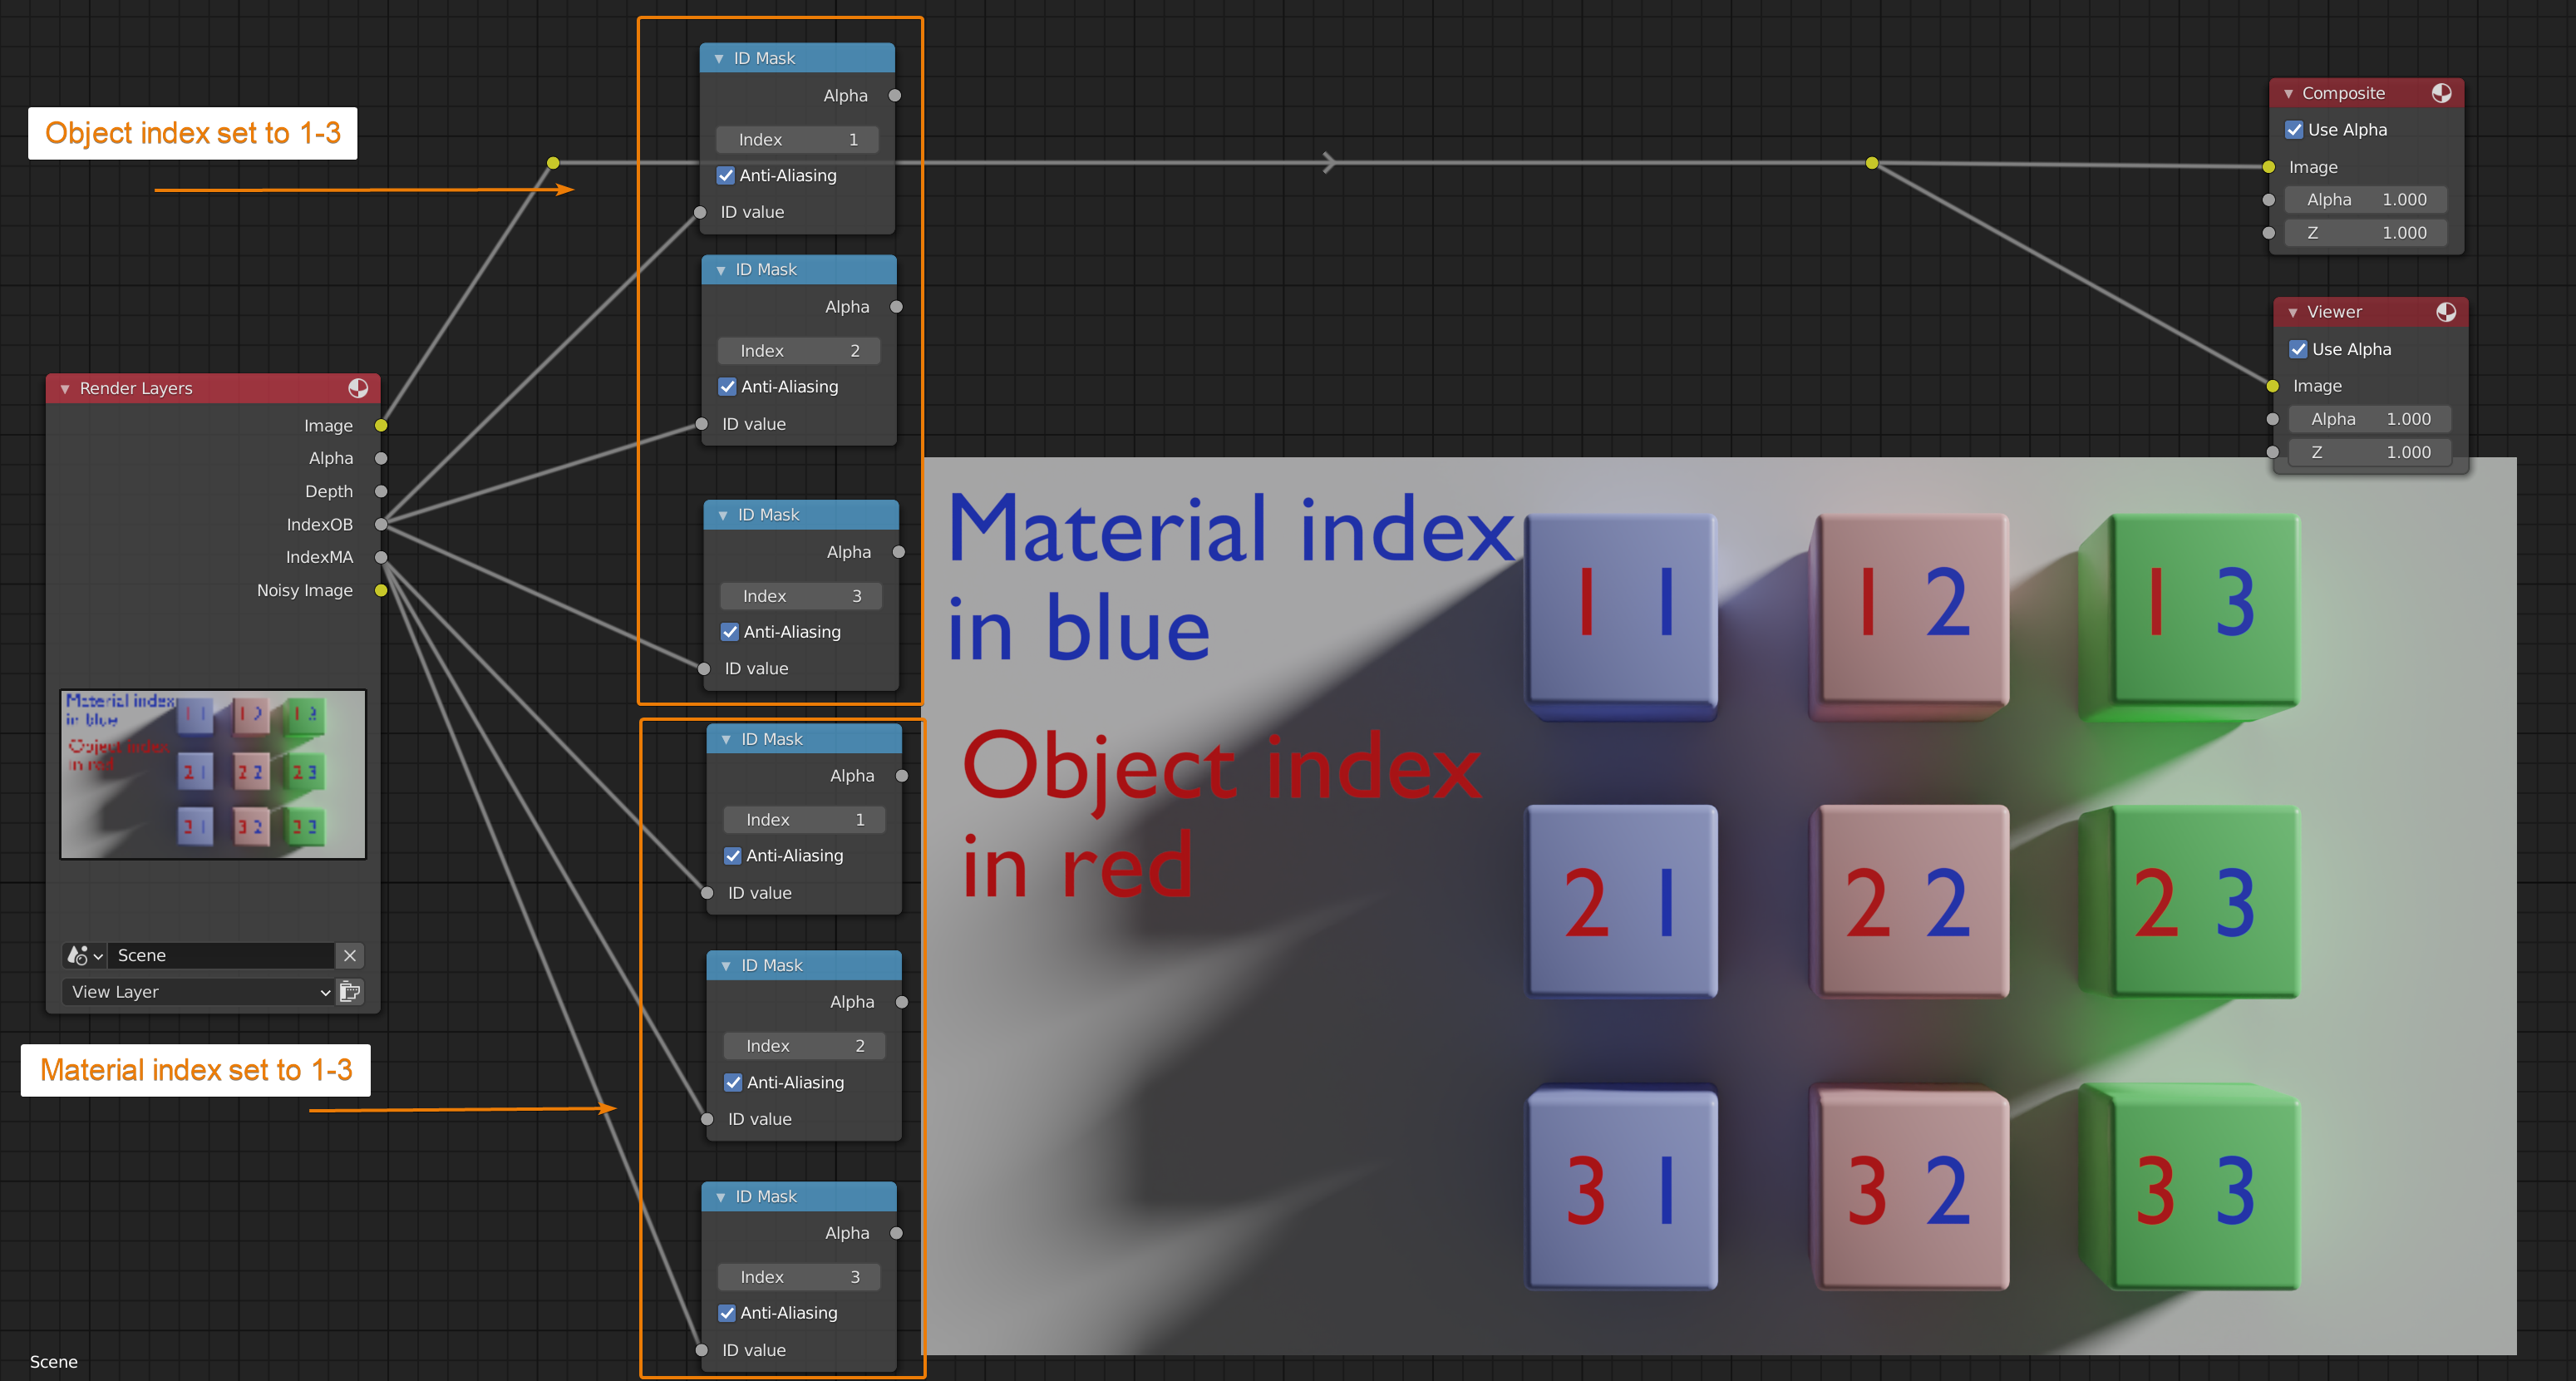
Here are some example outputs from the ID mask nodes
There are two debugging render passes. Render time and render sample count. According to the Blender manual these passes record the "render time in milliseconds per sample and pixel" as well as the "number of samples/camera rays per pixel".
External content: Blender manual render passes
This is really metadata that we can store on a per pixel basis in these passes. For most 3D artists there are no practical uses for this data that I am aware of. But we can visualize this data in the compositor by using a normalize node.
Let's stary by taking a look at the render time pass.
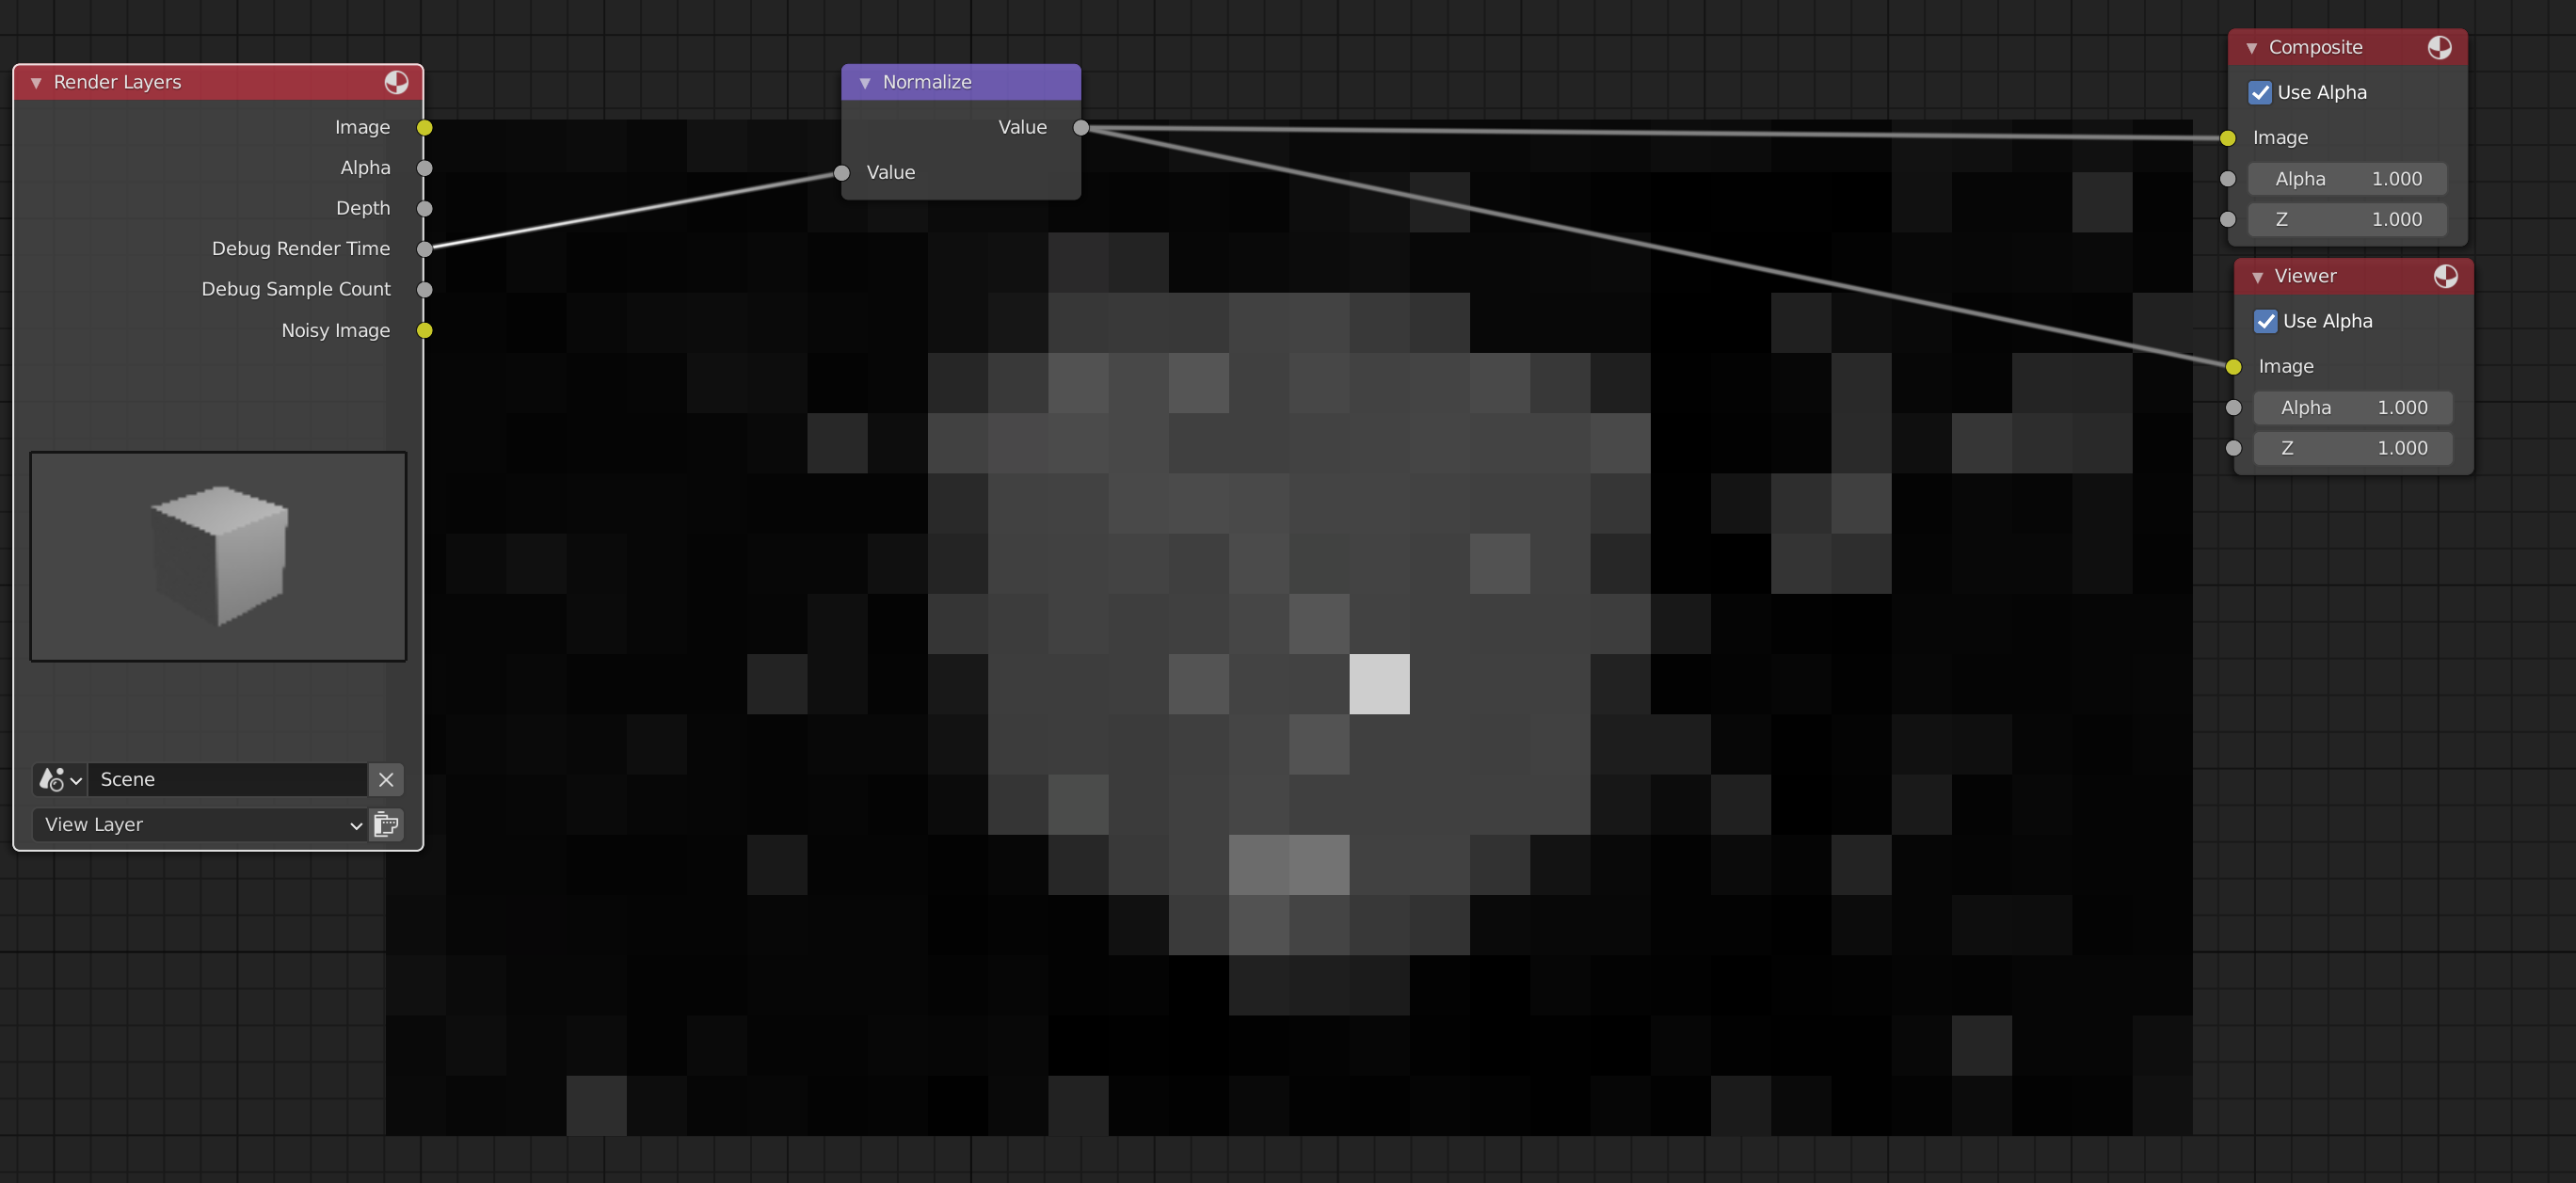
We use the normalize node to bring the values recorded into the 0.0 to 1.0 range so that we can see the relative difference between render times for each tile. In this case I used 64x64 tile size in the render settings.
Related content: Blender: A Cycles render settings guide
The smaller tiles you use the smaller pixilation we get. One of the tiles in the middle is much brighter than the rest. My understanding is that this is because in the first tile, the time it takes to initialize the render is included.
Moving on to the samples, here is an example with the same node setup in the compositor.

To get a difference in value here, I use adaptive samples in the cycles render settings. In this case we can see that Blender uses more samples on the edges of the cube. Highlighting those areas.
Cryptomatte is a masking feature that allow us to mask objects, materials and assets by eye dropping them in the compositor using the cryptomatte node. By assets, we really mean groups of objects.
I cover this feature in another article here, but we will cover it briefly in this article as well.
Related content: How to use cryptomatte for masking in Blender
To enable cryptomatte go to the passes in the view layer tab. Find the cryptomatte subsection and enable it for objects, materials or assets depending on your needs.
After you render you will get these three outputs from your render layer node in the compositor for each of the different mask types.
These will be numbered, 00, 01 and 02. Add a cryptomatte node and the the three outputs and connect them to the corresponding crypto numbers on the cryptomatte node.
For instance if you want to use cryptomatte for objects you take all the CryptoObject outputs.

Next you plug the pick output to your viewer node and enable the backdrop in the compositor. Now you can use the add button to color pick from the backdrop to add that object, material, or asset to your mask.
We are using the same example render as we did for the object and index pass above but this time with cryptomatte, creating the masks after rendering.

Continue color picking until all things you want in the mask are selected. Then use the matte or image output to get either a black and white mask based on the selection or a combined pass output that is alpha masked as in the examples below.


A lot of the previous passes we have talked about works together with a compositing node, such as the denoise node, ID Mask node or the cryptomatte node. Shader AOV or Arbitrary Output Values as it stands for is also tightly woven together with a node, but a shader node instead of a compositing node.
Shader AOV uses the AOV Output node in the shading editor to capture color or grayscale values from a material and turn it into a render pass. According to the manual this is good for artists who want to debug or finetune details in a material, but it can also be used to create some NPR(Non-photo real) renders, such as cartoon or anime style art.
Let's look at how it works.
In the view layer tab where we find our passes section we have a Shader AOV subsection. Here we have a list where we can add Shader AOV passes.
Press the plus or minus signs to add or remove passes, then double click the name and type to give a pass a new name. All names in this list need to be unique. Then tell Blender that this is a color or greyscale value by choosing the either color or value as the Shader AOV type.
In the shader editor, Pree Shift+A and add an Output->AOV Output node.
This node can take a color or value input. We can't use both. If we set a color type in the Shader AOV list, we have to use a color type here.
Type the name of the pass you want to associate this node with so that it matches your pass in the Shader AOV pass section.
Input the color or greyscale value from any part of your shader node tree depending on if you have a color or grayscale/value setup.
After you render you will have access to all the Shader AOV passes by name from the render layer node. Just like any other pass.
Let's now look at an example.

In this example we have setup two AOV output nodes, one for the mask that separates the blue from red and one for the color values.

Here in the diffuse color pass example we can see the output. Anywhere we don't have this material is transparent in this pass. For the black and white pass, we don't have a separate transparent channel. Instead, everything that isn't part of the pass is black.

We can also use the AOV Shaders in the world material if we want. Here is a simple example.

And here is the result in the compositor.

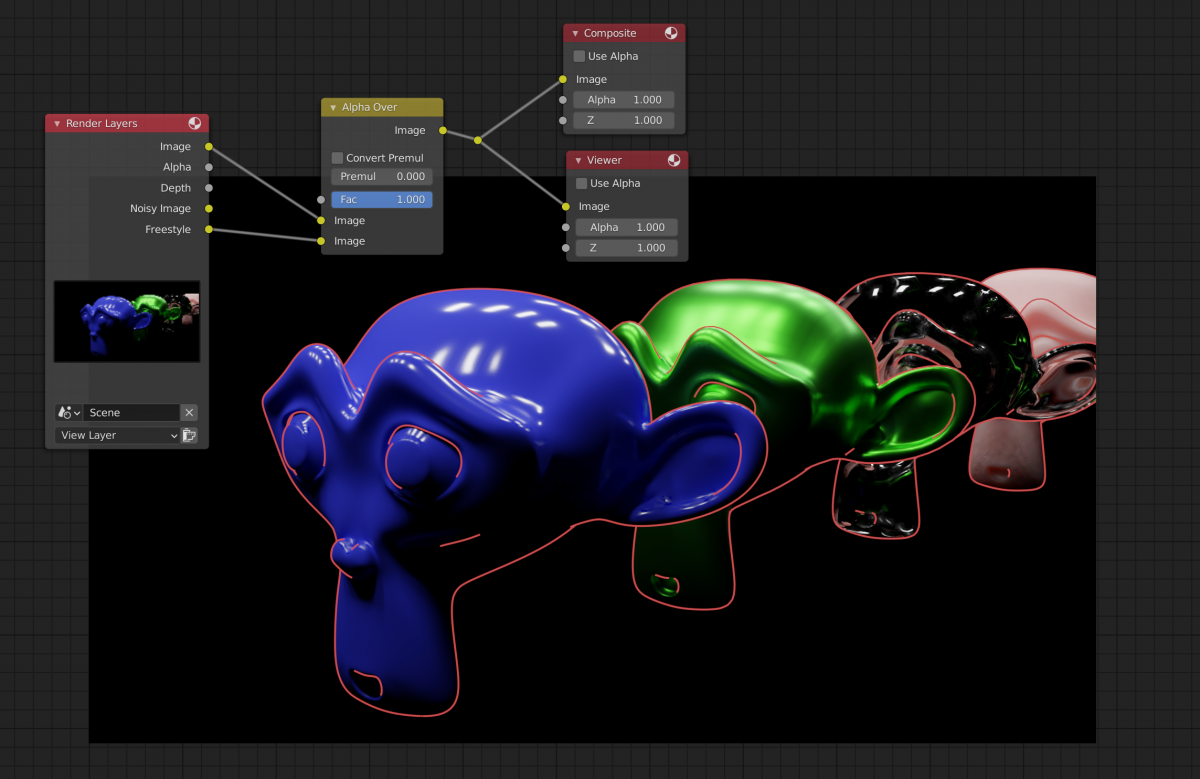
In Blender 2.83 we finally got a separate freestyle render pass. Before we had this we had to render the freestyle on a separate view layer with a transparent background and composite it over the original footage.
Now we can check a button and always have access to the freestyle lines as a separate render pass.
To enable it you first need to enable freestyle in the render settings. After that go to the view layer properties tab and find the freestyle section. Here you will find a checkbox labeled "as render pass". Check it and the freestyle lines will be rendered on its own render layer.

We can then composite the freestyle lines above the original footage using an alpha over node.
Related content: A guide to Blender freestyle rendering with Eevee and Cycles
The goal of this article has been to give a good overview of what can be done with the render passes in Cycles. There is a lot of diverse functionality involved and there are many features and possibilities available.
We covered the basics of how to access render passes and use them in the compositor. We covered the different types of passes. From light passes to data passes, cryptomatte and AOV.
Thanks for your time.
