


Having a solid understanding of how to work with vertices is key to being able to model fast and fix issues and problems that arise during the modeling process. In this article we will take a look at common operations that will help you build better geometry faster. Primarily in box modeling and polygon modeling workflows. But also, for retopology and fixing geometry generated or created in other ways.
To merge vertices in Blender, use the merge menu in edit mode by pressing M after you have selected the vertices you want to merge. Most options in the merge menu decide where the merged vertex will end up.
To join vertices in Blender, select two vertices and press J, joining vertices will slice through any geoemtry between the two selected vertices to create a direct path through any intersecting geometry.
Connect vertices in Blender by selecting them and pressing F. Connecting vertices create an edge between the vertices without taking other geometry into account.
Related content: Join, merge and separate objects in Blender
Let's explore these features further.

Merging vertices is when we have two or more vertices and we want to merge them into one.
We merge vertices by using the merge menu. You access it by pressing M on your keyboard while in edit mode. You can also find it by going to Mesh>Merge in the 3D viewport menu.
We typically merge in one of these three scenarios.
The first is when vertices we want to merge sit on top of each other, so that in the viewport it looks like a single vertex but in reality, they are two or more separate vertices simply occupying the same space.
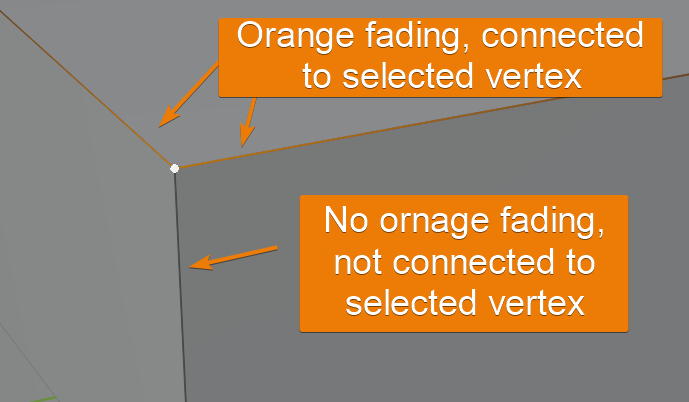
We can see that two vertices are sitting on top of each other by selecting the suspecting vertex pair. Just click the vertex and every connected edge will have an orange fade along it. If one edge that looks like it is connected does not have this fading orange it means that it is connected to the second not selected vertex that is sitting in the same place.
The second scenario is when two or more vertices are connected with edges but are not sitting in the same place. In this case we need to tell Blender, not only to merge the vertices, but where to merge them as well.
In this case any connected edges between the merging vertices will collapse.
The last alternative is that we want to merge vertices that are not connected to each other. In this case we still need to tell Blender the new location for the merging vertices. Any edges that are connected to vertices that are not merging, but simply connected will maintain their connection, but the edge will connect to the newly merged vertex.
Ok, so back to the merge menu, the merge menu is context sensitive, meaning that depending on what we have selected it will show different alternatives.
When we are in vertex select mode indicated by the vertex select mode button in the top left corner of the 3D viewport being blue the merge menu will have one of two sets of options when we press M.


The extended options with "at first" and "at last" are only available when we have an active vertex. The active vertex is generally the last selected vertex, indicated by a white color instead of orange.
If you use a multi-select tool such as a box select, no vertex will be active, in this case, use Shift + Left click to select a vertex as active. If it is already selected, the vertex will first be deselected and the second time you shift-click it will be selected and active.
All options in the merge menu describe where the merged vertex will end up after the merge except the last option, "By distance". This option is discussed below.
In some cases, we end up with a mesh that has multiple instances of vertices sitting on top of each other. In this case we don't want to merge all vertices to the same location. But instead, we want to merge each pair or multiple vertices that are sitting on top of each other with each other without necessarily moving any vertices positions.
To clean up our geometry by merging vertices in this way, follow these steps:
When you have performed the operation, an info box will display in the status bar at the bottom of the interface.
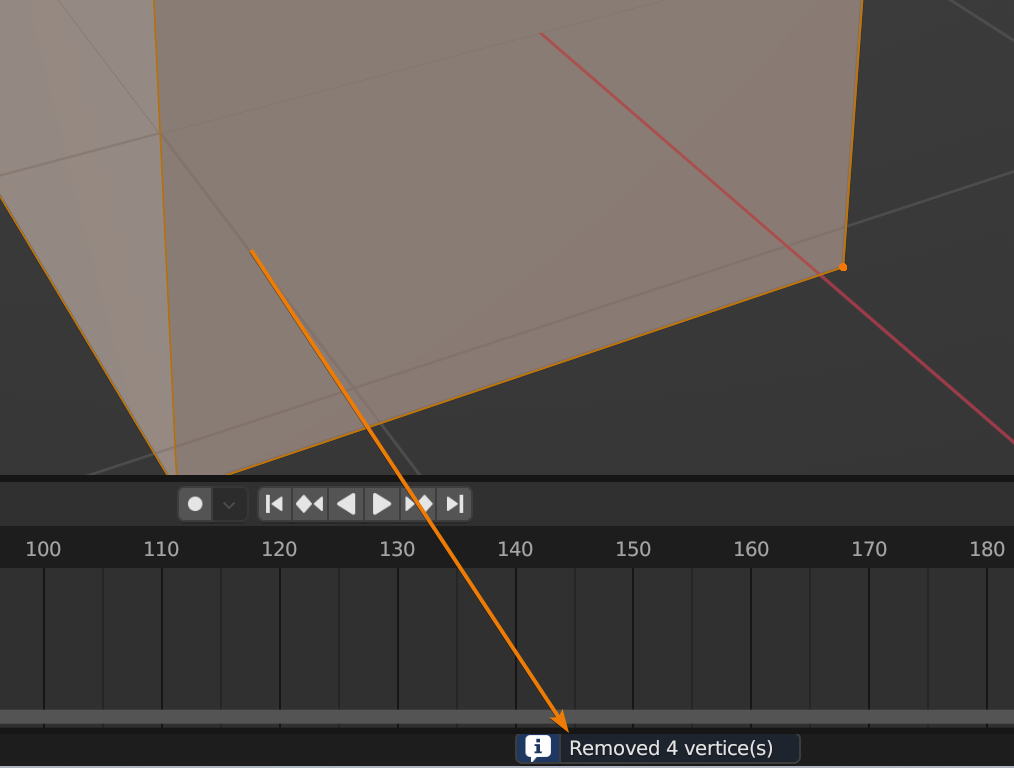
If the number doesn't seem right, you can press Ctrl+Z to undo the operation and troubleshoot what might have gone wrong.
In the example above we selected all vertices in the mesh, usually this is fine. All vertices that are not duplicate vertices will remain intact if they are not sitting too close to another vertex that is not supposed to merge.
We can also select just a portion of our mesh if this happens and perform the merge by distance function on part of a mesh. Just make sure that you have X-Ray turned on in the upper right corner of the 3D viewport when you make your selection so that you select all vertices through your mesh or you might just select one of the vertices in every overlapping vertex.
Connecting vertices simply create an edge between two vertices with no regard to the surrounding geometry. Joining vertices on the other hand will slice through any geometry along the way between the two vertices we join and create vertices at every other edge it slices though. Potentially creating new edges, vertices and faces.
The most common tool to use in my experience is to connect vertices, but joining has its place and can sometime be a quick alternative to the knife tool or a lot of other modeling tasks that need to be combined to create the same result.
Connecting vertices is done with the F key. To connect two vertices, follow these steps:
Another way to create the same kind of geometry if we have a single vertex is to select the vertex and press E to extrude. This will create a second vertex connected to the first vertex with an edge that we can place where we want.
The extrude tool also works with snapping so that we can place the vertex in a more exact location.
Related content: How to snap to vertices in Blender and when is it useful?
Join is when we want to create one or more edges between two vertices and slice through all geometry elements between them. For example, we can join two vertices on a diagonal across a face and the face will be split into two faces with an edge between them.
To join two vertices simply select the two vertices using your favorite selection tool and press J on your keyboard. You can also find the tool in the menu by a slightly more technical name by going to Vertex>Connect vertex path.
In this article we covered merging, connecting and joining vertices. Merging vertices can be achieved through the merge menu where we have options for merging vertices to various locations or when we have multiple places of duplicated vertices we need to remove.
We learned the difference between joining and connecting vertices as well as how to perform those functions.
I hope it was helpful and thanks for your time.
