


Rigid body simulation is probably the most common type of physics simulation. It is extensively used in games, and it allows objects to fall, collide, slide or bounce without deformation to any involved object. A rigid body object is a solid geometry that has no deformation, or a deformation small enough to be ignored.
To setup a simple rigid body simulation in Blender, follow these steps:
From here we can duplicate the cube multiple times with Shift+D and rotate each one different amount. We can set some of the cubes to passive and have the active rigid body objects fall and bounce off the passive ones to make a more interesting simulation.
This is the basics, but there is a lot more to how rigid body simulations work and its use cases. Let's now explore them further, starting from the very beginning.

The rigid body simulation system that Blender uses is called Bullet physics.
A rigid body simulation is a type of physics simulation where objects can fall, collide, interact with gravity and other forces without deforming the involved objects. Rigid body simulations can also be combined with the animation system or any other simulation type.
It is generally not a simulation that happens in isolation, instead it is able to interact with a lot of other systems within Blender.
The rigid body simulation system also features constraints that make rigid body objects behave in certain ways in relation to each other. A constraintobject is usually an empty object. The constraint then takes two rigid body objects as input together with a range of other parameters to dictate the relationship and behavior between these rigid bodies.
We do not cover constraints to any extent in this article, but we explain the settings related to constraints that can be found in other parts of the rigid body simulation system.
The rigid body simulation system is well documented in the Blender manual, and you can find it here:
External content: Blender manual, Rigid body
We can use rigid bodies both for still rendering and animation. For instance, we can use the rigid body system to create motion blur for falling objects in a single frame. But the most obvious is to use simulations for animation to see the simulation happen in action and interact with the scene.
Related content: Blender Eevee Motion Blur guide
Often, you are only two clicks away from making an object a rigid body in Blender. When your object is selected, click the simulation tab in the properties panel, that is the icon with a circle orbiting another circle. Then press Rigid body to make the object a rigid body.
The simulation tab then houses all the settings related to this specific rigid body object. We will continue to cover all of these settings as we move on.
As we create our first rigid body object, Blender takes care of setting up all the default values for the simulation itself along with making the selected object a rigid body object.
If you hit Space, (or Shift+Space if you configured Space for another function) the timeline plays, and the simulation starts immediately. Your rigid body objects start to fall and will fall to infinity or until it has reached the largest number your system can handle. Whichever comes first.
To make the simulation a bit more interesting we must setup a floor for our object to land on, but by default when we have a floor that we also make a rigid body, it will also fall.
This leads us to the first setting for our rigid body object. The rigid body type.
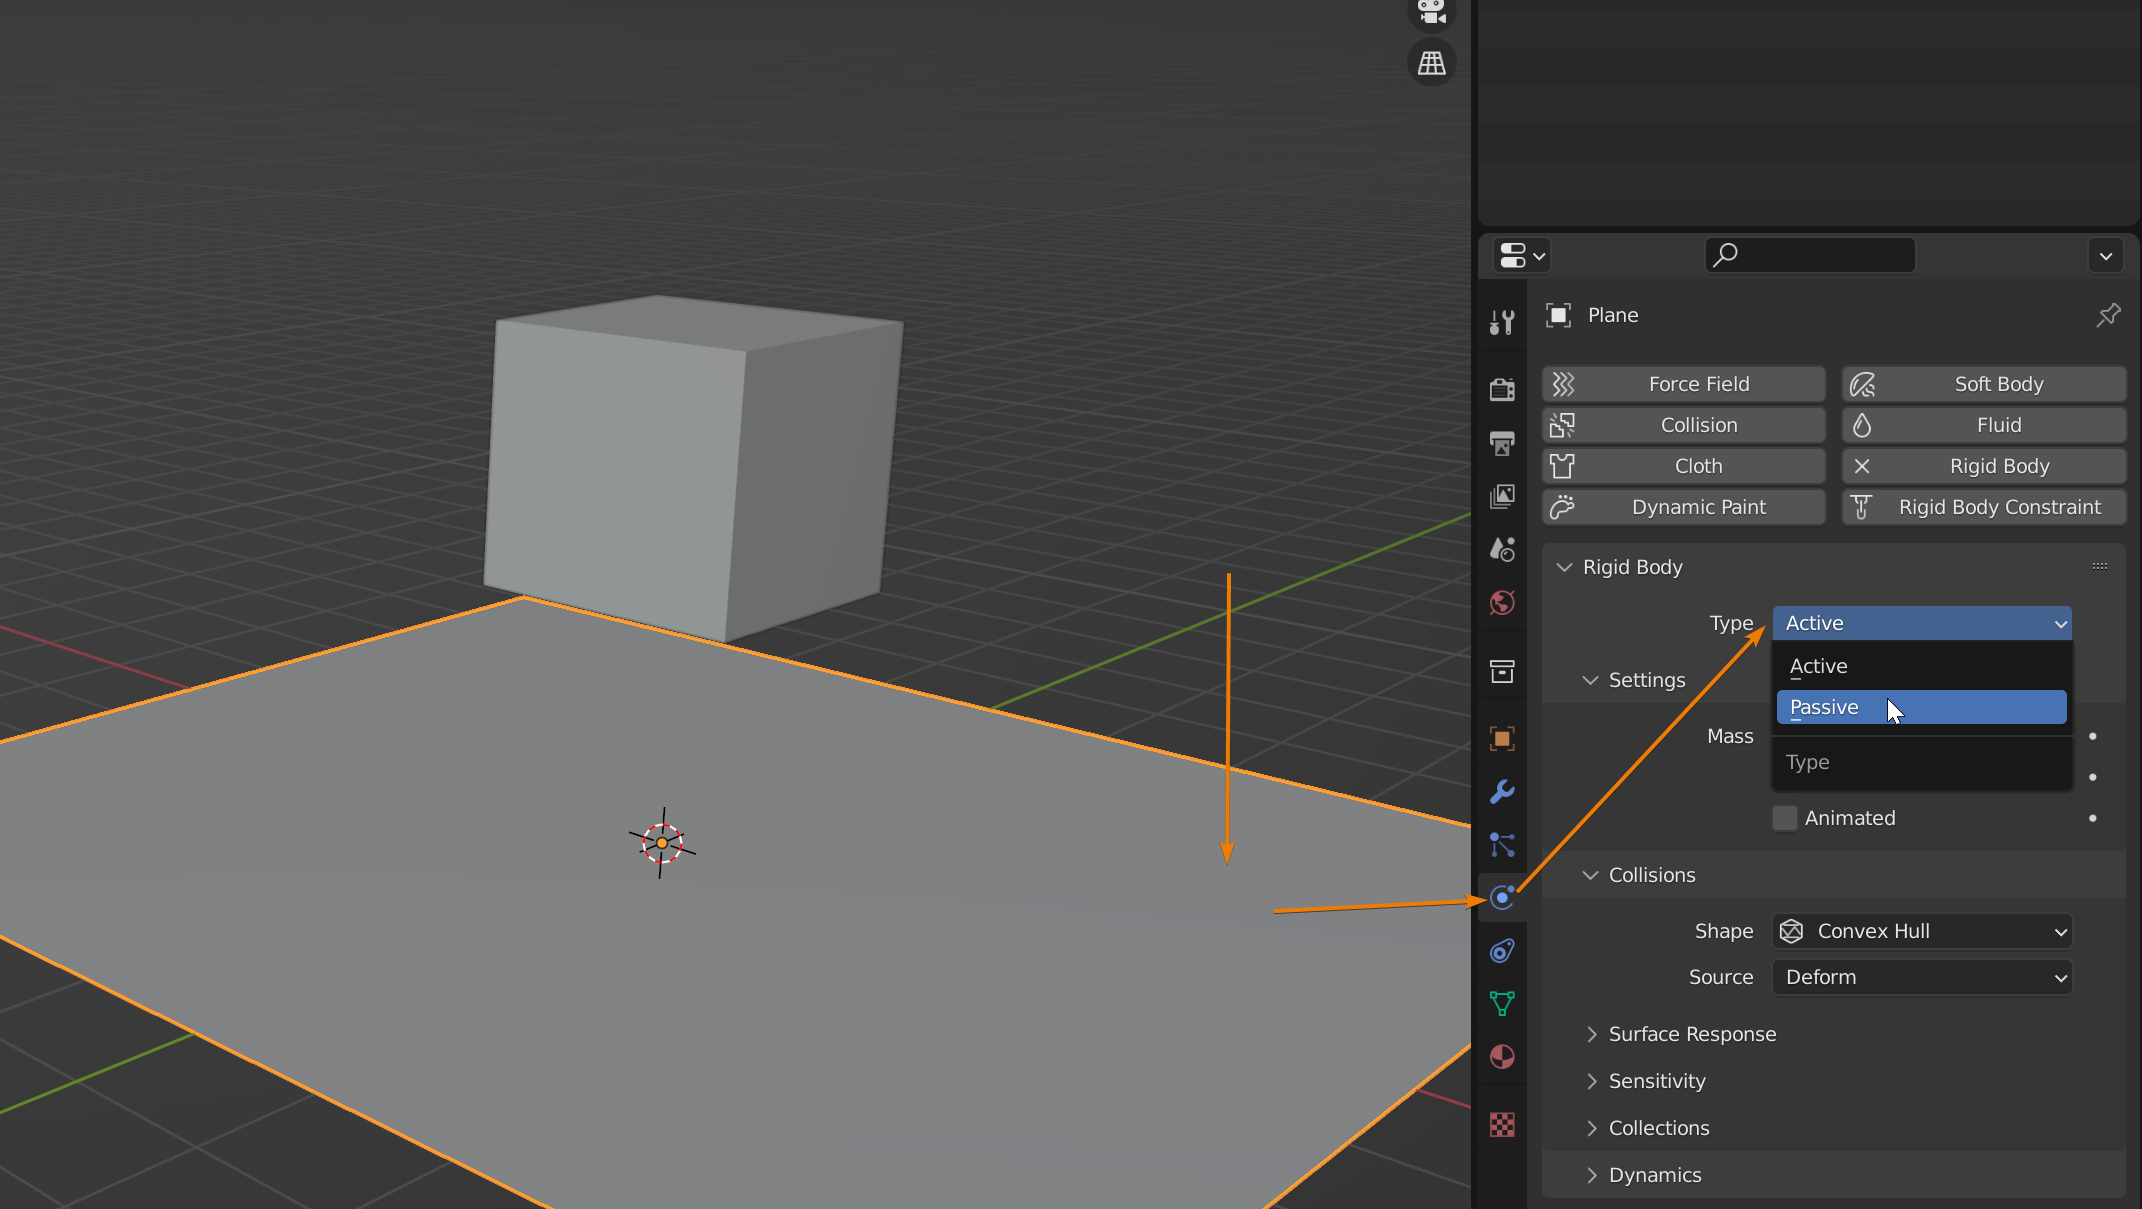
We can set this to either active or passive. An active object will have forces act upon it. These are all the forces that we can add to our scene from the add menu by pressing Shift+A and going to the force's submenu. But it also includes gravity. A passive object will therefore float in midair and not fall, but other rigid body objects can interact and collide with it.
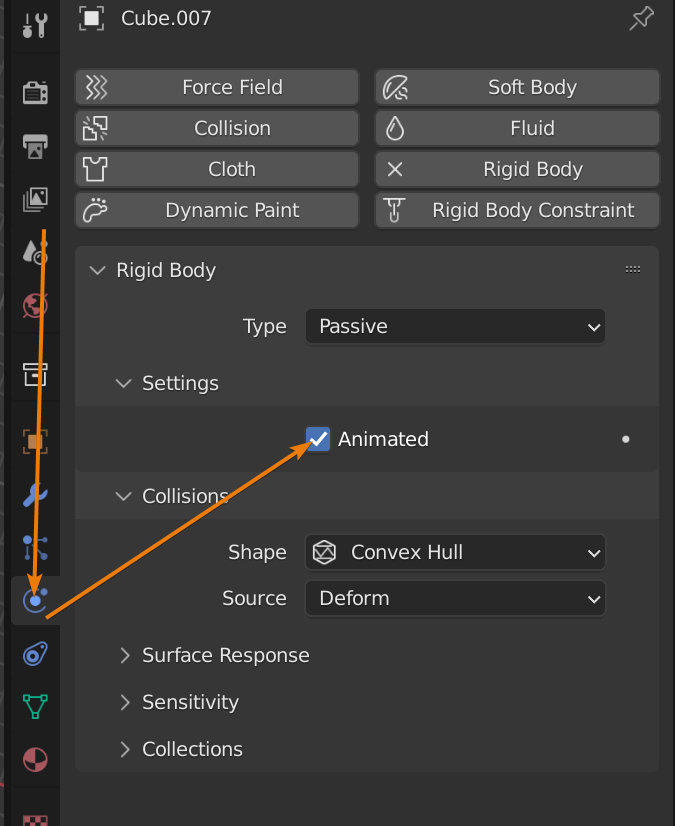
A passive rigid body object can still be animated and moved in real time as we play the simulation. But for a rigid body object to accept animation, we need to check the animation checkbox in the settings subsection.
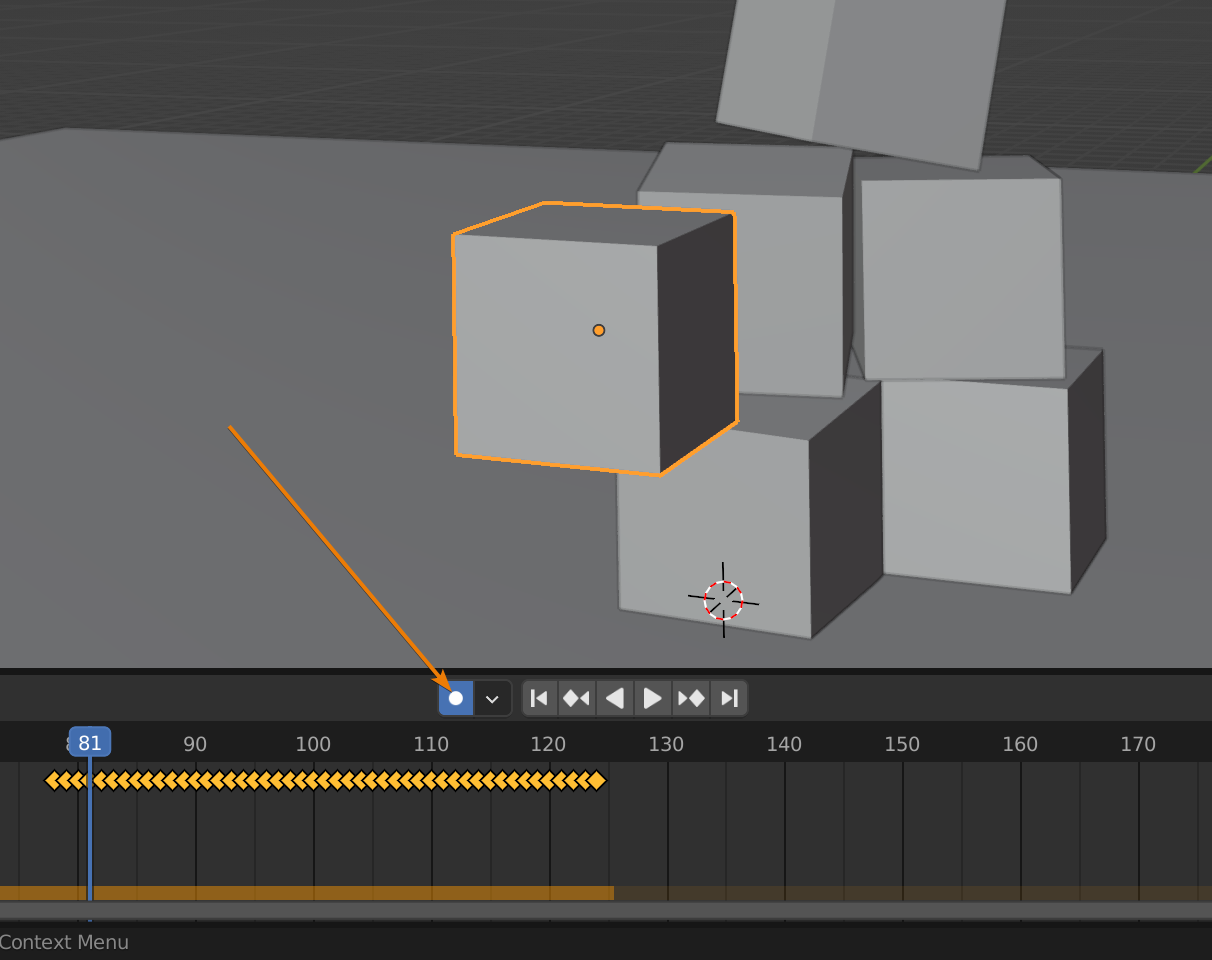
As we play the animation, we can now select a passive (or active) rigid body object that is enabled for animation and press G to move it and smash it into other rigid body objects manually to interact with the simulation.
If we, at the same time, have auto keyframe turned on, we can have Blender keyframe the movement of the object we move so that we can playback the simulation and the effect that our interaction has. You can find the auto keyframe toggle in the timeline editor, next to the timeline controls.
For a passive object, the only property we have in the settings tab is the animated checkbox. For active objects, we also have mass and a dynamic checkbox.
Unchecking the dynamic checkbox makes the object act like a static mesh object again. It does not participate in the simulation if this isn't checked. The reason for this setting is that we can easily animate it.
This means that we can change a rigid body object from participating in the simulation and not on the fly at every frame. To animate this checkbox, or any other that has the dot next to it, follow these steps:

In the image above, when the frame moves from 230 to 231 the checkbox will go from checked to unchecked and the object will stop participating in the simulation past this frame.
The last setting here is mass. It changes how much impact the object has when it hits another object in the simulation. It mimics how mass works in real life.
If you use real world scale, Blender can calculate the mass for you if you go to Object->Rigid body->Calculate mass
You will be presented with a lengthy list of real-world materials. Blender will use the size of the object to calculate the mass based on the material you choose.
From this menu, we can also reach many other features for rigid body simulation. For instance, we can make the selected object a passive or active rigid body object from this menu.
Let's move on and look at the collision settings.
The most influential collision setting is the shape. We don't necessarily use the objects mesh to calculate collision. Instead, we often use a simpler invisible shape to calculate the simulation against. Often an object is too complex to calculate physics and it would use unnecessary resources and slow down the process.
This means that we could have a cube mesh and set a sphere collision shape to have it tumble down a hill instead of sliding down if we wanted to. If an object doesn't collide in the way you expect, checking the collision shape is the best place to start.
We can choose from these collision shapes in Blender:
We can view the collision shape for the first five basic collision shapes of rigid body objects by going to wireframe mode with Shift+Z or by selecting it from the view modes in the top right corner of the 3D viewport.
The first five alternatives are basic shapes that are fast to calculate collisions and if performance is important, we should consider using these first. For instance, we might be simulating hundreds or thousands of objects, so each one doesn't need to be too accurate, but performance is important.
However, if accuracy is important, mesh, convex hull, or compound parent might be better options.
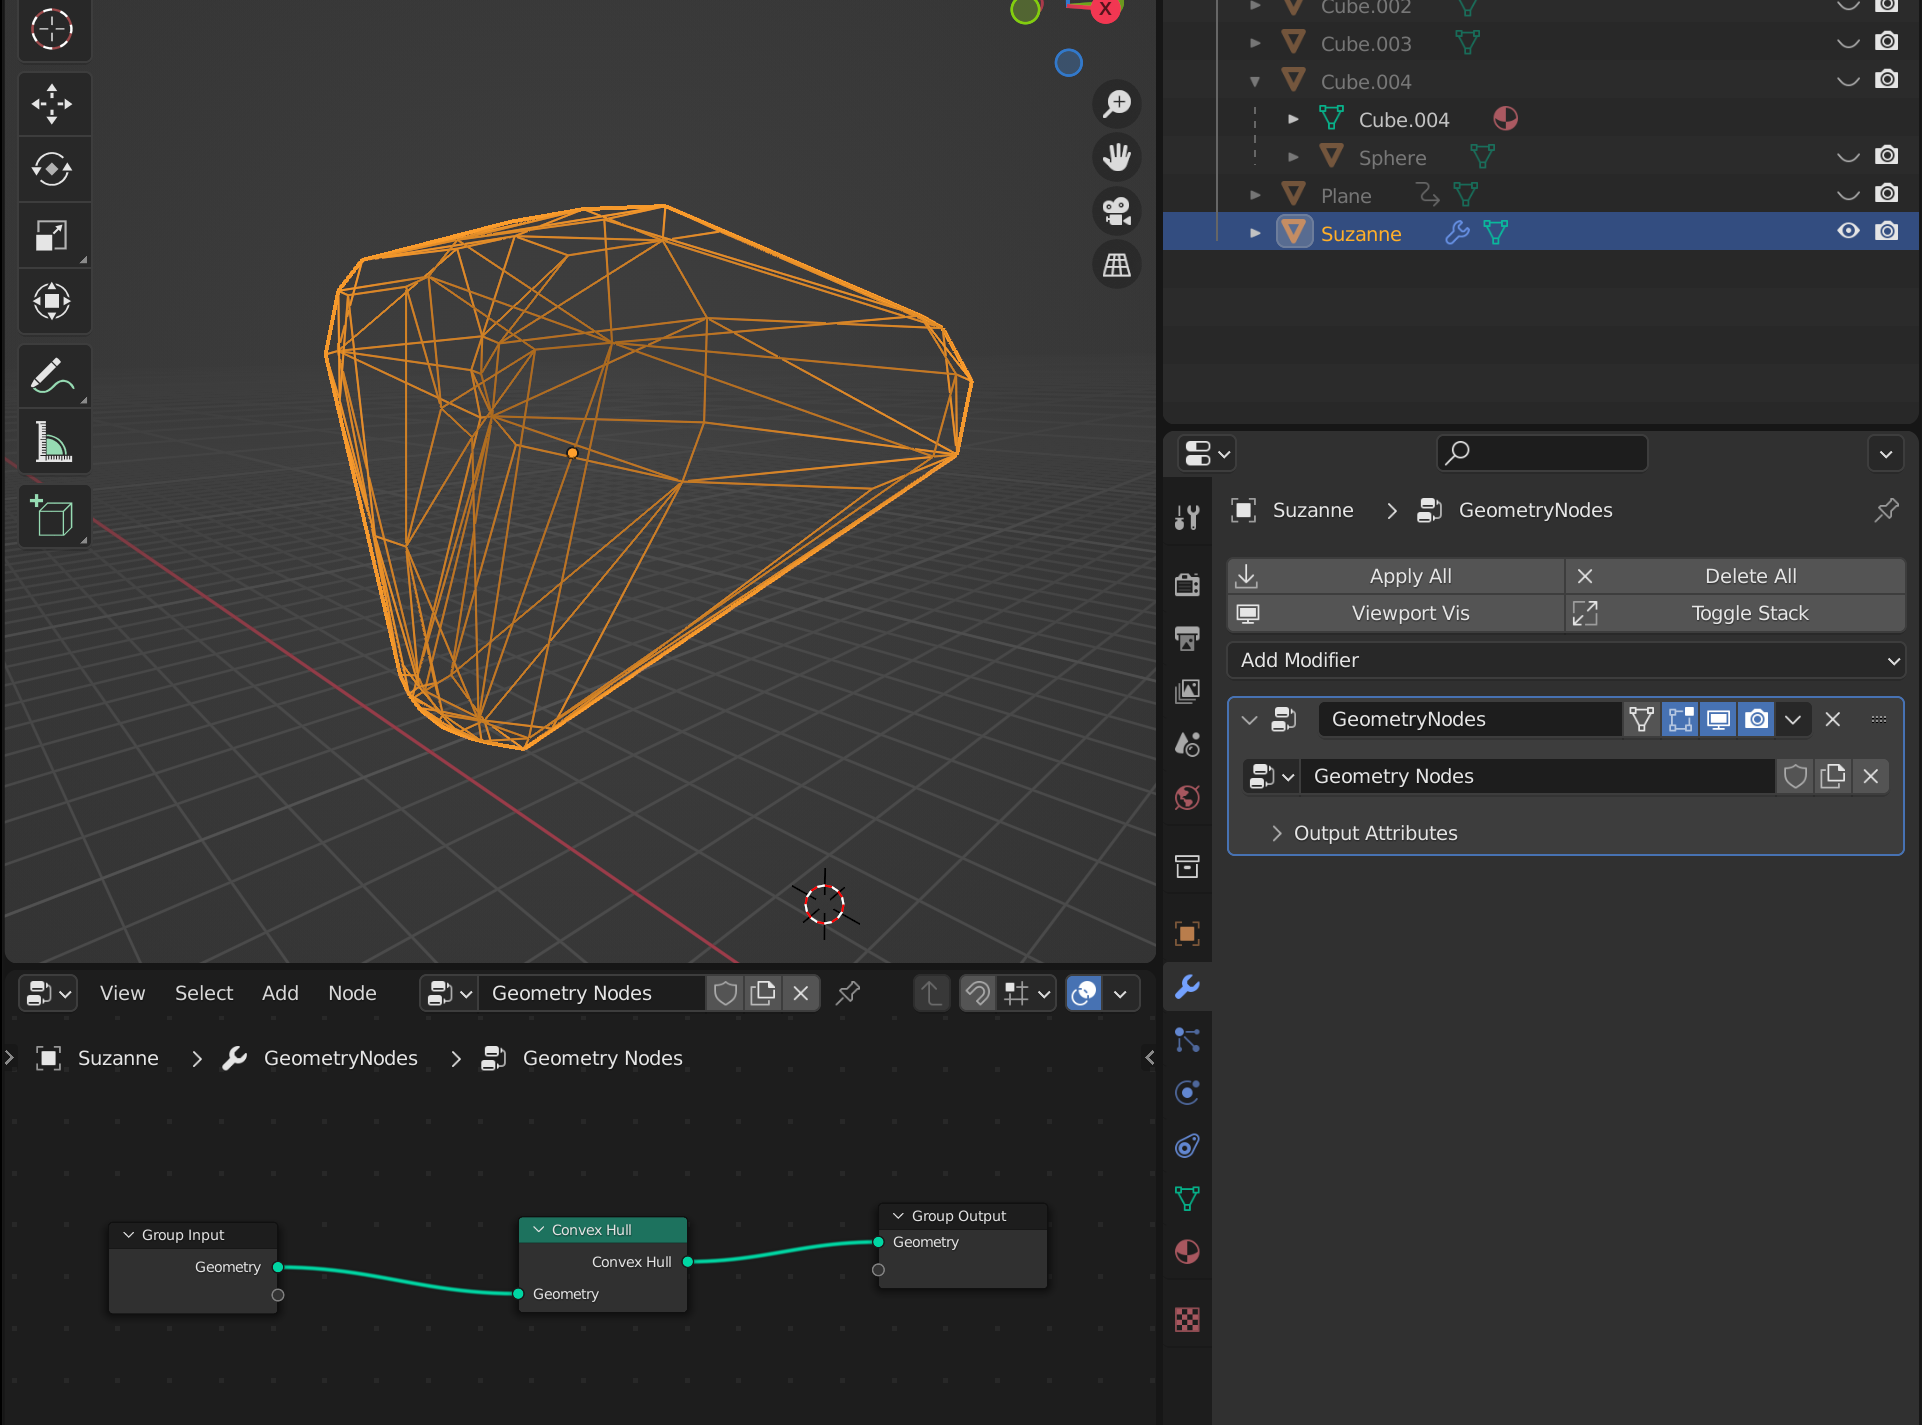
The convex hull option is the best of both worlds. It generates a collision shape based on the rough shape of the object. But currently there is no direct way to visualize a generated convex hull collision shape.
However, there is a workaround with geometry nodes that allow us to visualize it temporarily as outlined in this StackExchange question and answer.
External content: StackExchange Visualize covex hull collision shape
We add a geometry node tree to the modifier stack and open a geometry node editor. Press Shift+A and search for "convex hull". Add the node between the input and output nodes in the graph and the mesh will turn in to the collision shape.
Related content: How modifiers work in Blender, an overview
The collision shape is now the actual geometry output for the object, so make sure to remove the geometry node from the modifier stack before rendering.
Let's move on to the mesh collision shape. With it, the actual mesh is triangulated and used instead. With both collision hull and mesh as the collision shape we get another setting named source.
The source setting has three options:
The base uses the base mesh that you have in edit mode. The deform option adds support for shape keys and deformation modifiers and final allows the complete mesh output after the entire modifier stack has been calculated.
Related content: Blender shape key basics guide
If the rigid body is deforming during the simulation, you can use the deform option together with the deform is checkbox that appears when we have both mesh as the collision shape and deform as the source.
Next is the surface response settings. Keep in mind that you have to adjust these settings for both colliding objects.
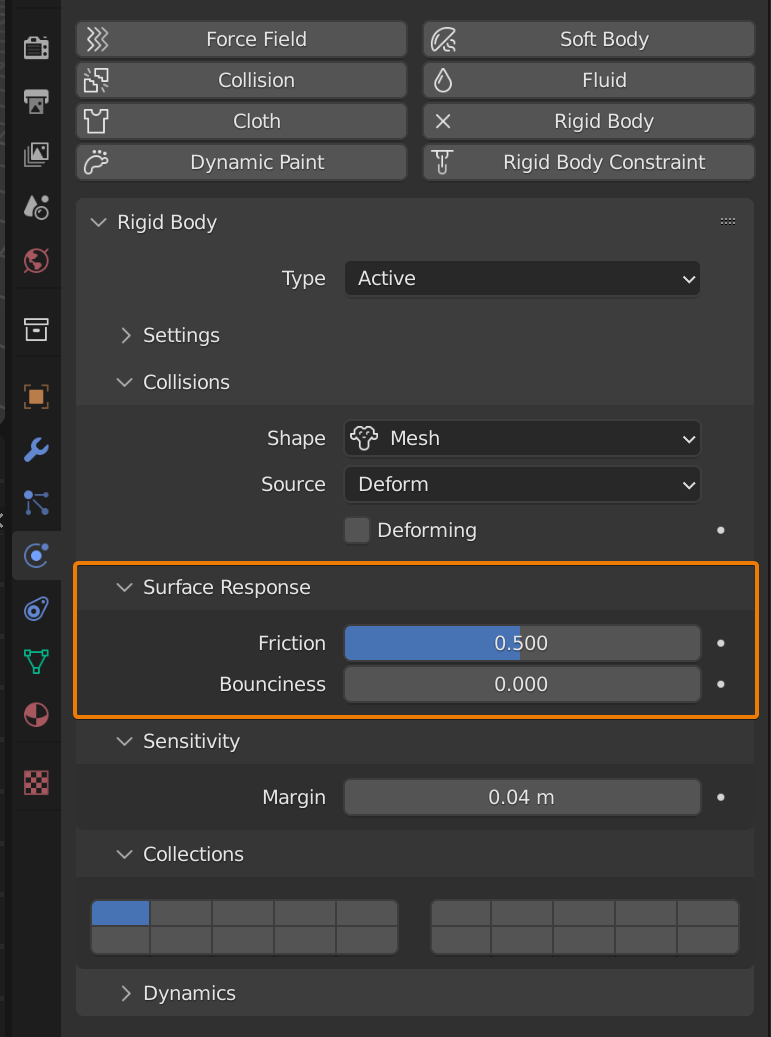
The lower the friction is the more an object will slide against another. Higher friction will make objects come to a halt quicker. Pretty self-explanatory. Bounciness therefore makes more bouncy objects the more bounciness is applied.
These are values that you will have to play with to get the right feeling for your simulation.
Next is sensitivity and the only parameter is margin. The margin isn't meant to set a value for a gap between objects when colliding. It is a technical parameter that can help the simulation to become more stable and perform better if setup correctly.
The Blender manual says that the margin is either embedded or leaves a gap. These shapes embed the margin:
With an embedded margin there is no gap created between the colliding objects, instead the collision shape is shrunk, and the margin takes up the remaining space. So, the total size of the collision shape does not change.
With the other collision shapes, such as cone, the margin creates a gap between the colliding objects.
We can read that a passive type object with a mesh collider can have a margin of 0 in most cases while it should not be zero for other types and shapes.
External content: Blender manual
Last in the collision settings is the collections, this is different from the collections we have in the outliner.
Related content: How to work with collections(layers) in Blender's outliner
We call these collections rigid body collections. Here we can tell the simulation that only certain groups of objects within the simulation can collide with each other.
There can be up to 20 different groups and any rigid body object can be part of one or more groups. Just click a group to make the object a member and shift+click to add an object to multiple groups.
Dynamics is only available for active rigid body types. The frist two settings are Damping for translation and rotation. These refer to linear velocity and angular velocity.

If an object is launched through the air, the damping translation is how much resistance the object is experiencing and therefore how fast it will move. With a high value, like 0.9, the object can feel sluggish, like it is moving through syrup or honey.
The rotation refers to angular velocity and the more dampening applied the more resistance the object will have for spinning and rotation. However, don't quote me on any of this for your physics homework. This is simply my conclusion after testing.
Next, we have the deactivation subsection. Here we can deactivate the objects dynamics. Note that this refers only to the dynamics, that is, linear and angular velocity. We can still push the object around, but it won't gain any momentum on its own. As soon as another rigid body object stops pushing, it will just stop.
The linear and angular velocity settings here are thresholds. When the rigid body object spins or is launched at the threshold speed, the dynamics will be deactivated, and the object can only be pushed by other objects.
There is also a "Start deactivated" checkbox to simply start the rigid body object in an inactive state when we hit play.
In a rigid body simulation, we often want to change the same setting for a lot of objects at the same time. If we added 100 copies of an object to our scene, and we want to set them up to behave in the same way in the rigid body simulation.
So far, we have only changed settings for one object at a time. To change the settings for multiple objects we can use a few different techniques.
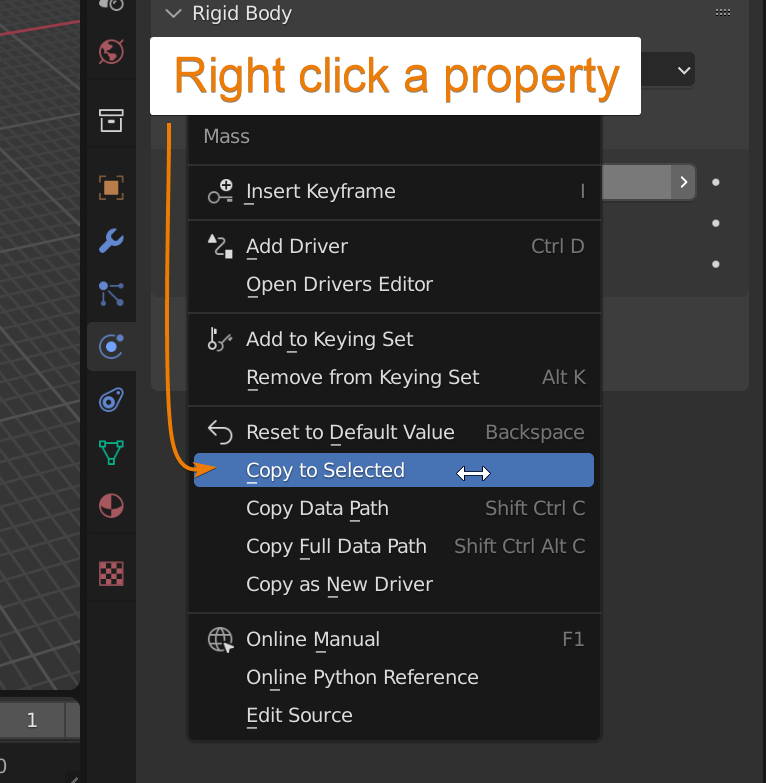
In short, you can either select all objects you want to apply the setting to and Shift+click the object you want to copy from to make it active, in the properties panel, you then find the setting, right click it, and choose "copy to selected".
The other way is to go to the rigid body menu through "Object->Rigid body" in the 3D viewport. Here we can for instance choose "add active" to make all selected and the active object a rigid body object of the type active. Same goes for passive.
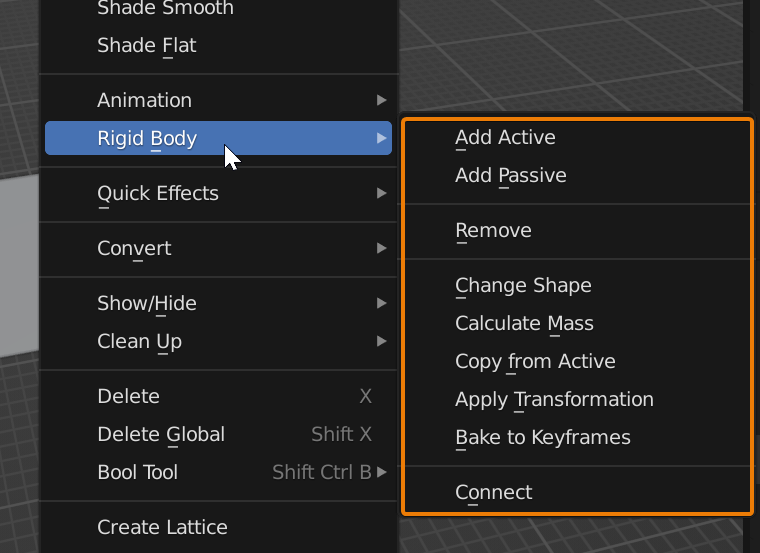
We can also use "copy from active" to copy all rigid body settings from the active object to all selected objects.
A note here though, when we say "copy from active" or "copy to selected" we are not talking about the rigid body type of active. We are talking about the active object as in the last selected object, the object with the lighter orange outline in the 3D viewport.
Related content: How selecting works in Blender
Here are a few examples:
To make all selected objects a rigid body object follow these steps:
To remove the rigid body from all selected objects, follow these steps.
To copy all rigid body attributes from one object to many follow these steps:
To copy a single property from one rigid bidy object to many follow these steps:
A rigid body world holds the parameters that are global for the entire rigid body system within a scene. These are things like, how impactful forces should be, the speed of the simulation and some more technical settings like how often the calculations of the simulation should run.
When we make our first object a rigid body object a rigid body world is added into the scene automatically.
We can access the rigid body world settings by going to the scene tab in the properties panel.

Expand the rigid body world section to see the available settings. You will find three subsections.
In the settings section, you will find these settings:
Let's cover them.
The collection parameter takes a collection as input. For an object to be part of the rigid body world, it needs to be in this collection.
When we add our first rigid body object, a rigid body world is added, a collection is also added called "RigidBodyWorld". We cannot see this collection in the outliner if we don't switch it to show orphan data. But any object that we turn into a rigid body is automatically added to this collection to be included into the rigid body world.
The constraints setting is like the collection settings, but instead of the objects in the rigid body world, it contains the constraints objects. These are for the most part empties that connect two objects with a rigid body constraint.
Next, we have a speed parameter, this allows us to change the speed of the simulation. Often, we need our rigid body simulation to be larger than the real-world scale. In those cases, the simulation can appear to be in slow motion. We can increase the speed to precent this and bring it into a more sensible speed for the scale of our simulation. This parameter can also be animated to move in and out of a slow-motion effect.
The next three parameters are more technical and dictate how the simulation updates.
The checkbox, split impulse limits the force that objects produce when colliding with each other within the simulation. Personally, I haven't found that it makes any difference. But according to the manual it can make the simulation less stable but also allow simulations to occur on a smaller scale.
External content: Blender manual, rigid body world
The substeps per frame and solver iterations decide how often the simulation should be recalculated. The higher the more accurate the simulation will be, but at the cost of performance.
The solver iterations is the same as substeps per frame but it controls the calculation for rigid body constraints while substeps per frame handles the steps of the actual simulation. However the solver iterations can also increase stability when stacking multiple rigid body objects on top of each other.
If a stack has a tendency to fall over before anything has acted upon it, one option is to increase the solver iterations.
On the other hand if objects tend to move through each other, increase the substeps per frame.
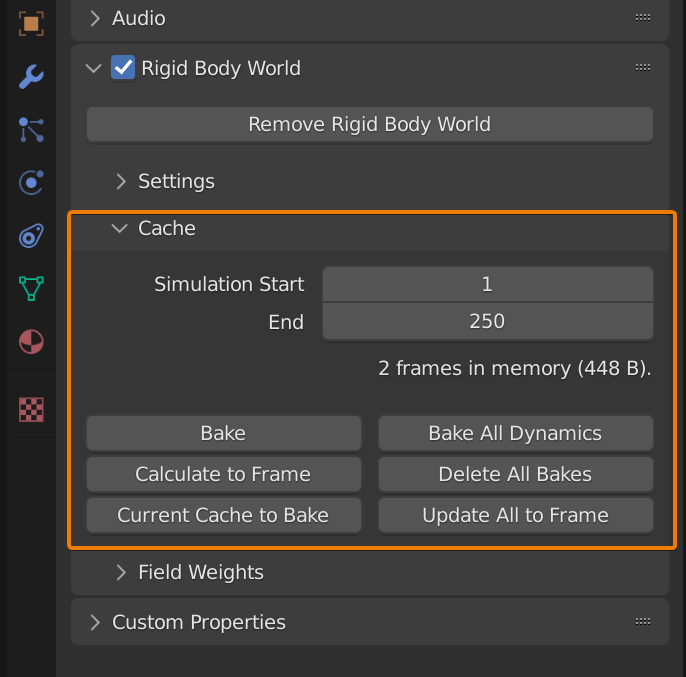
The cache settings allow us to bake the simulation to disk so that we can play it back in real time. If we don't do this Blender has to calculate the simulation in real time as we play it. This can become quite performance intense when we have complex simulations.
As we playback a simulation in real time you can see in the timeline that the simulation data is saved in memory for faster playback. If we make a change to the simulation this bar changes color to indicate that the cached data is outdated.
If we then play the animation again the bar once again fills up. The data that Blender saves as we run the animation is saved to RAM. If we want to permanently keep the data, we bake it, and Blender moves the data from RAM to disk and stores it inside the blend file.
Your blend file needs to be saved to disk for this to work as intended.
From the cache panel, we can choose to bake in several ways. By pressing the bake button, we will bake the rigid body simulation from the start to the end frame. After that save, your blend file to save the bake to disk.
We can set our play head to a frame in the timeline and choose calculate to frame. This will calculate from the start frame to the selected frame.
If we have played the simulation and cached frames, we can choose "current cache to bake" to move those frames from cached to bake. Then save the blend file to save the bake to disk.
If we press Bake all dynamics, Blender will bake other simulations as well, so if you also have a fluid simulation or a cloth simulation in your scene for instance, Blender will bake them all.
"Delete all bakes" will delete all baked data for the rigid body world and for all other simulations in the scene, while delete bake will delete the bake in the current simulation.
The last subsection in the rigid body world settings is the field weights. Here we can decide how impactful each type of force should be, including a slider for all and for gravity. The sliders go from zero to one indicating full effect or no effect. But if we type in a number the value can be set anywhere from negative 200 to positive 200 to amplify any effect.

The effector collision slot tells the rigid body simulation if forces need to be in a specific collection to be considered for the simulation.
So, what can go wrong when we use the rigid body simulation system? Here are a few common issues that you may come across.
By default Blenders timeline end frame is set to 250 frames. So, this problem is not related to the simulation. To extend or change the duration of the simulation go to the output tab in the properties panel. That is the white printer looking icon.
In the frame range section, look for the "end" parameter and change it to the number of frames you want the simulation to last.
In some cases, our simulation can seem to explode into a furry of flying objects. If this happens there can be several causes.
It is likely that you have configured one or more values too high or too low in relation to another value. It can also be that your simulation is scaled too small or that the simulation isn't calculated often enough, making a value suddenly spike.
First check so that your simulation is on a large enough scale. If it is in the scale of centimeters, change it to meters to see if that solves the problem.
If that doesn't help, check the collision shapes of your objects, and make sure that they are what you expect. Also check the margin in the sensitivity subsection of the rigid body settings. Also keep in mind to check both objects that are colliding.
If objects pass through each other in your simulation, go to the rigid body world settings and change the substeps per frame setting to something higher. The default is 10, you can try to increase this to 30 or 50 or even higher. Just beware that the substeps per frame setting heavily impact performance. It is how often the simulation is calculated.
If your object is stuck in mid air, first make sure that it is of the rigid body type active. Next make sure that the "dyanmic" checkbox is turned on and that "Animated" is turned off.
After that you can check in the dynamics subsection to make sure that dynamics isn't deactivated. If it is, your object won't move if it isn't pushed by another object. Also make sure that the damping translation and rotation isn't set too high.
If this happens, move your timeline playhead to frame zero or one.
By now you should have a good understanding of how rigid body simulations work. We have covered what they are, how we set them up and most settings related to each individual object and the rigid body world.
What we didn't cover was rigid body constraints.
Thanks for your time.
