


When I first started out using Blender, empties were a completely foreign topic to me. I had no idea why they would be useful. Today, I can't remember when I last did a project that didn't involve empties.
An empty object is often just called an empty in Blender or empties for multiple empty objects. An empty is an object with nothing inside of it. It is a representation of a single point in 3D space. 3D artists often use empty objects as reference points. For example, by parenting other objects to empties, using them as reference point in procedural modeling or as an external controller for one or more parameters.
They are extremely useful for creating a single point of control. The transform values of an empty can be mapped to any other parameter. For instance, you can have the distance between two objects change depending on how many laps you rotate an empty object.
While that in itself isn't very useful, there is no limit to how many parameters or how complex the math leading up to the position or rotation of an empty could be.
While we won't dive into anything advanced in this article, we will cover the basics of empties and give some examples of common use cases.
Most object types are containers that contain various kinds of data. An empty on the other hand, is an object type that doesn't contain data. Therefore, in Blender, called an empty. Instead, an empty at its core is an object representing a single point in space. A point with three values, one for each axis in a 3D world. X, Y and Z.
While at first, an empty doesn't sound like something incredibly useful. It is one of the most used object types. We can use an empty in many areas of Blender. For instance:
When modeling, many of Blenders modifiers support input from an object, this is often an empty object we use to manipulate the behavior of the modifier. For instance, the array modifier can use the position of another object to determine the distance between objects or how many objects should be in the array.
Related content: Top 10 Blender modifiers and how they work
In shading, we can use an empty object in a shader to set a single point in space as a custom vector to be used as a starting point for textures to be mapped from. We can use the object output for this from the texture coordinate node as an example.
Related content: The complete beginners guide to Blender nodes, Eevee, Cycles and PBR
In animation we can use an empty in a modifier like the displacement modifier and use an empty to map the texture coordinates. If we then animate the position of the empty over time, we animate the displacement. This could be used to create water effects as an example.
Related content: How to use displacement in Blender
For rigging, there are two kinds of rigging, mechanical rigging and rigging with armature and bones. Mechanical rigging makes heavy use of empties to create joints or keep track of a point in space to animate around.
We can also use an empty to organize our scenes and objects. Imagine having a complex object with many parts. Each part could be its own object and we can then parent all the objects to an empty so that we can control all the individual parts as a single object.
Related content: How parenting works in Blender
As you can see from these examples, there are many cases were we can use empties and there are even more options that I haven't mentioned yet. For instance, empties are the base for creating reference image objects in Blender.
Related content: How to set up background reference images in Blender
On another node, we can have an object, such as a mesh object that doesn't contain any mesh or a curve object that doesn't contain any curve or other kind of data. But that doesn't make them an empty object even if they are "empty". They still maintain their object type. The data these kinds of objects can hold can still be added to them.
Empties are their own object type with their own characteristics. They can't even be filled with any kind of data or converted into another kind of object.
To add an empty in Blender follow these steps:
An empty object with a plain axes widget as the visual representation will now be added at the location of the 3D cursor.
Related content: How to use the 3D cursor in Blender
Plain axes is the most common visual representation of an empty, but we can use any of the other kinds. The only difference is how it is visualized in the 3D viewport. The functionality is the same. A single point in space. Here is a list of all the options.
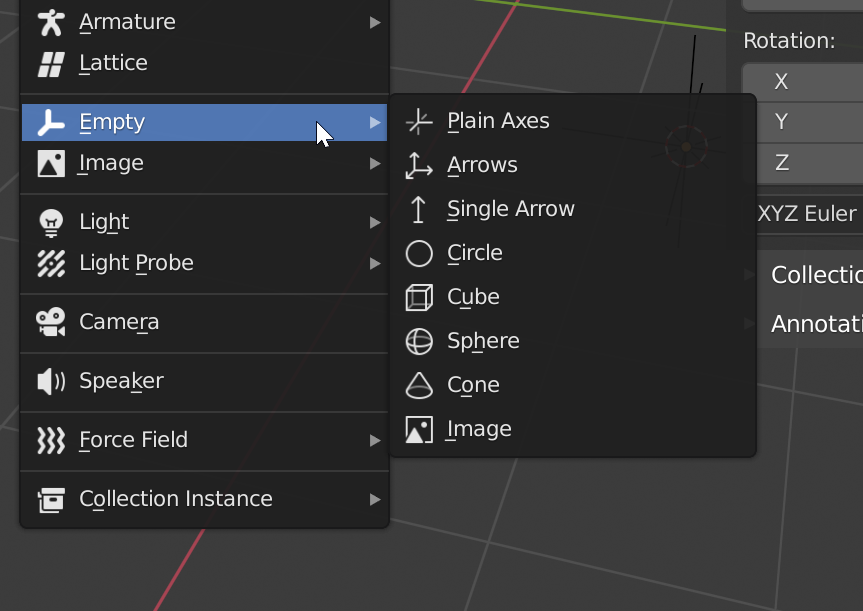
Below the empty category, there is also an image category, these are also empty objects but setup with the image display option and Blender automatically opens a browser for us to select an image to use as the visual representation. Otherwise, all these options are the same.
We can transform an empty just like any other object using the Grab, Scale and Rotate tools. Either from the tools panel or using the shortcut keys, G, S or R.
Empties also work together with the control options found in the middle of the 3D viewport header such as proportional editing, snapping, transform orientations and transform pivot options.
Related content: How to center objects, origins and pivot points in Blender
Related content: How to use snapping tools in Blender
An empty only has object mode available. This is because all other viewport modes in Blender are designed to work with the data contained in various object types. But empties don't have any data contained in them and are therefore limited to object mode.
Same is true for lights and camera objects, but these kinds of objects have other purposes and therefore other settings at the object level. In the case of lights, they can also have other kinds of data attached that isn't related to the 3D viewport. For instance, light node setups.
Related content: Blender: lighting basics tutorial
Related content: How to move the camera in Blender
Related content: 5 cool camera tricks in Blender
The only settings we have for an empty object is the visual representation and the size of it.
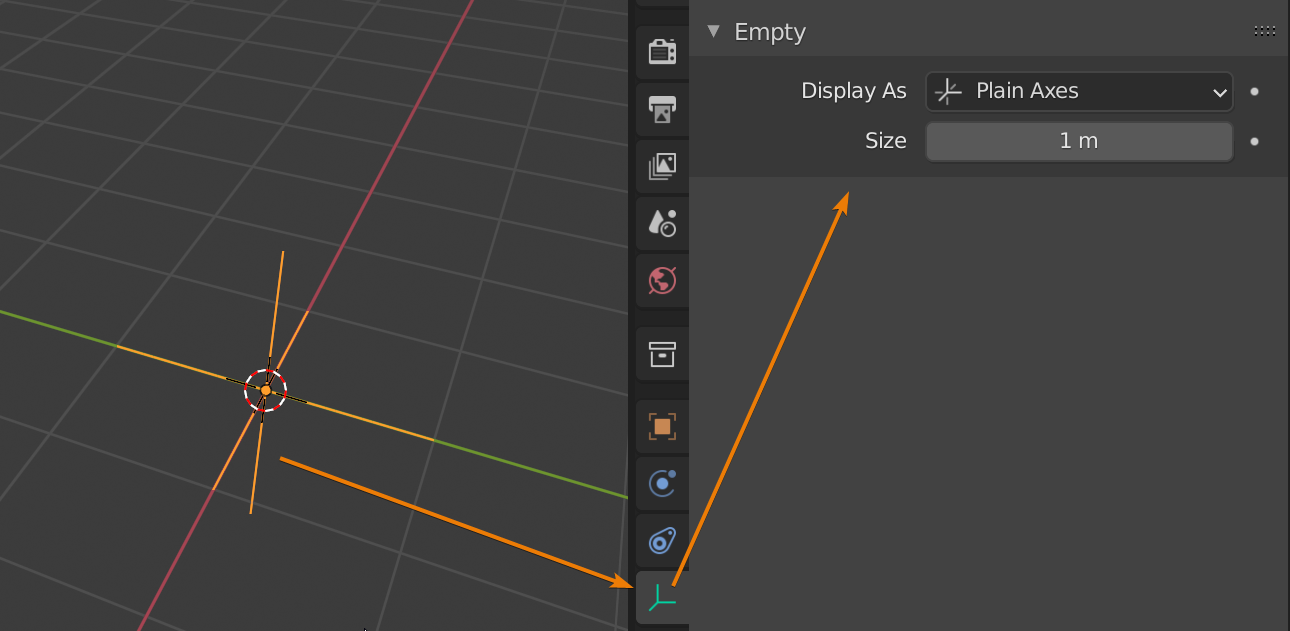
However, if you set the visual representation to image, we can use it to bring in reference or background images that won't show up in our final render. In this case the icon tab changes from a green widget representation to a red image icon and settings for the image setup appears.

You can read more about setting up background reference images in this article.
Related content: How to set up background reference images in Blender
Now we will go over three examples of how to use empties in these basic scenarios.
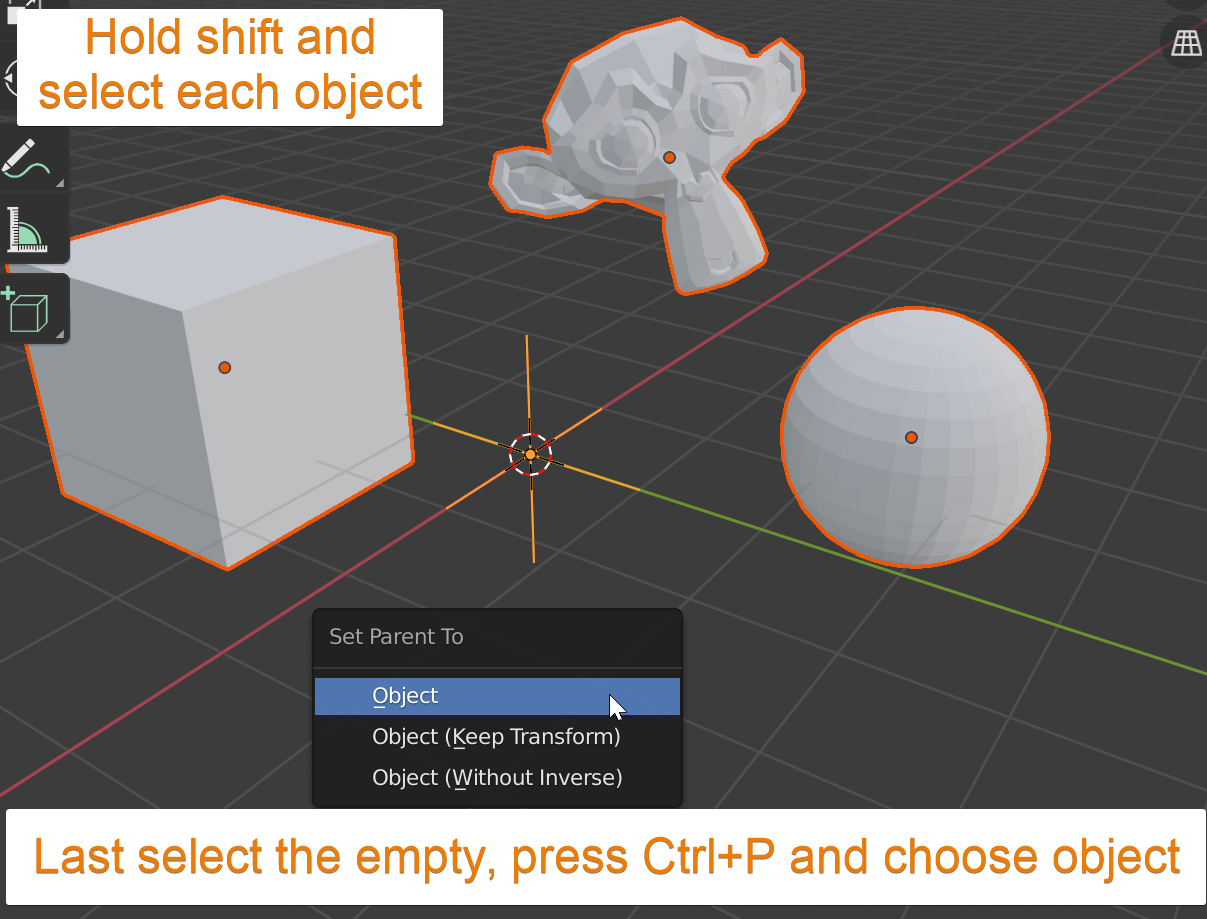
To use an empty as a parent object, hold shift and select each object you want to make a child of the empty. Then while still holding shift select the empty last so that it becomes the active object indicated by the lighter outline of the last selected object.
Then press Ctrl+P and choose object.
When you have parented the objects, if you transform the empty, the children will follow the transformation. There is also a dotted relationship line between the child and parent object and in the outliner, the children will be displayed below the parent in the hierarchy.

To unparent an object, select the child, press Alt+P and choose clear parent.
You can read more about parenting here:
Related content: How parenting works in Blender
We start with an object that we want to array. This is most likely a mesh object, but could also be another kind such as a curve or text object. In this example, use a cube.
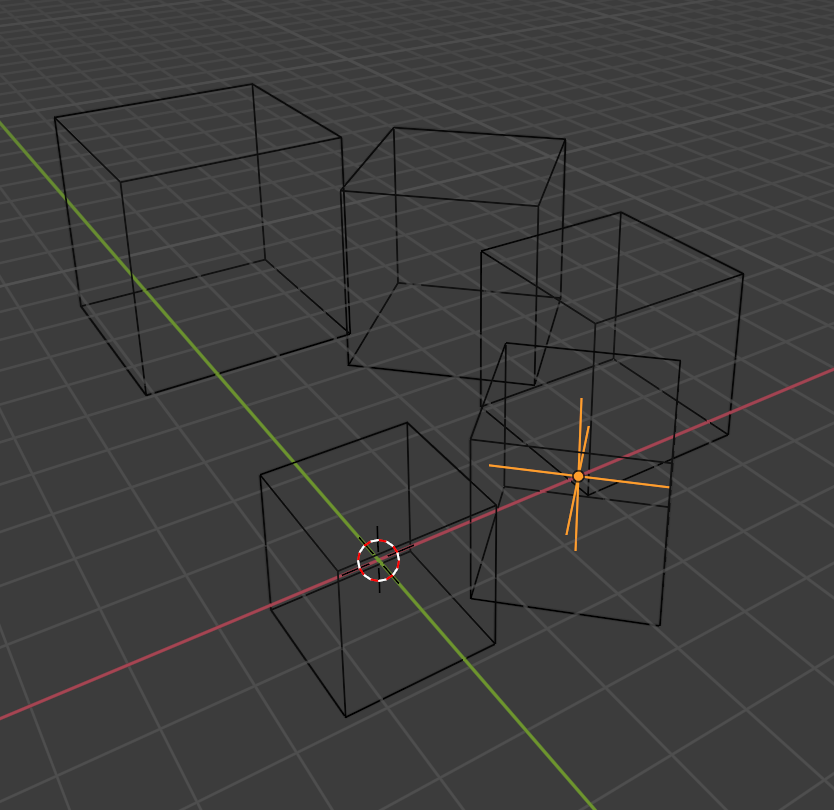
Go to the modifier tab and add an array modifier. , set the array modifier count to 5 uncheck relative offset and check object offset.
Add an empty to the scene at the same location as the cube, then select the empty as the object in the array modifier. Then move the empty 3 units on the X direction.

What is happening here is that the distance between each array is decided by the distance between the cube's origin point and the empty's origin point. Meaning that there will be a copy of the cube with the distance between each copy's center of three meters.
We can also scale and rotate the empty to create a radial array and change the scale for each copy.
Here I have scaled the empty by 1.2 and rotated it 45 degrees on the Z axis. For each copy the scale and rotation is applied just like the addition to the position. This may seem simple but to create complex looking art, it is really a matter of piling up a lot of simple tricks.
In this article we covered empty object otherwise known as empties. We learned that they are incredibly simple objects that are simultaneously very useful in many situations. We looked at how to add them, what they are and how we can use them from a theoretical perspective. We also took a dive into a couple of examples.
Thanks for your time.
