


In this article we are going to cover how to assign materials to an object. How to assign multiple materials to different parts of the mesh contained inside the same object and assigning the same material to multiple objects. Let's get right into it and start with the basics.
To assign a new material to an object in Blender, follow these steps:
Let's get into it the other ways we can assign materials.

Above, we essentially covered how to create a new material. We need to have an object that we create and assign the material to. We do both in the same process.
If we have a material readymade, perhaps we appended, linked it or pulled a material in through the asset browser. You might also simply have created a material on another object.
Related content: How to use the asset browser in Blender
In those cases, we have a material available in our scene, but it is not assigned to an object or atl east not to the object we want it assigned to.
To assign an already existing material to your object, follow these steps:
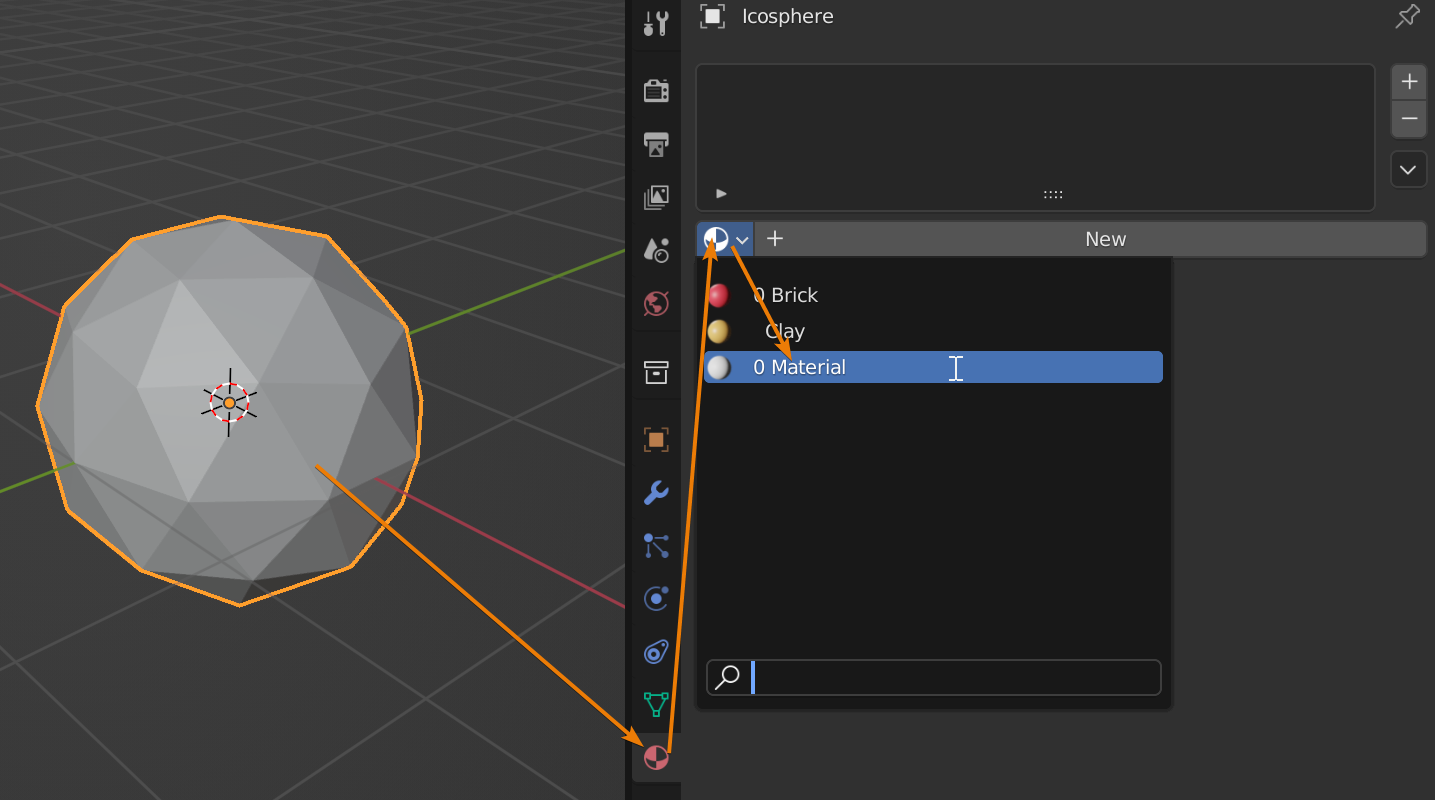
Now, you might already have one or more materials assigned to your object. In that case you first need to press the plus sign on the right side of the material list. This will create a new material slot that can be populated by a material.
Make sure that the new material slot is selected, it should be by default when you just added it, then press the "new" button to add a new material to the slot. You can also browse for an existing material using the material icon.
While in the material tab, you can expand the surface section to start to make changes to your material.
For a full beginners guide on how to create custom materials using the shader editor, you can read this guide.
Related content: The complete beginners guide to Blender nodes, Eevee, Cycles and PBR
By the way, if you need materials to get started you can check out our free texture library guide here:
Related content: Top 32 free texture libraries for Blender and 3D artists
And for those that lean more towards procedural materials, I can recommend this course by Creative shrimp.
External content: Blender market - Procedural texturing course
All of their courses are really high quality and to the point. Highly recommended.
It is also worth mentioning that if you have the shader editor open at the same time and change the material in the header of the shader editor. You not only switch what material that is being viewed in the shader editor, you also swap the previously viewed material for the new material on your object.
You can see this change if you have the material tab open in the properties panel while making this change. You will see the name of your material switch to another in the list.
If you have multiple objects in your scene that you want to assign the same material to it can be tedious to select every object and individually assign materials to them. There is an easier way.
If you prepare one object with the material you want assigned to multiple objects, you can then link or transfer the materials from that object to multiple other objects at once.
To assign one or more materials to multiple objects follow these steps:
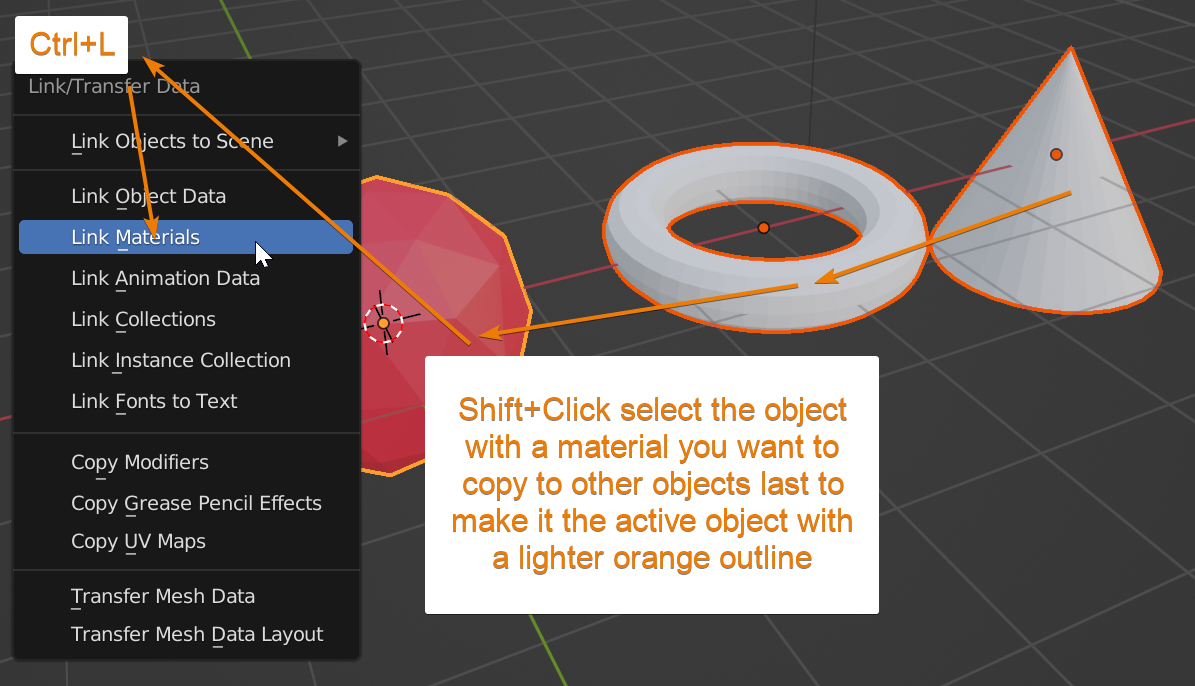
All objects you selected will now have the same materials as the active object that you prepared to have its materials transferred.
Since we can have multiple materials assigned to the same object, we also need a way to assign different materials to different parts of an object.
We can do this in edit mode by selecting the faces we want a particular material assigned to and manually tell Blender what material each face or group of faces should have.
By default, Blender will assign the first material that we add to an object to all faces. Before we can assign different materials to different faces we need to add at least two materials to our object by following the instructions above.
When we have two or more materials assigned to our object, we can follow these steps to assign the different materials to different faces:
If you are not sure how selections work in Blender, you can read this guide.
Related content: How selecting works in Blender
As you can see, while we are in edit mode, we have three additional buttons in the material tab. Assign, select and deselect. The selection buttons can be helpful if you need to select all faces with a particular material assigned.
In this article we looked at basic material assignment. We learned that we can assign and create materials at the same time or use the same material on multiple objects.
We also looked at how we could link a material from the active object to multiple other selected objects. At last we also explored how we can assign different materials to different faces in the mesh.
There is a lot more to explore when it comes to materials in Blender. Here I will link a few articles that can be interesting as you continue to explore this topic.
Related content: The complete beginners guide to Blender nodes, Eevee, Cycles and PBR
Related content: How to add a texture to an object in Blender
Related content: PBR and the principled BSDF shader explained
Related content: Mixing materials and textures in Blender
If you made it this far, also make sure to check out our E-Book.
Related content: ArtisticRender's Blender E-Book
Thanks for your time.
