


Mixing materials and textures is essential for creating stunning shading results in Blender. There is rarely a single clean material that on its own can capture the essence of a surface and therefore mixing becomes a crucial part of the shading workflow.
This is how we can mix materials in Blender:
If you are completely new to materials, nodes, and shaders I suggest that you start by reading these articles before coming back here:
Related content: How to add a texture to an object in Blender
There are an infinite number of ways we can mix textures and materials together in Blender. There are also slight differences between mixing textures and materials. We will start with a bird's eye view and then look into various levels of mixing and different mixing techniques at each level. So, let's jump into it.
There are several layers where we can mix materials in Blender. Let's start from the very top. For a single object we can add one or more material slots that we occupy with materials. We do this in the material tab in the properties panel.
To find it, select your object, go to the material tab in the properties panel indicated by a red sphere icon with a checker pattern. Located close to the bottom.
Here we have a list of the material slots added to our object. We can add as many slots as we would like, and each slot can have a single material attached. Click the plus icon next to the list to add a slot and add a material to the slot by pressing new below the list or by pressing the material icon to the left of the new button to add an existing material to the slot.
Each face on our object can only have a single material slot and therefore a single material. We can assign a material to one or more faces by going into edit mode, selecting the faces we want to have a certain material and pressing the assign button below the list of materials.
Related content: How selecting works in Blender
This is a limited way of mixing materials. There is no interaction between materials on different faces and different materials assigned to adjacent faces leaves a harsh line dividing the materials.
But while this method is limited don't neglect it and use a single material on all your objects at all times. It depends on how we choose to organize our objects. Take a car for instance. It is made up of several materials and pieces. In some cases, it might be suitable to have the car be represented as a single object while simultaneously using multiple materials for different parts of the car.
But then again, we might want to combine all of these materials into a single material on the car. We could do this in a process called baking.
Related content: How to bake textures in Blender
In other cases, we may want to represent the car using an object for every part of the car. Each part may then have it's own material.
The point is that we are not limited to either a single material or multiple materials. Just like we are not limited to representing something using a single object in Blender or multiple. It all depends on what goal we are trying to achieve and the workflow we choose to get there.
Let's move on. We can also mix different shaders inside a single material to have more dynamic control over what real-world material goes where.
Instead of assigning different materials to different faces, we can assign the same material to a group of faces or to the entire object and mix shaders inside the node editor for a more dynamic interaction between these materials.
For example, we may have a metal material, but it is also covered in dirt and rust. In reality these are three materials that we need to mix in some way to get the most realistic result possible. So, let's use this example and mix three different shaders using three different sets of PBR textures.
Related content: What is PBR and how do we use it in Blender?
I am going to texture a sphere using these three textures for our example.
External content: Poly haven - Rust Coarse 01
External content: AmbientCG - Metal 003
External content: CGBookcase - Dirt 02
I also used this HDRI for lighting.
External content: Poly haven - Aircraft workshop 01
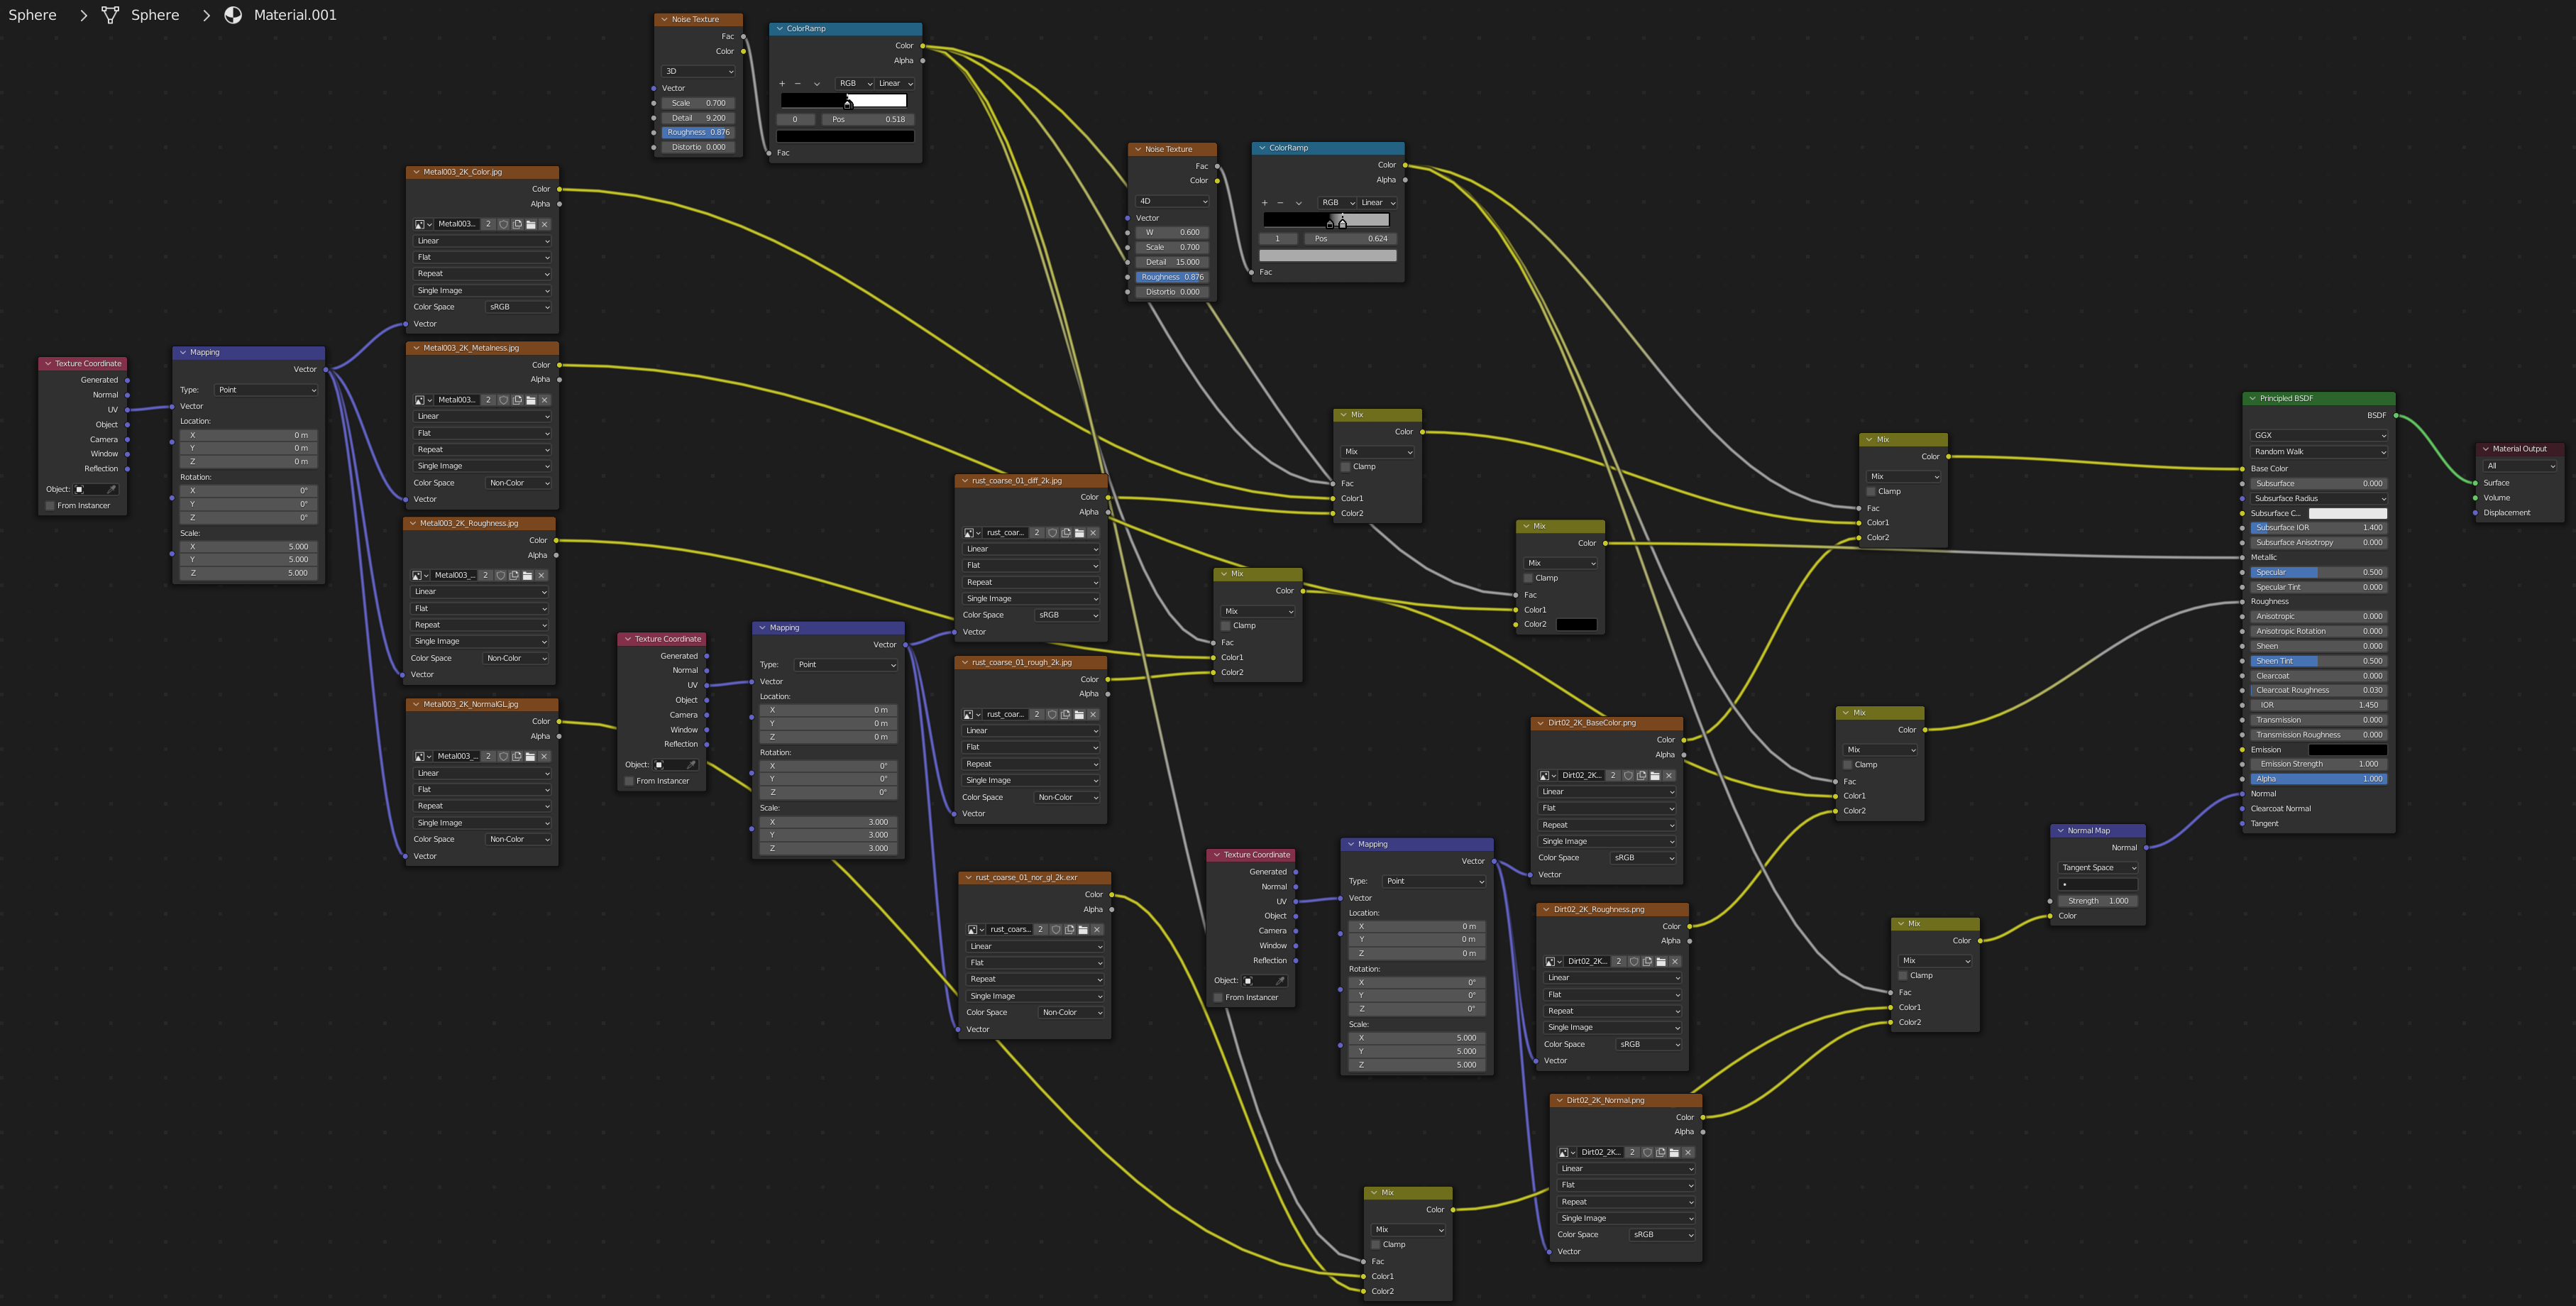
And here is the node setup we will end up with before we start mixing individual textures in the next section.
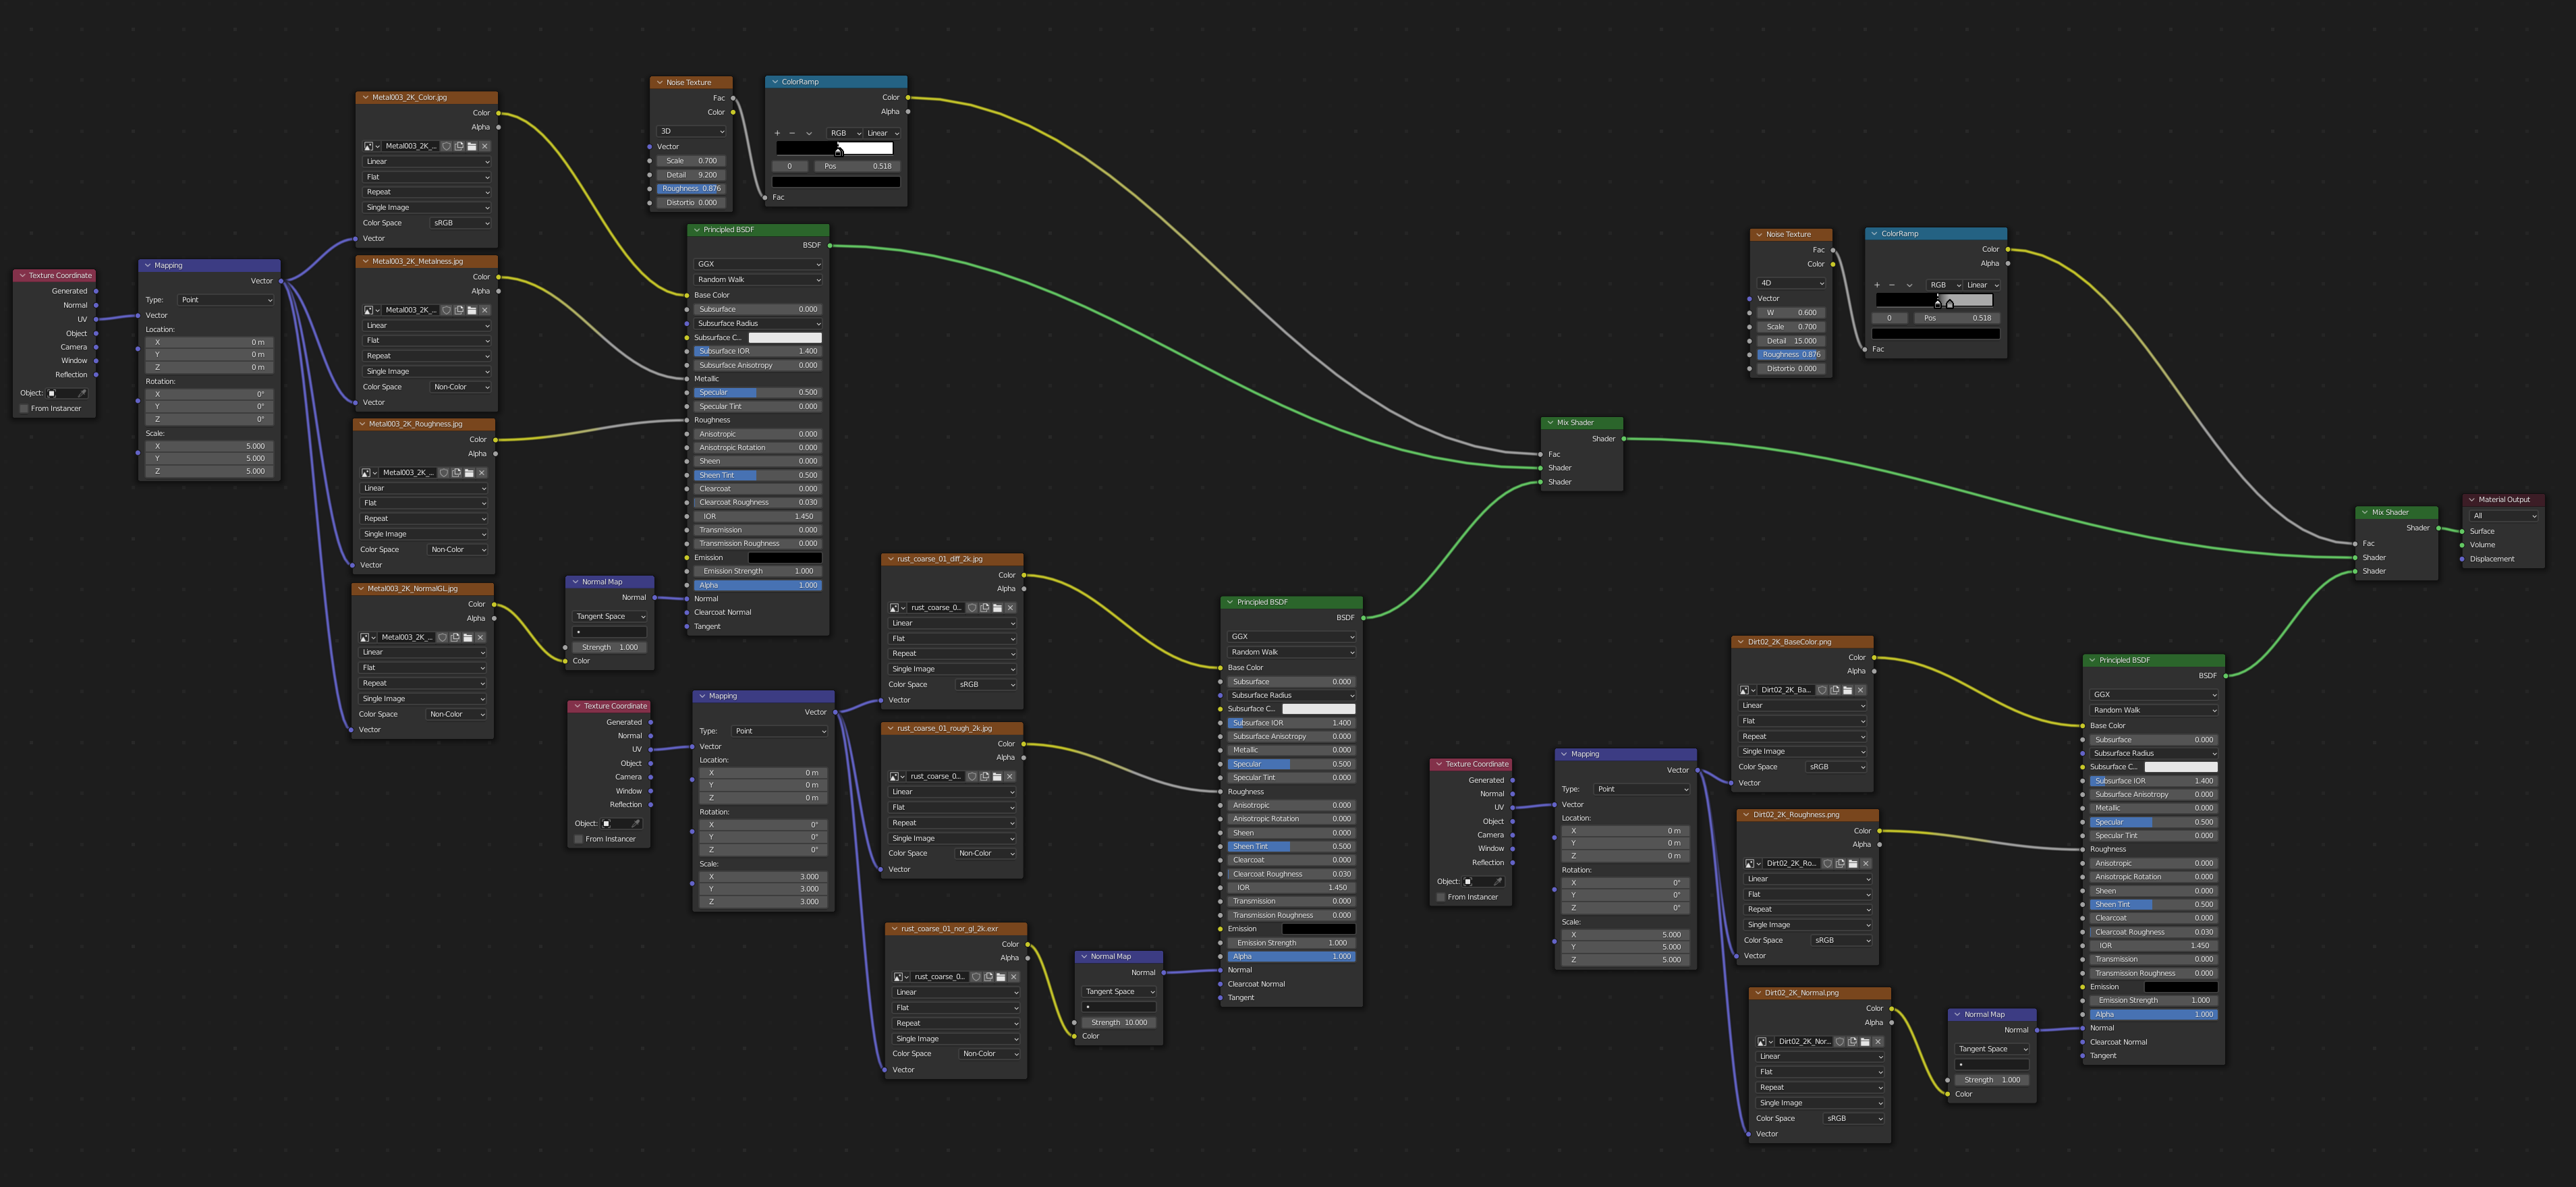
And the result will look like this.

It may look complex at first but much of what we are doing is just bringing in the PBR texture sets and connecting them to the principled BSDF shaders. Essentially repeating this pattern three times.
When mixing materials by assigning different materials to different faces, we were limited to one material per face.
Now we have zoomed into a single material, and we can control how it is going to mix across the entire surface assigned to that material.
In this case, we have taken three real world materials, a metal, a dirt, and a rust and set them up individually inside a single material in Blender.
Next, we mix these materials using a mix shader. The magic happens when we have different input in the fac input socket of the mix shader that mixes the principled BSDF shaders.
Related content: Physically based rendering and Blender materials
Since the fac input has a gray socket, it means that it takes a single value between 0 and 1 as input. This single value can vary across a surface. So we can input any grayscale texture and use it as a mask.
Any position that is black will get whatever shader is inserted in the top shader input slot and any position that has a white color will be shaded with the lower input slot.
For gray scale values there will be a mix between the two shaders.
Our first mask created by using the noise texture and a color ramp looks like this when applied to the sphere.
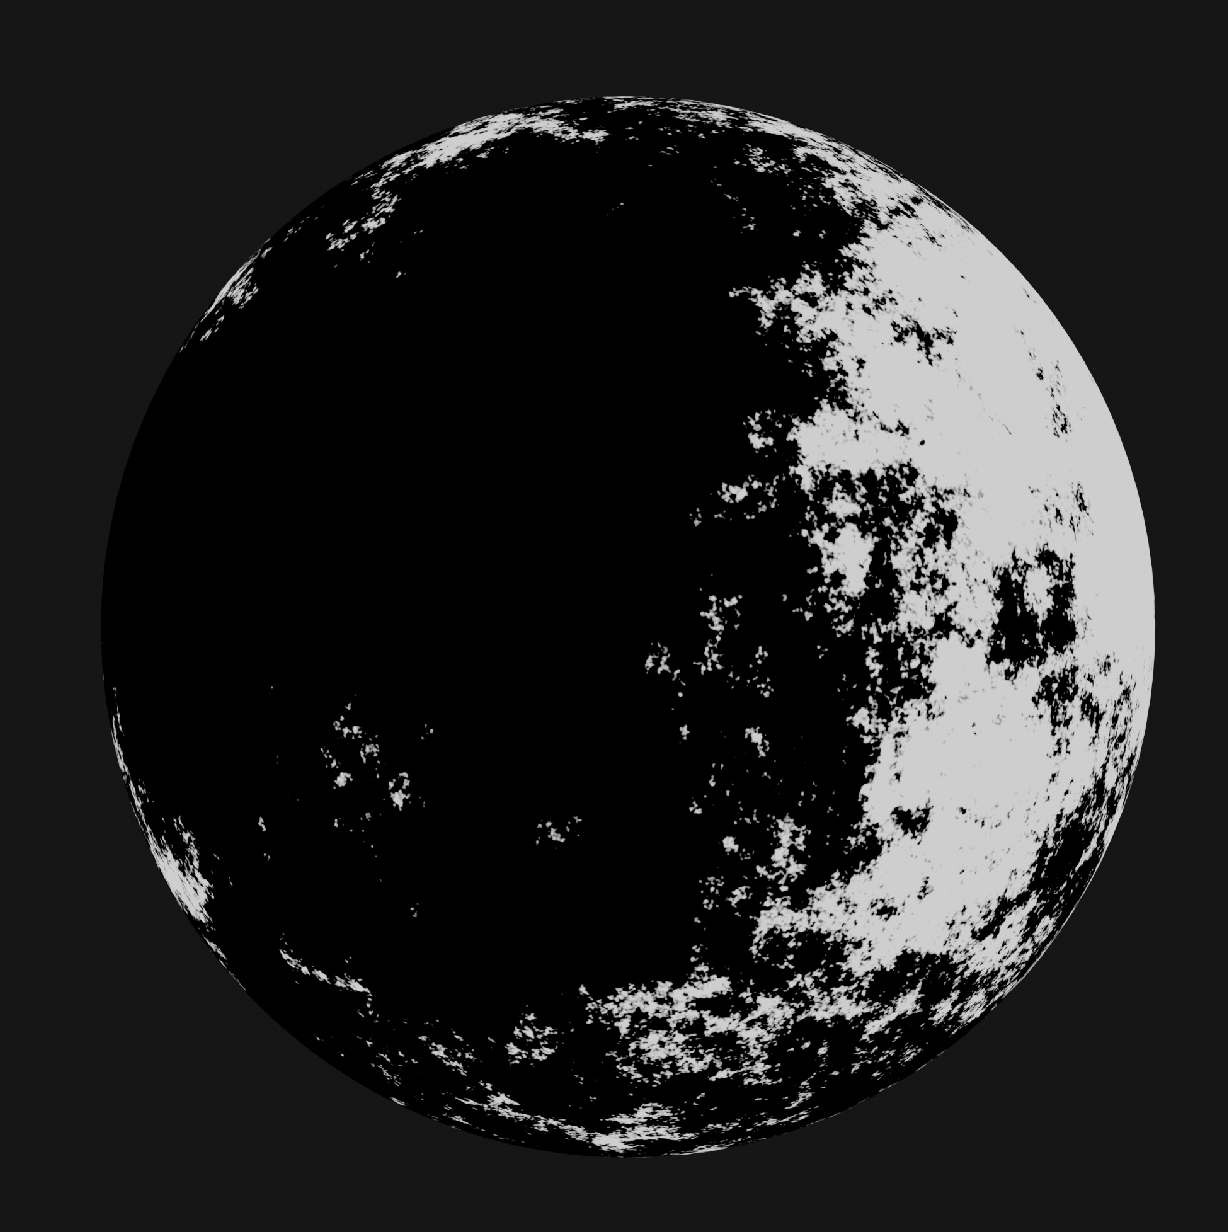
The node setup looks like this.
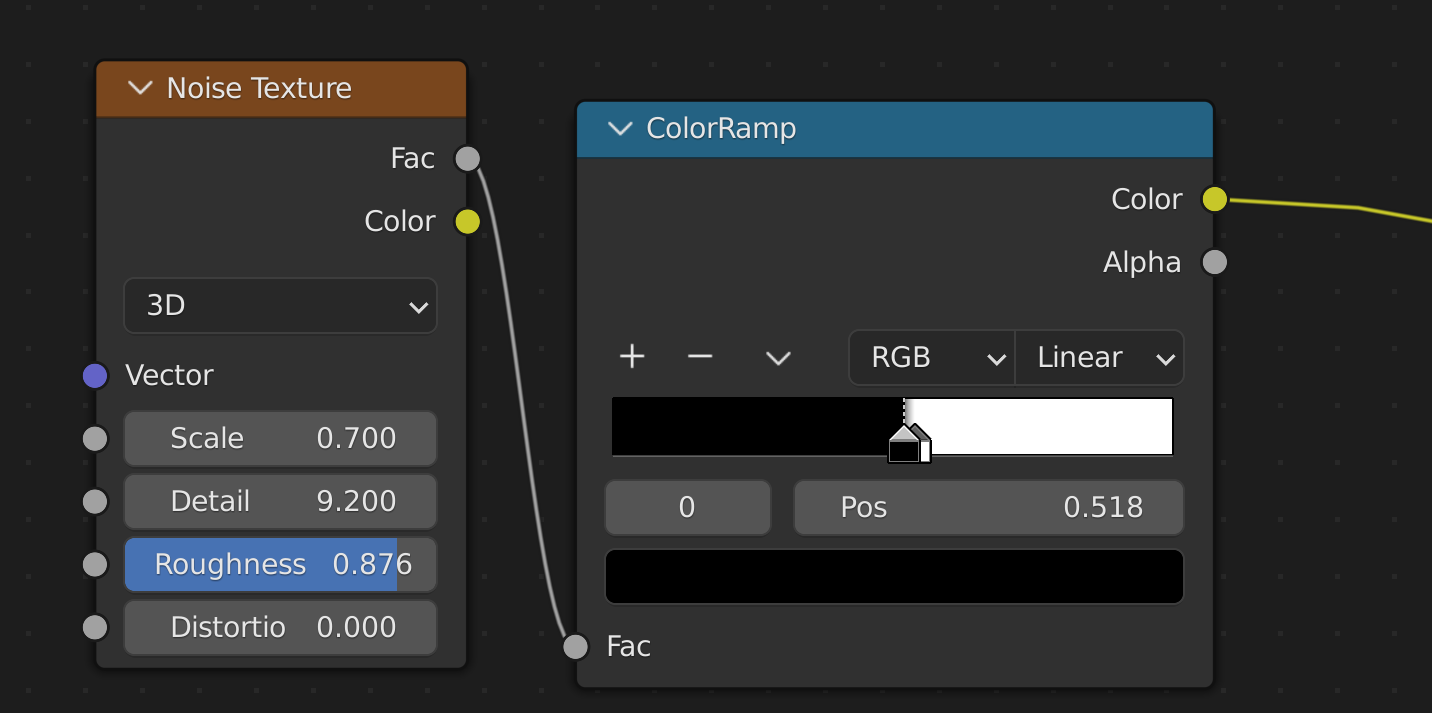
Since there is no input in the vector slot of the noise texture, Blender uses generated coordinates from the texture coordinate node. We have also adjusted the scale, details and roughness values.
The color ramp is used to take any value that is about middle gray and darker and crush them all to black, to create larger areas of black on the surface.
Then we leave a small gap of gray before bringing the white flag close to the middle of the color ramp as well. This does the same thing for the white values. making everything from about middle gray up to white the same white color.
Related content: How the color ramp node works in Blender
The result is that we get a very narrow gradient between the rusty areas and the metal. This is because in the real-world metal is either rusty or metal. There isn't much in between. But a small gradient helps so that our transition doesn't become too sharp.
We could be done here, and we would have a material that inside of it mixes two shaders so that we create a more dynamic blend between two different real-world materials inside a single material in Blender. This is the basics of mixing shaders in Blender.
In this example we mixed principled shaders, but we could mix any kind of shaders in Blender. From glass shaders, to diffuse and glossy and create our own shader mix for any kind of effect.
The mask can also be created in any possible way. We can use anything from vertex paint to paint directly on our object or a black and white image that we texture paint for exact control over where each shader should go on our objects.
We can even mix however we want between procedural textures and hand painted textures or images.
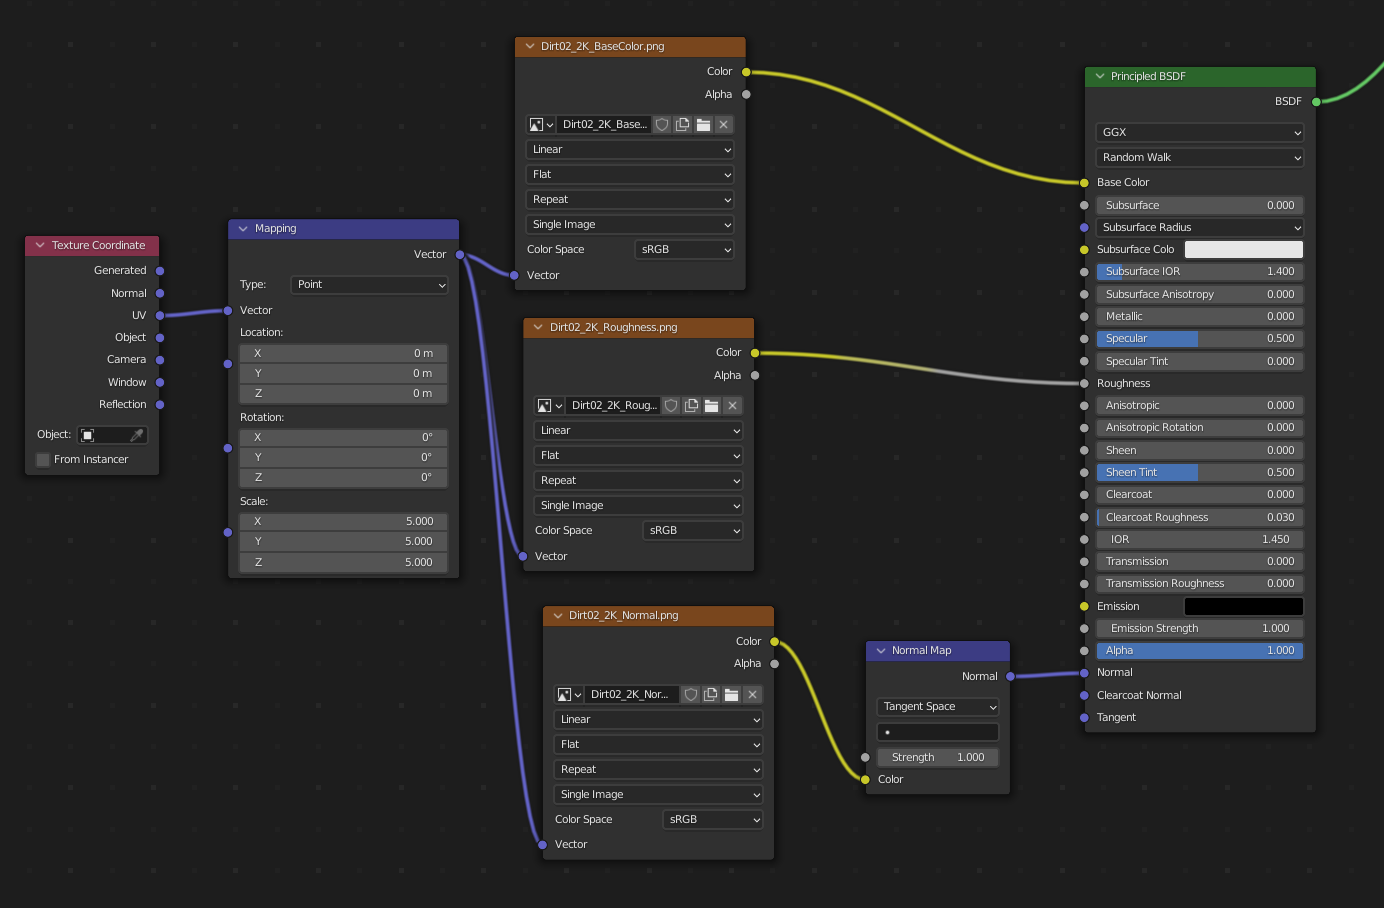
Our first mix shader could have gone straight to the material output. But on top of that I also added a little bit of dirt using a dirt material.
We take the output from our first mix shader and plug the result into a second mix shader with a new mask and the shader we want to mix with in the bottom slot.
The mask used this time looks like this.

You can see that it is similar to the first mix. But this time I changed the noise texture to a 4D variation. This exposes the W parameter that acts like a seed value so that we can change the noise pattern and get a different mask.
The second most important change made here is that we are no longer mixing between a black and white value. Instead we use a light gray and black.
The light gray allows the original mix to come through everywhere so that the dust layer is less prominent. Kind of like a see-through layer. It is rare for dust to cover up a surface completely so this makes sense in this scenario.
When in doubt, use the mix shader.
We then mix these complete shaders with a mix shader node. There are two types of shaders we can use to mix two other shaders together. The mix shader and the add shader.
The mix shader is the only mixer that can guarantee that we don't break the laws of physics. When the add shader is used for mixing, we can end up with more energy output from incoming light than the incoming light has. Essentially creating more energy out of nothing.
This is why you will see mix shaders used most of the time. However, there are cases when we may see add shaders used. We may actually not want to follow the laws of physics and want to create something that doesn't exist, or we may want to fake something because it is more efficient or easier than creating the real thing.
Now we will zoom in even further and look at how we can mix textures directly. In most cases it is a good idea to keep each real-world material behind its own principled shader and mix them at the shader level using mix nodes.
But we can also use a single Principled shader and mix all of the textures behind a single shader instead. The above example would look like this.
I would advise against using this approach since it is much harder to read and if we want to make changes to one of our real-world materials, we will have to involve all the other materials as well. The metallic map we use in the metal material also needs special treatment and the normal map is not exactly accurate at the edges when mixing this way.
Instead, let's go back to the setup we had when mixing on the shader level and zoom in to a single material. This time we will use the rust material as an example and see if we can improve it.

At this point we are dealing with the individual PBR components of our shader. The most impactful adjustments we can make are in the roughness and diffuse color map. The normal map is more fixed and requires quite complex math to make changes to. So we will focus on the first two.
We can bring in additional textures to mix between but in this case we already have a lot of textures in our material and performance and memory use is something to consider.
Related content: Memory optimization for rendering in Blender
Therefore, we will mix with altered versions of the same texture. Here is an example of what we can do with the diffuse map.
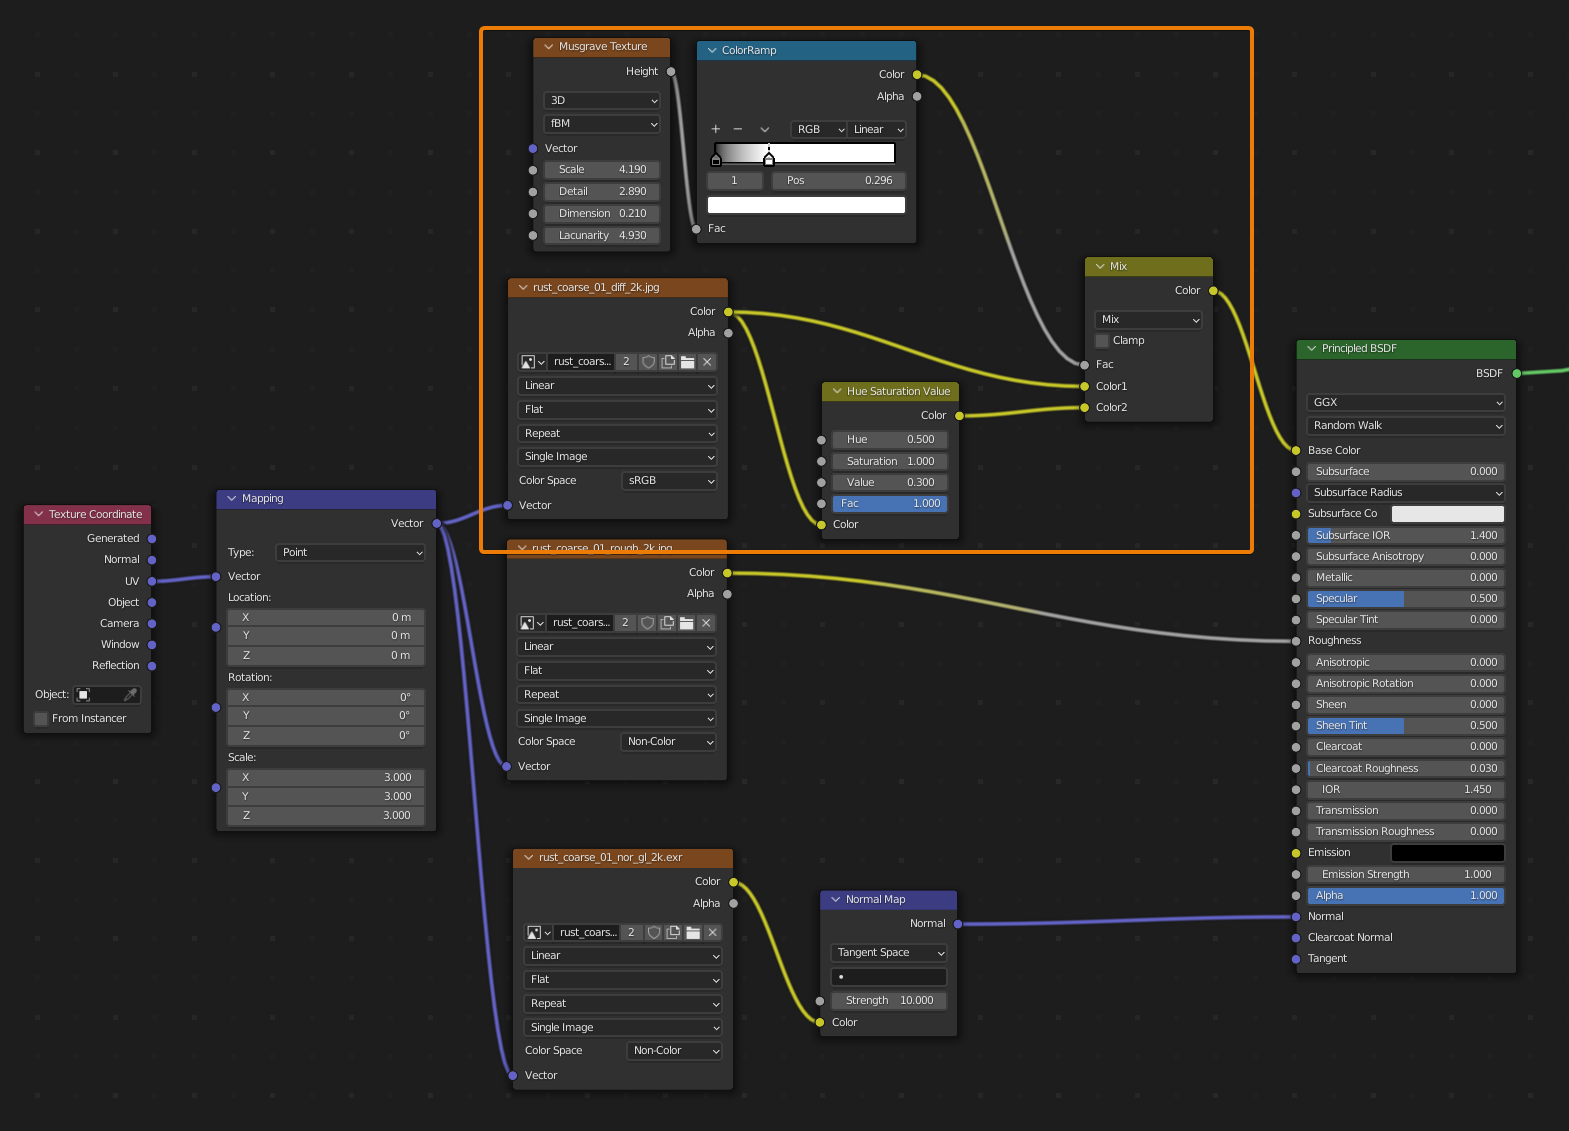
In this case we used a musgrave texture with adjusted parameters to get a slightly different pattern. The color ramp is also configured quite differently to bring out the correct mix between black, white and gray scale.
We then use this as factor for a mixRGB node. This is the color mix equivalent for the shader mix node.
For the mix we use a variation of the original diffuse texture that we darken using a hue saturation value node. We adjusted the value down from 1.0 to 0.3. The result is a much darker rust that follows the same pattern as the original texture.
The result looks like this.

At first glance it might seem like we didn't do much but subtle details like this is what can distinguish a good artwork from an excellent one.
By now you should also be able to see that the same pattern we use when mixing occurs over and over. We have two or more shaders, or textures that we want to combine, and we use a mask to tell Blender what goes where.
For the roughness, let's try something different. Currently we have ten textures in our material. We may want to reduce this number if we don't have enough memory to store all of them and be able to render. For instance, if we are rendering without GPU.
Related content: How to use the GPU to render with Blender
Also, I will let you in on a secret. If you are on Mac, the upper limit is 8 image textures per material. This is a platform limitation. So in those cases, you may also want to reduce the number of image textures used. If you have more than 8 textures on a Mac, at least up until version 3.0 of Blender, all image textures will render pink.
Anyway, let's remove our roughness texture and mix together a substitute. Here is the node setup.

In this article we looked at how we can combine different materials on the same object using various methods and combinations on different levels. We started by exploring how we can change the material on different faces. A very limited way of combining materials. But still very important.
Thanks for your time.
