


Changing the color of an object in Blender can mean different things. Do we want to change the color for the final render or in the viewport? If we want to change the color in the viewport, what viewport mode are we in?
Let's cut to the short version of how to change the color of an object in the viewport.
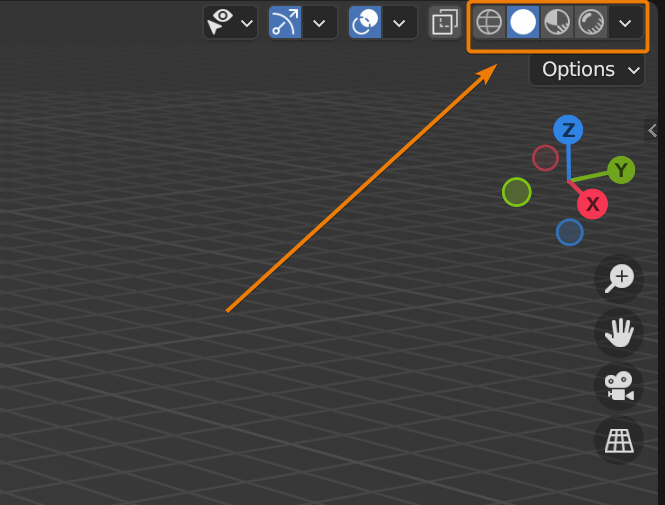
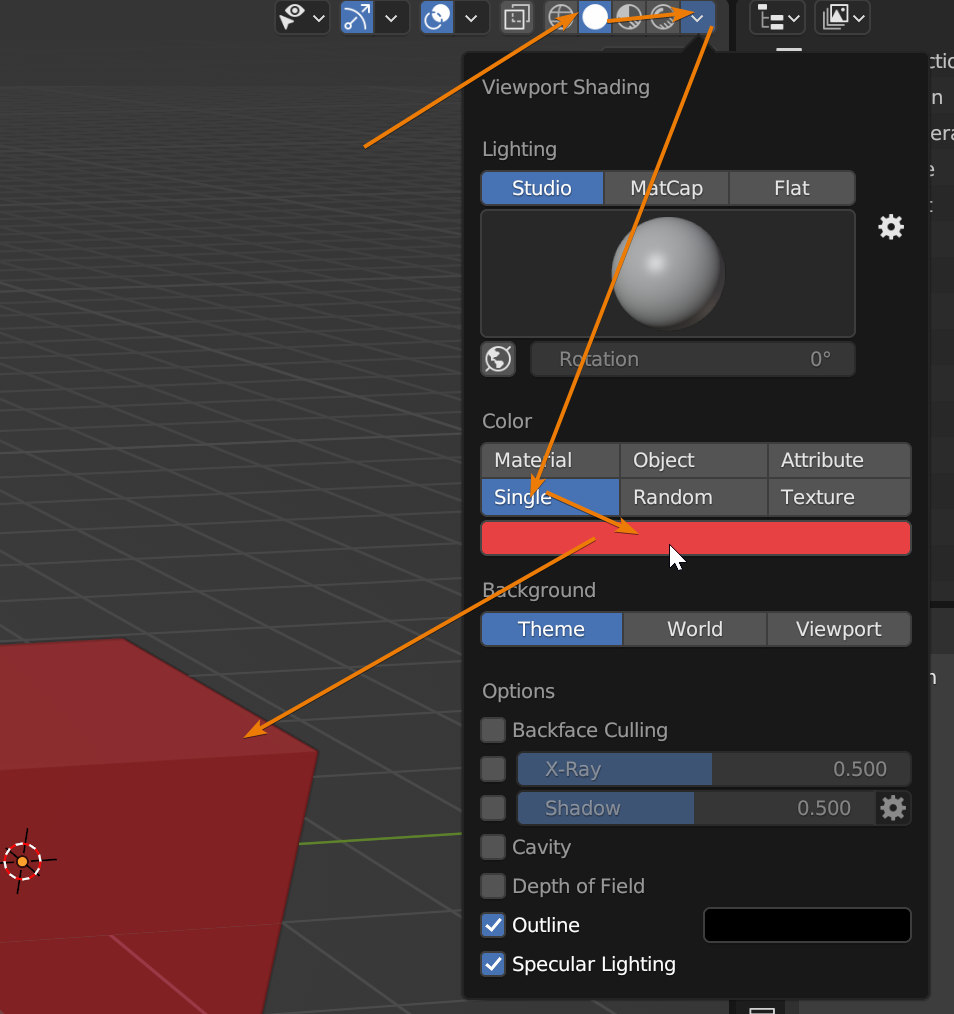
To change the color of a specific object in the 3D viewport, go to the viewport shading menu in the top right corner of the 3D viewport while in solid shading mode and check object under color. Next, select the object, go to the properties panel and press the object properties tab, which is the orange box icon. Go to viewport display and change the color.
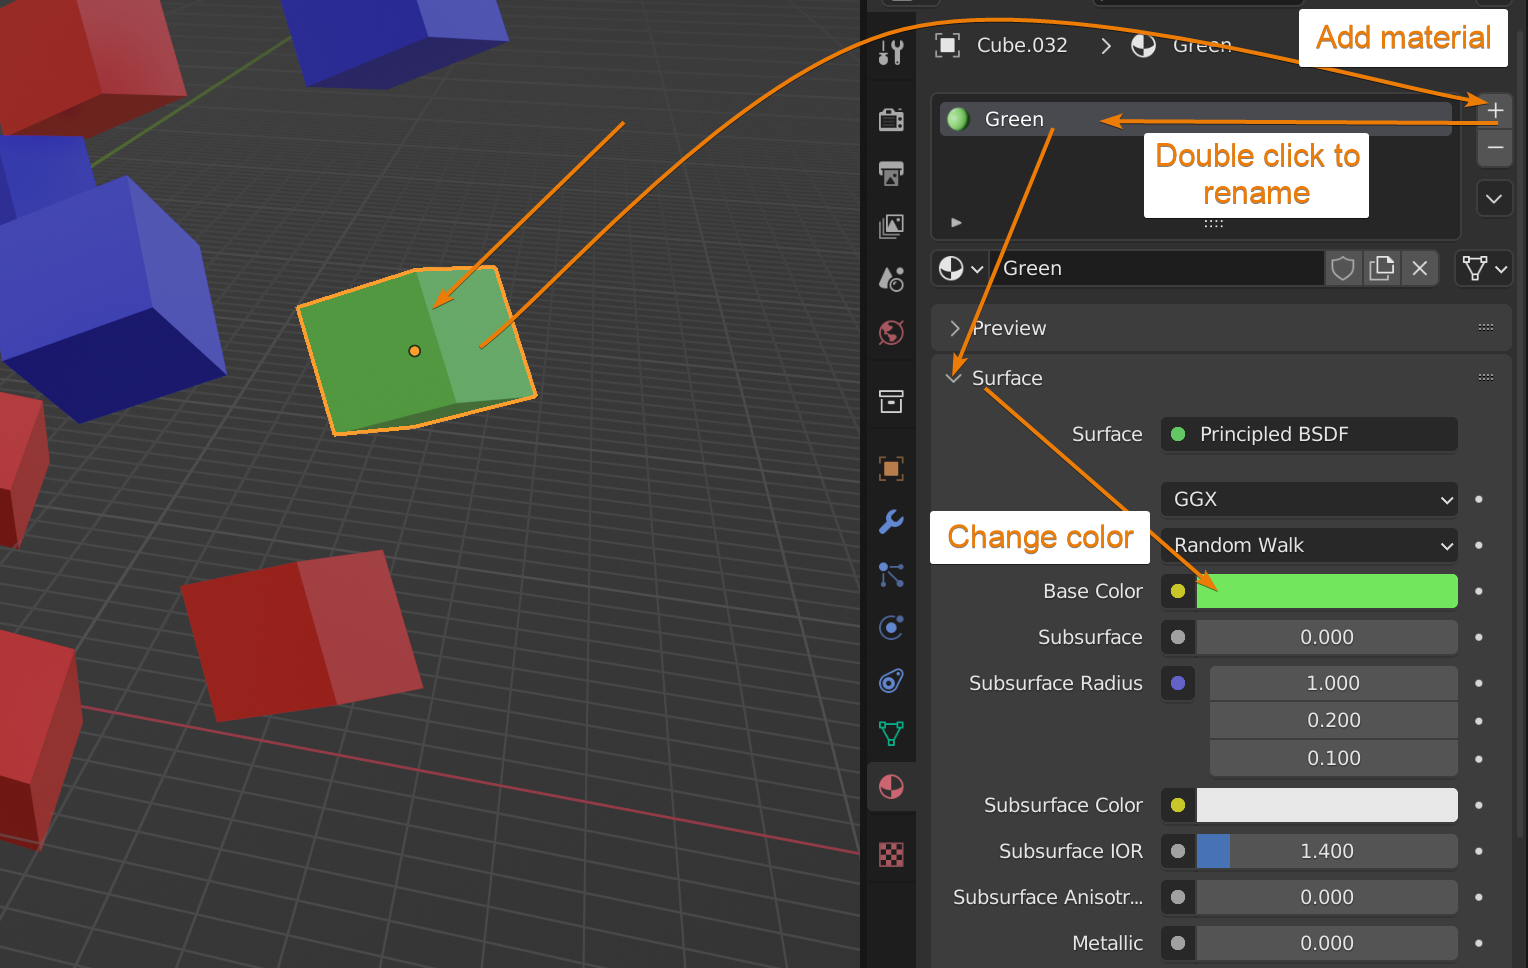
To change the final render color of an object, select the object, go to the material tab in the properties panel, that is the red sphere icon and add a material, expand the surface section and change the base color to the color you want.
With that covered, we will dive into some detail, covering multiple ways of how to change colors around both for the viewport and for images we render.
Related content: How to add a texture to an object in Blender

We are always in one of multiple viewport shading modes. Depending on the viewport shading mode, there are different ways we can adjust and change how our objects are displayed.
By default, we are in solid shading. We can see what mode we are in and change to a different mode in the top right corner of the 3D viewport.
If you cannot see the shading buttons, middle mouse clicks and drag on the header towards the left and the hidden parts of it will become visible from the right.
The shading modes are (from left to right):
Changing the color in wireframe mode doesn't really apply or make much of a difference, so we will start with our options in solid view mode.
To access the settings for a viewport shading mode, press the down arrow next to rendered view mode. This dropdown is context sensitive and will change depending on your current viewport shading mode.
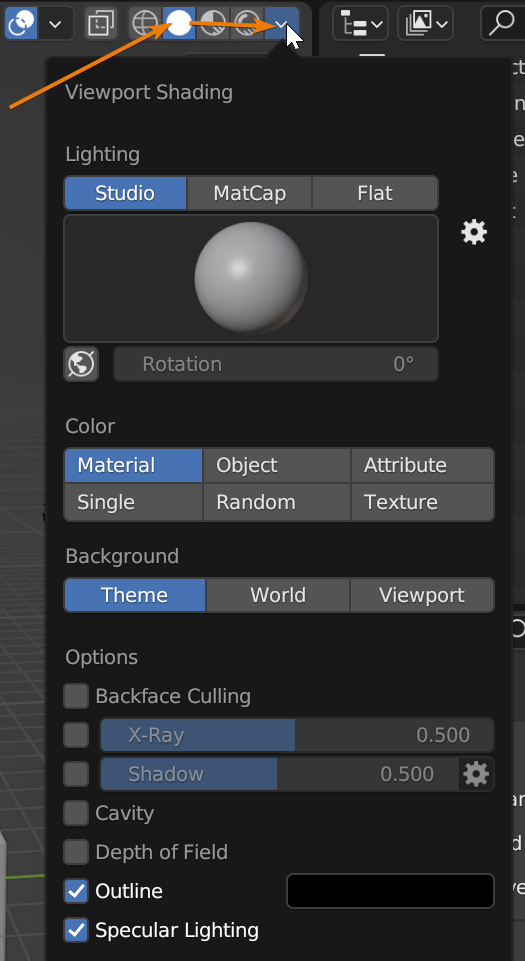
Here we have several options allowing us to customize the look and feel of our viewport. In this article we focus on the coloring of objects. Primarily objects that have faces and surfaces that can actually have a color. While we can change the color of objects that don't have a surface in the viewport, such as lamp objects or the camera, we will focus on objects with surfaces here.
Also, there are other factors than color that affect the final look of the objects in our viewport, such as the lighting and various overlays and shadow settings. If you want the full story, you can check out these articles.
Related content: Blender viewport shading guide
Related content: How to use 3D viewport overlays in Blender 3D
Also, if you want a quick way to make your viewport look awesome, press Matcap in the lighting section and pick the look you want.
Now, if we focus on the color section, we have six options.
Let's cover them in turn.
Material means that the material of a face determines its viewport color. This is the default. If we select this, we can select an object, such as the default cube and go to the material tab in the properties panel.
We can select one of the materials present in the material list, then expand the viewport display section, to find the color settings. If we change this to any color, all objects with this material will have the selected color in the viewport.
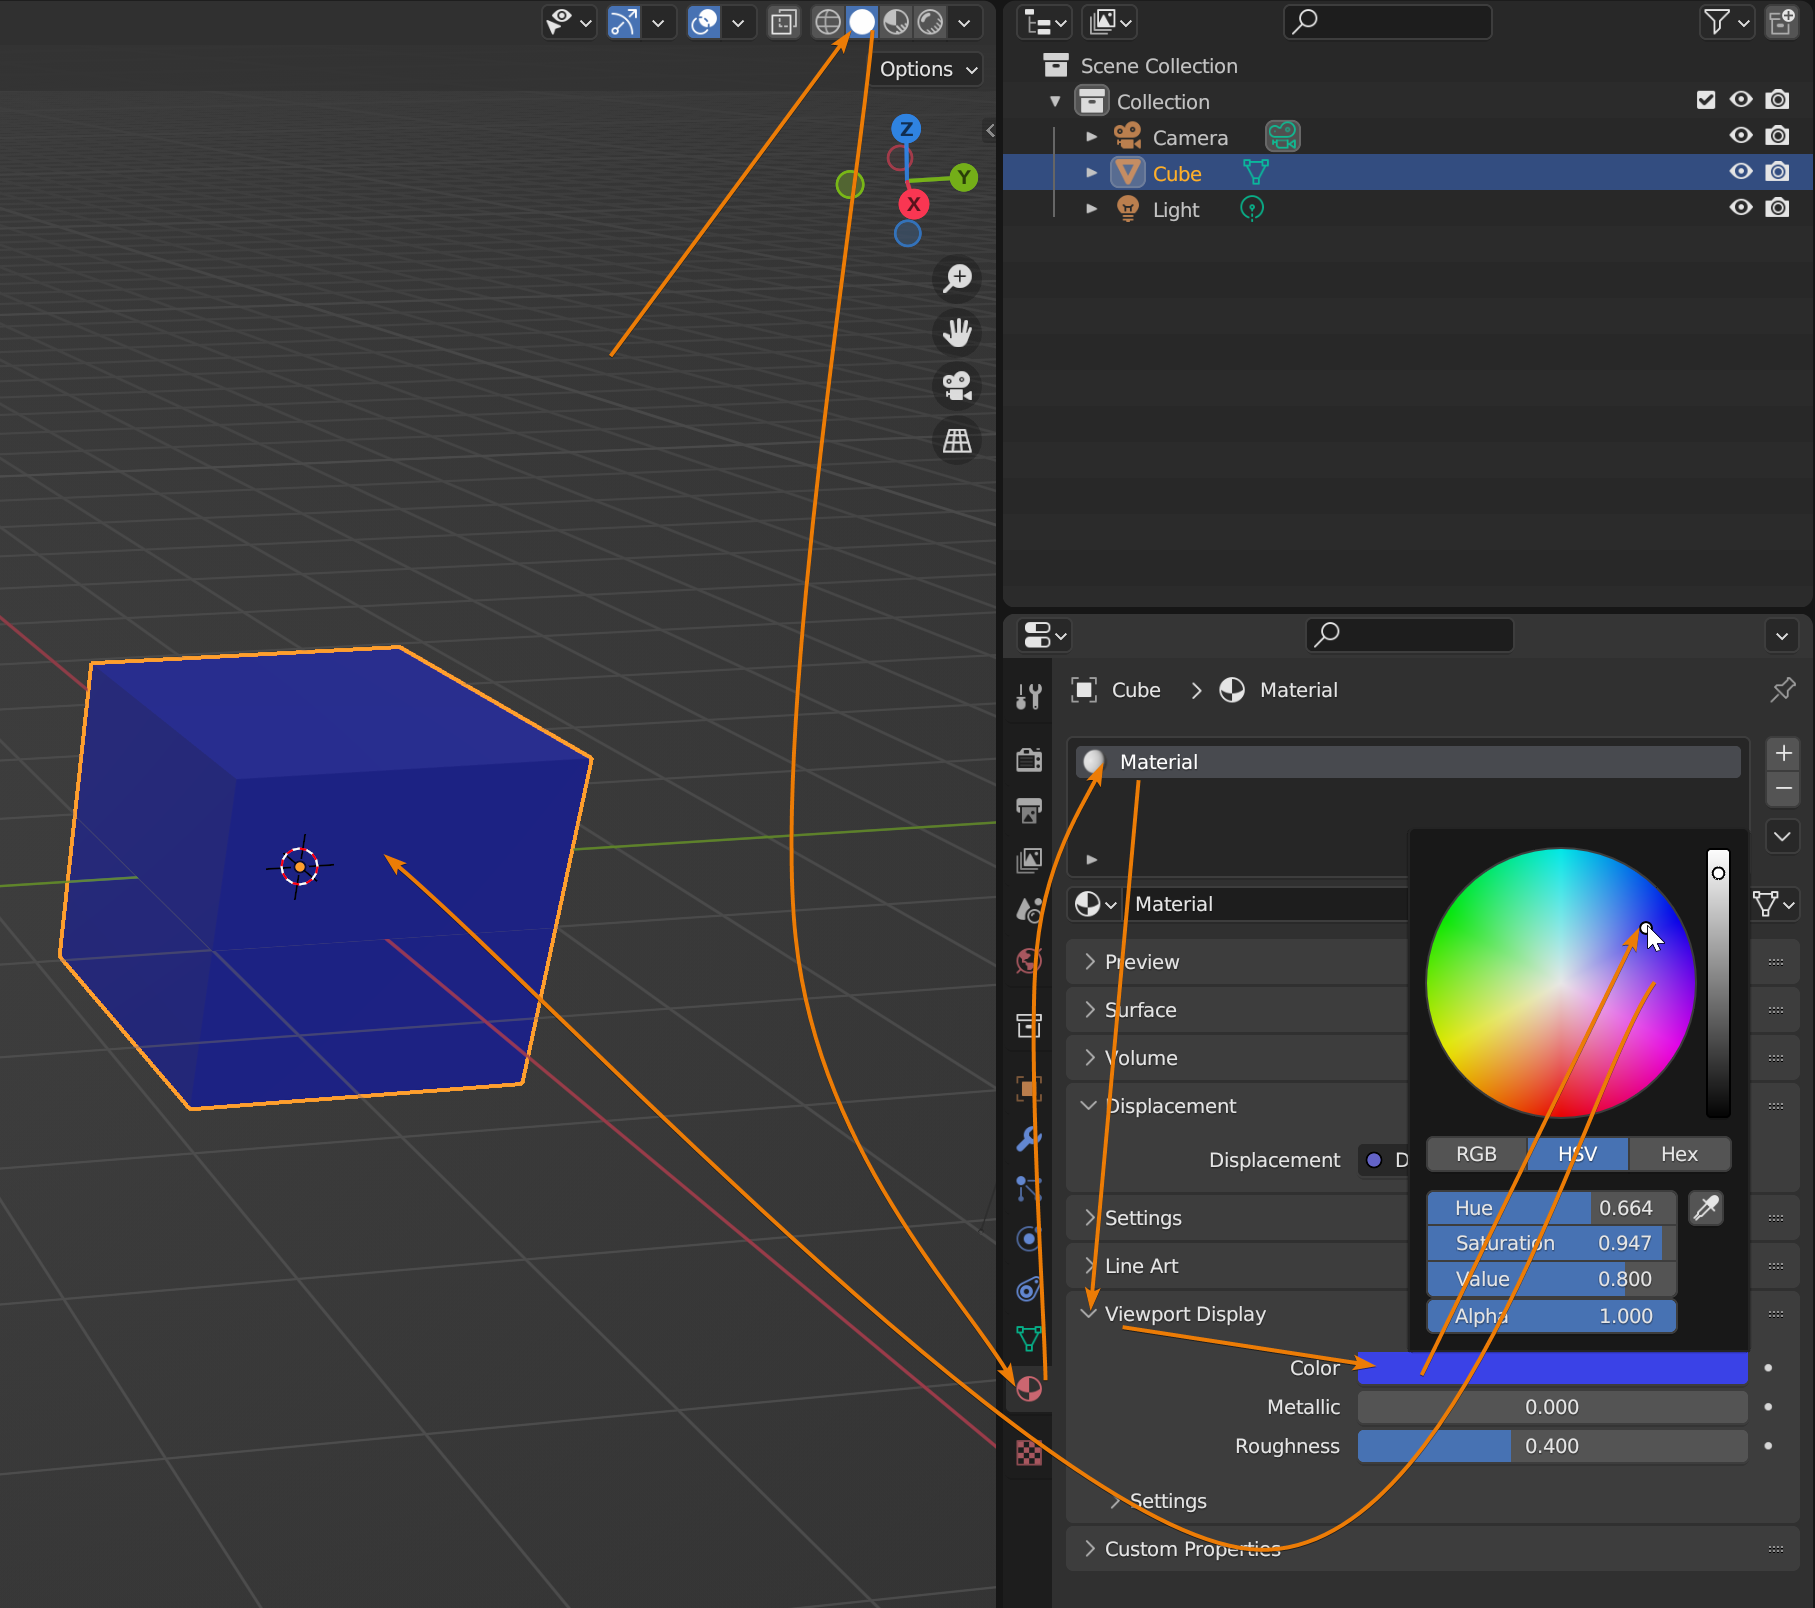
For as long as the color is set to material in the solid viewport shading settings, all objects with this material will be blue in the viewport regardless of how the actual material looks when we render it.
You can also play around with the metallic and roughness settings in the viewport display settings for the material to see how this affects the material.
If we instead change the solid viewport color to object, we can setup viewport colors in a similar way. But instead of basing it on what material is currently on an object, we simply set a color per object.
Go to the viewport shading menu while still in solid shading mode and select object for the color.
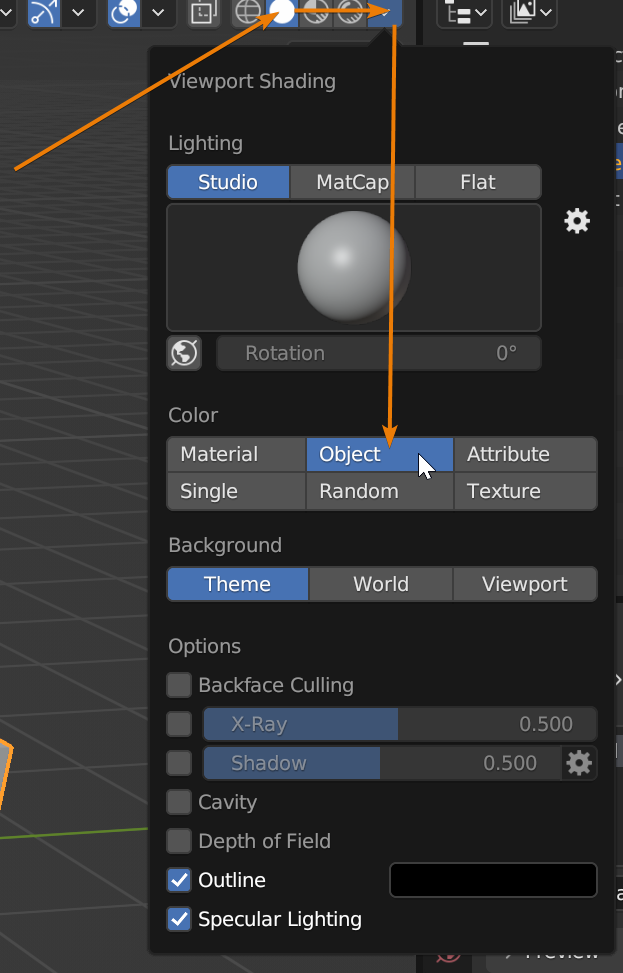
Instead of going to the material tab, go to the object tab and find the viewport display section here instead.

Next, if we set the color to attribute, Blender will use the vertex color we have painted on our object. There is a special mode in the 3D viewport called vertex paint that we can use to paint objects based on vertices. So, each vertex can have its own color and colors will blend along edges.
While displaying colors in the viewport isn't the primary use of vertex painting, it is still an option.
Next is single, this mode simply gives us a color attribute picker in the shading settings menu to pick a color from that all objects will get.
The random option will give each objecta random color. There isn't much else to it. The color pattern between objects gets quite similar and an object never get very saturated colors. This is to make it easier on the eyes.
Left for last is the texture option, this will use the texture from the currently active texture node with the currently active UV map.
The active texture is whatever texture is setup in the last selected image texture node in the shader editor for the material on the object.
Likewise, the UV map used is the selected UV map form the UV map list found in the object data tab in the properties panel. That is the green triangle icon. You can expand the UV Map section to find the list of available UV Maps for the selected object here and the UV map currently selected will be used to map the texture.
To learn more about textures, I encourage you to read this article:
Related content: How to add a texture to an object in Blender
To learn everything, you need to know about UV maps, there is also this article:
Related content: The definitive tutorial to UV mapping in Blender
For material preview mode and rendered shading mode, we have to look into how to actually render color. We will come back to this below, but for now we will look at how to bulk change colors for multiple objects in the viewport.
For complex scenes with a lot of objects, we sometimes need to quickly change colors around for multiple objects to get a better pre-visualization of the scene.
The first way is to have the objects in our scene already setup with the right materials and simply change the viewport display color for our materials while using the material color option in sold shading view.
This way we can then just change the materials for objects in our scene and the viewport display color will change as well.
To quickly change material on multiple objects, you can select all objects you want to have the material and then last shift select an object that already has the material on it. After that, press Ctrl+L to bring up the Link/Transfer data menu and choose "link material" this will make it so that all selected objects will get the material from the active object.
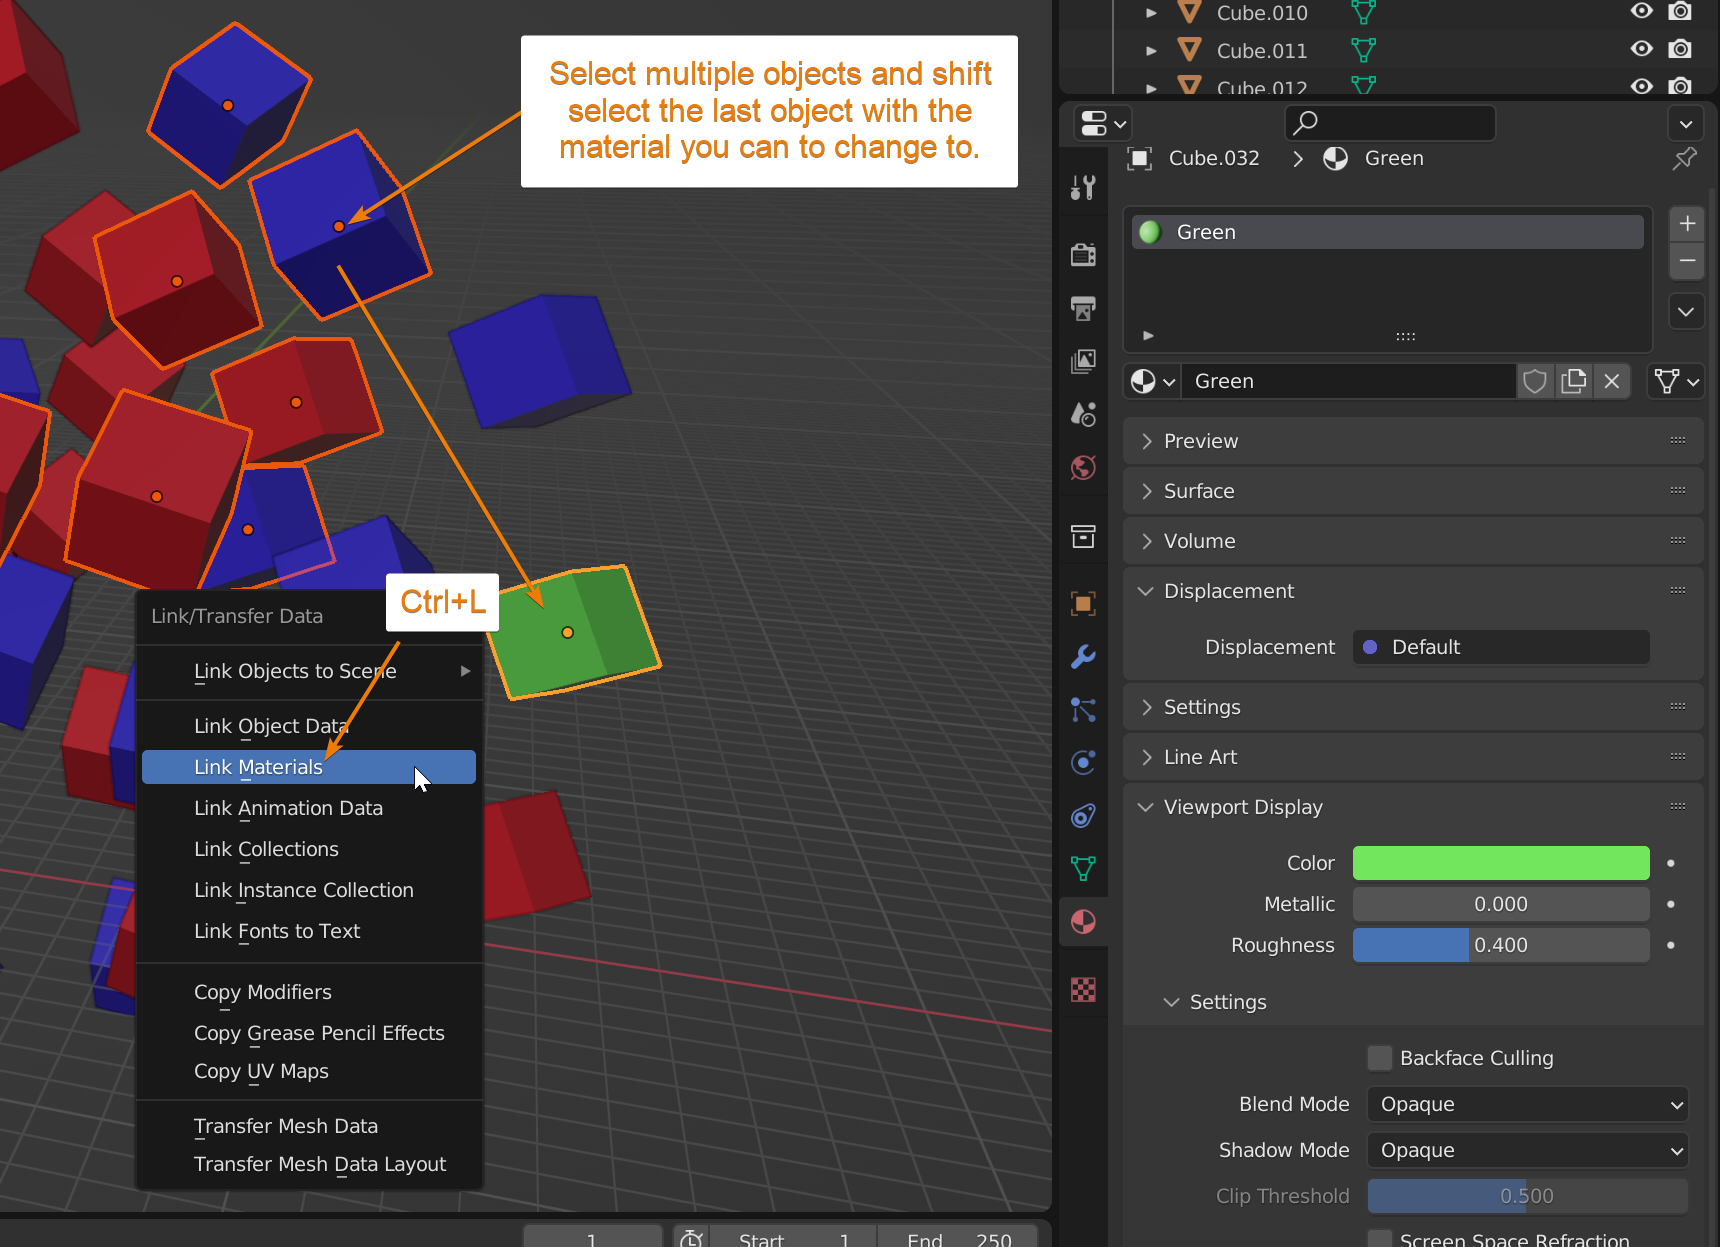
The active object being the last selected object with the lighter orange outline in the viewport.
But what if we don't want to involve materials? After all, they will affect the final render.
What we can do instead is to use the object color option in the viewport shading menu and use the viewport display color on the object level instead of the material level.
To quickly change the color of multiple objects using the object color mode, you can first change the viewport display color on one object.
Next, select all objects you want to have the same viewport color and last, shift select the object that is already setup with the correct viewport display color. Then right click the color in the properties panel and choose "copy to selected".

This will copy the viewport display color from the active object to all other selected objects.
You can do the same for any parameter in the properties panel to copy a setting from one-to-many objects.
If you need to brush up on how to make effective selections in Blender, you can also read this guide.
Related content: How selecting works in Blender
To change the rendered color of an object, we need to change the material. Follow these steps:
When you render, the object will have the color you choose. But for the 3D viewport, you will still see the same color as before. By default, in various shades of grey.
Related content: How to render in Blender
But if you change the viewport shading mode to material preview or rendered view, you will see the material in the viewport.
There is much more to learn about materials and a good place to start is here:
Related content: The complete beginners guide to Blender nodes, Eevee, Cycles and PBR
In Blender, materials stand by themselves, and we simply link in materials to objects and assign them to either the whole object or to one or more faces on the object.
So, to change the color of multiple objects, we simply assign the same material to them all at once. But first we need to have a material setup on an object. We can then link this material to all other selected objects.
To do this, select all objects you want to have the material you created, then hold shift and select the object with the material already assigned to make that object the active object as indicated by the lighter orange outline.
Next press Ctrl+L to bring up the link/transfer data menu and choose material.
The material on your active object will now populate the material list of all selected objects.
We have now covered how to color objects in our viewport and in the final render. To go ahead and render the scene from the cameras point of view, press F12 or go to render->Render image from the menu bar at the top.
We learned about different shading modes in the viewport and that there is a difference between colors in different modes.
Thanks for your time.
