


While we may have used the compositor quite a bit it can be a bit confusing how to integrate this with the VSE. While to compositor does affect the VSE it applies to the whole VSE with Blenders default settings. But we can also use it on a strip-by-strip basis.
To composite on a strip-by-strip basis, follow these steps:
In the rest of this article, we'll go into more details about the process of getting our scenes ready for rendering. How to bring that scene into the VSE as a strip in more detail and finally we'll go over how to render from the VSE.
So, let's back up a bit and start from the beginning.
We will first look at how we can setup a scene for compositing in the first place using the most basic setup so that we can use nodes in the compositor and get it applied to our scene.
To setup our scene for compositing:
If you want to learn some compositing and post-processing effects you can check out this article.
Related article: Top 12 post-processing effects to enhance your Blender renders
If we have strips in the VSE and we want to add compositing to all strips in the timeline, this is all fine. But if we want to add different post processing to different strips, we need to learn a bit about scene strips in the VSE. For a detailed read, refer to the article below.
Related content: Meta strips, scene strips and adjustment layers in Blender VSE
But for now, let's just know that a blendfile can contain multiple scenes and a scene can be a strip in another scene. So, we setup our blendfile so that we have one master scene that contains our VSE with all our strips. This is the scene we render. Then we can have scene strips that contain scenes with their own compositing in them.
So, we can apply our compositing to the master scene containing our VSE strips, or we can go into a secondary scene and do our compositing there before adding that scene as a scene strip in our VSE master scene.
In the example above, note that compositing effects the scene we are currently editing. It could be to the VSE master scene where all compositing applies to all strips or a local scene that is added into the VSE master scene as a scene strip.
I also recommend setting this scenes resolution to the final resolution. If our scenes have a different resolution than they do in the VSE scene they will be scaled weirdly. We can still apply resolution scaling in the VSE scene if we want to do a lower resolution render.
The above steps will work for 3D scenes but how can we add compositing to video clips that we contain within scene strips?
Go to the compositing setup and delete render layers then go to add > search > image and place it into the graph. Connect the image node image output to the Composite image in or start setting up the compositing nodes we want to use.
On the image node click open and in the file browser window navigate to the folder containing our video. For video files just select the file and click on open image. We can also import image sequences by navigating to the folder containing our image sequence.
Select the first image in the folder and then go to the final image and hold shift while selecting the final image. With all the images selected click open image.
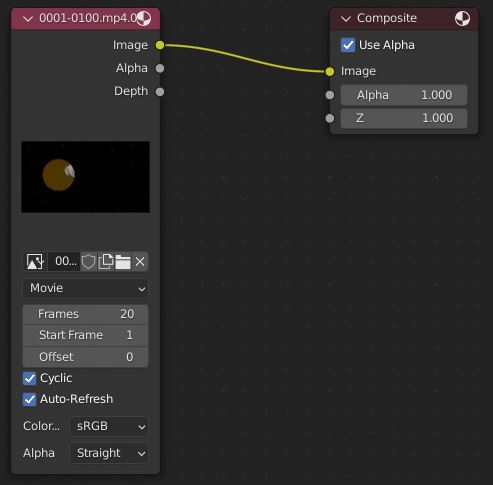
After we've imported our video make sure to set the frames to the number of frames in the video or where we want it to cut off. Enable cyclic if we want the video to loop.
To setup the VSE scene:
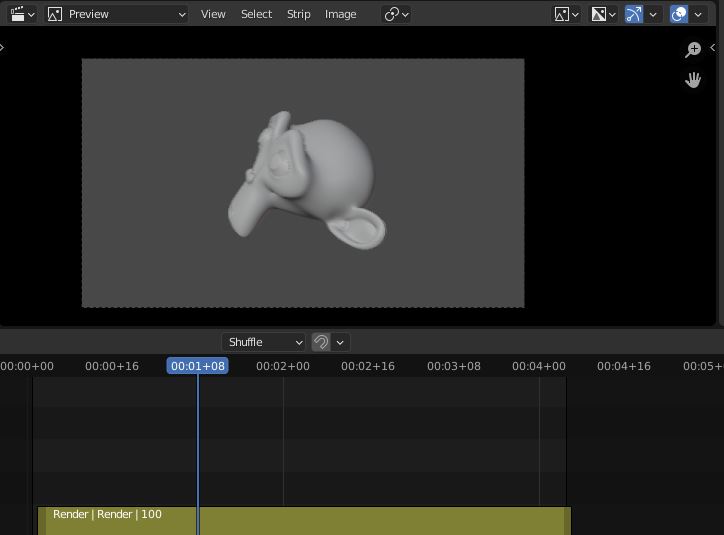
When we add a scene strip to the VSE that scene will use all of it's compositing. This allows us to use multiple different compositing setups per VSE rather than Blender compositing the whole entire VSE.
We can repeat this for as many scenes as we want as well as having the ability to mix in anything that's already been rendered which can be handy for speeding up render times or for mixing in anything else.
Something to note is that the scene strip will use the resolution of the scene and not the VSE scene. We should make sure all of our scenes have the same resolution. In case we want to keep a scene at a lower resolution we an select the strip and press N to bring up the side panel.
go to strip > transform and use the scale values to fit the strip to the size of the VSE scene.
Once we've setup our VSE scene with all the strips we want to add we can navigate to properties > output properties > output and configure the file output path as well as the file format.
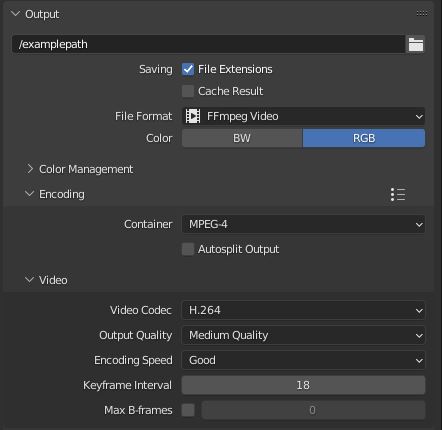
For shorter scenes it may be better just to output directly to a video format. On longer scenes we should output our animation as an image sequence.
So why we would output to an image sequence instead of just outputting directly to any video format? An image sequence allows us to stop and then just start from where the last frame rendered. This can be useful during long renders or in case of a crash.
We can also choose to output multilayerEXR images as the output. This allow us to maintain as much information as possible and do a second compositing pass if we want to.
Related content: How and why to use EXR in Blender
Once we've configured our file output all we have to do is press Ctrl + F12 and then Blender will start rendering the animation.
Compositing in the VSE can be a bit unintuitive at first but very powerful. We can setup each scene to look however we want as well as making unique compositing choices for each. It's also fairly easy to bring these scenes into the VSE and combine them however we'd like.
After that all we have to do is render. All the compositing effects in our scene strips will be applied when we render.
Thank you for your time.
