


With the EasyFX add-on you can quickly add post-processing effects to your render in Blender without having to set up a compositing node graph manually. I used it for many of my quicker projects when I just need something to show, but it is also great for creating a starting point for further post-processing in the compositor.
EasyFX adds an interface to the image editor that allows us to quickly add and adjust post-processing effects to our render. Behind the scenes EasyFX add node setups in the compositor that we can then further tweak and change manually.
Let's see where we can get, ho we install, and what features are available for this simple, yet very time saving add-on.
We will look at the add-on from the 2.8x and later version.
You can download the EasyFx add-on from this website.
External content: Nilssoderman.com download page for EasyFX
You will find both the original version for 2.79 and the ported version for 2.80 and above.
Extract the zip file you download and copy the easyfx.py file into your Blender add-ons folder.
You can also open Blender, go to edit->Preferences and in the add-on section press install and browse for the file to have Blender copy it to the add-on location.
Next, enable EasyFX in your user preferences.
Once installed, the add-on is available in the UV Editor and Image editor. We will primarily use it in the image editor. The reason it is enabled in both is probably because once, these editors were sub-modes of the same editor.
If you need more instructions on installing EasyFX, you can check out this article.
Related content: 30 Blender addons (install, manage, free and paid)
EasyFX is available as a tab in the image editor once the installation and activation are complete. We can bring up the image editor and press N to open the right-side properties bar.
Related content: Blender 2.8 Editors and Interface
The window that pops-up when we do an F12 or ALT+F12 render for animations is an image editor, so we have access to the add-on in the same window just right after the render has finished.
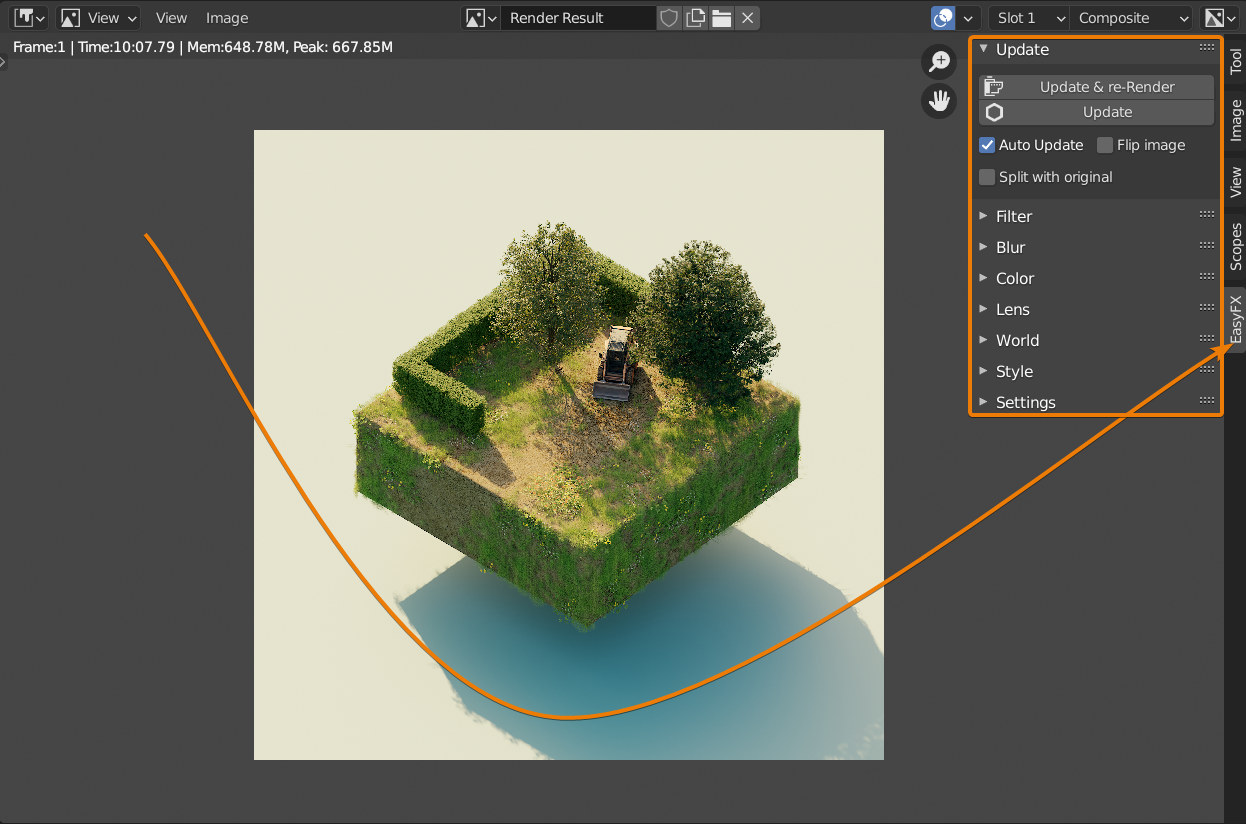
EasyFX has its own tab that contains all settings for the add-on.
Keep in mind that it only works for the rendered result and not on other images brought into the blend file.
There are several sections. containing different filters and effects. Some of them require certain passes to be enabled
Related content: Render passes in Blender Cycles: Complete guide
There are several sections in the interface.
In the update section, we can update what we have in the compositor and re-render the image. This is required by some features of certain pre-requisites wheren't met when the initial render was made.
For instance, if you turn on a transparent sky in the world section, this will change the transparent film render setting and a re-render needs to be made.
There is also a flip image and split with original setting here that is useful for getting a better idea of your changes. But also helpful for these quick effects.
In the filter section, we find these effects:
As we enable them, the interface reveals additional settings to tweak them further.
As you enable different effects, keep in mind that the entire compositing node tree needs to be recalculated so it may take a few seconds before your changes take effect.
In the Blur section we can turn on depth of field and if we are using Cycles, Motion Blur. There is motion blur for Eevee as well, but we can't enable it here.
Related content: Blender Eevee Motion Blur guide
Keep in mind that motion blur made in the compositor requires a vector or speed pass, as we also call it.
In the color section, we can do color adjustments and balancing. Here we have access to these features.
Keep in mind that changing the color values here uses a Color balance node in the compositor behind the scenes. By default, it is set to Lift/Gamma/Gain. When using filmic in the color management, we want to set this to Offset/Power/Slope before we change the colors here.
In the lens section we find some effects that are easily overdone by artists.
These are effects that are often undesired by a photographer but are absent for 3D artists. For realism, 3D artists sometimes create these imperfections that are otherwise created by an imperfect camera.
Use them sparingly.

In the world section we can set up mist using the Z depth pass. But we can change this to the mist pass in the compositor for a better effect.
We can also set up a transparent background, but this requires a re-render.
The same goes for the image sky feature. Here we can replace the background with an image sky. But only if transparency is enabled and in the EasyFX interface we can only bring in an external image.
To pick an image from within the Blend file, we need to go to the compositor instead of picking one here.
In the style settings, we can add cinematic borders and cell shading. But the cell shading simply turns on freestyle.
Related content: A guide to Blender freestyle rendering with Eevee and Cycles
You should have at least the combined pass and the Z depth pass enabled. The combined pass for obvious reasons. This is the image output, and the Z depth pass is used by some features.
For instance, motion blur also use the vector speed pass and probably enable the mist pass as well so that you can change to it from the Z depth pass in the compositor afterwards since the Z pass isn't always the most optimal to use for some of these effects.
Keep in mind that the add-on changes some other settings in your file as well. For instance, when you enable transparent background, it will not try to filter out the background in the compositor, instead it will enable transparent in the render film settings and this may require a re-render.
Related content: Blender: A Cycles render settings guide
Related content: A guide to Blender Eevee render settings
As far as I know, EasyFX is no longer maintained by the original author but it still works with the latest version of Blender.
EasyFX does not add functionality to Blender, it is a simple way we can quickly add common effects to your final render. From there you can open the compositor and continue to tweak your post-processing.
Thanks for your time.
