Mirroring in Blender may have multiple meanings. We may want to mirror geometry, or a brush stroke or perhaps we are talking about creating a mirror as a shader. Let's take a deep dive into mirroring in Blender and see what each of those can mean.
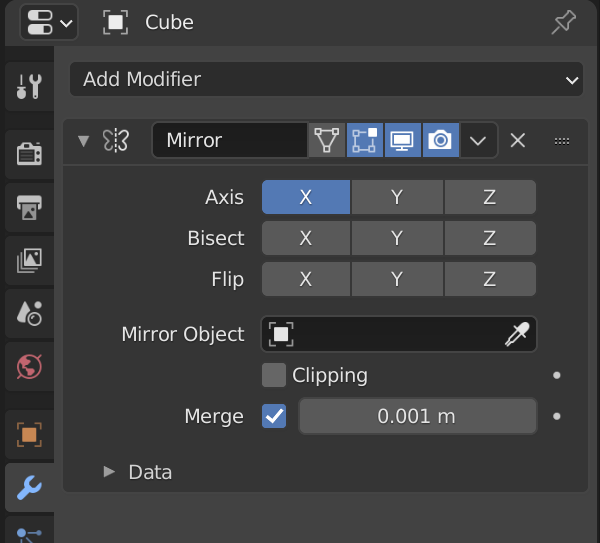
The most common way to mirror in Blender is to use a mirror modifier. We use this to mirror geometry between the positive and negative side of an axis. In object mode, go to the modifier stack and add a mirror modifier to your object. By default, your object will be mirrored on the X axis.
If you are here to find out about how to create a mirror as in a reflective material, click here and I will take you further down the article.
The mirror modifier creates symmetry between the positive and negative part of the axis we mirror across. For example, the geometry we have on the positive side of the X axis can be mirrored to the negative side.
I explain the mirror modifier in this video together with all its features:
But for completion’s sake, I will explain it here in the article as well.
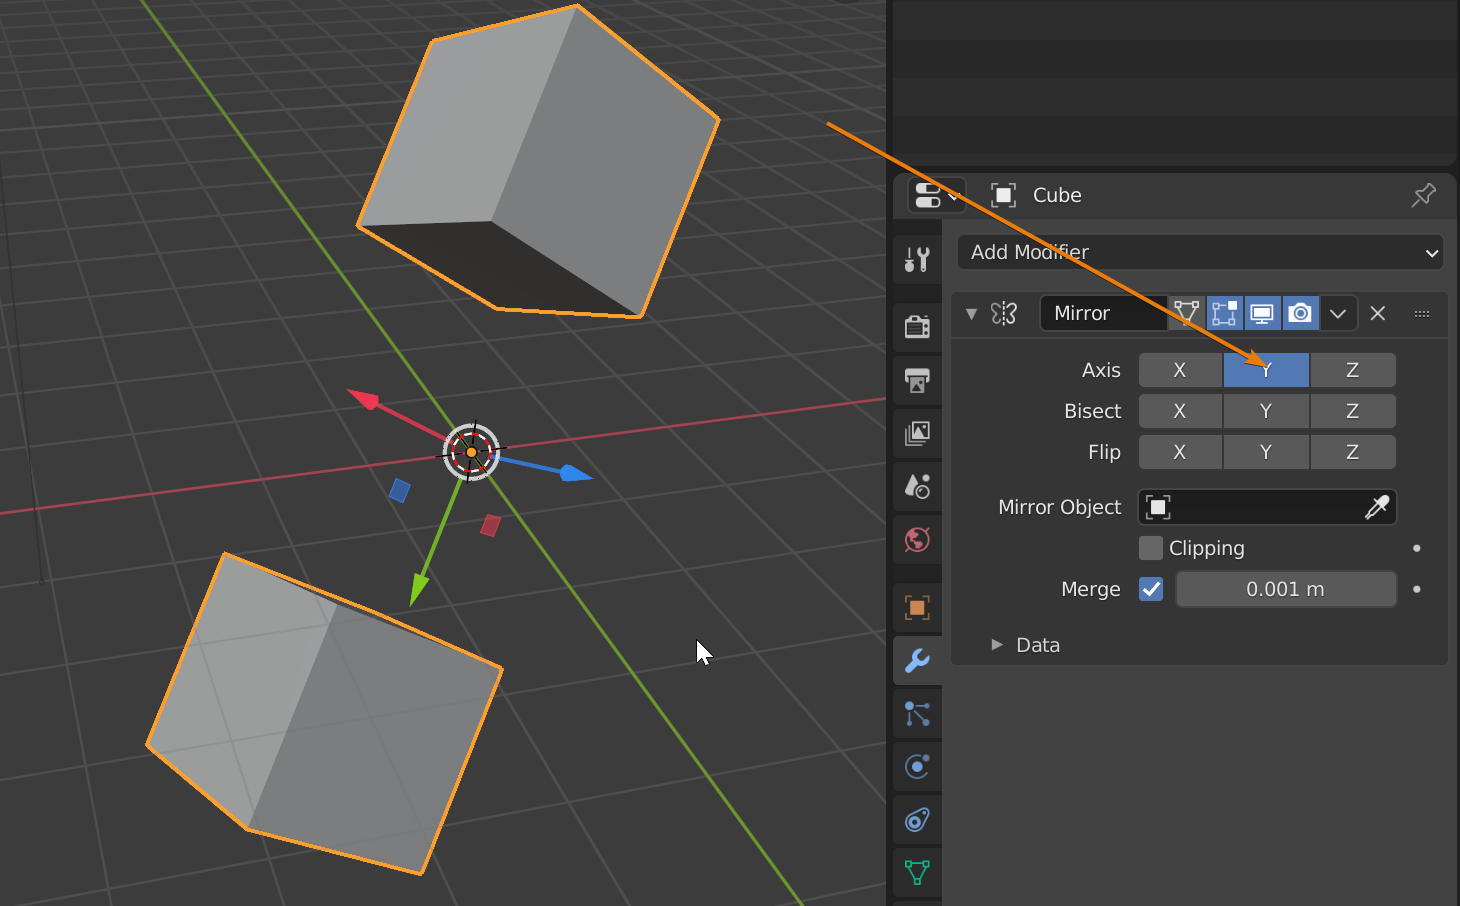
We can start with the new interface in 2.90. The mirror modifier now looks like this. To add it, select your object, go to the wrench tab in the properties panel and add a mirror modifier from the "generators" group.
You can learn more about modifiers here:
Related content: How modifiers work in Blender, an overview
I also cover the mirror modifier in this article as part of the most used modifiers in Blender.
Related content: Top 10 Blender modifiers and how they work
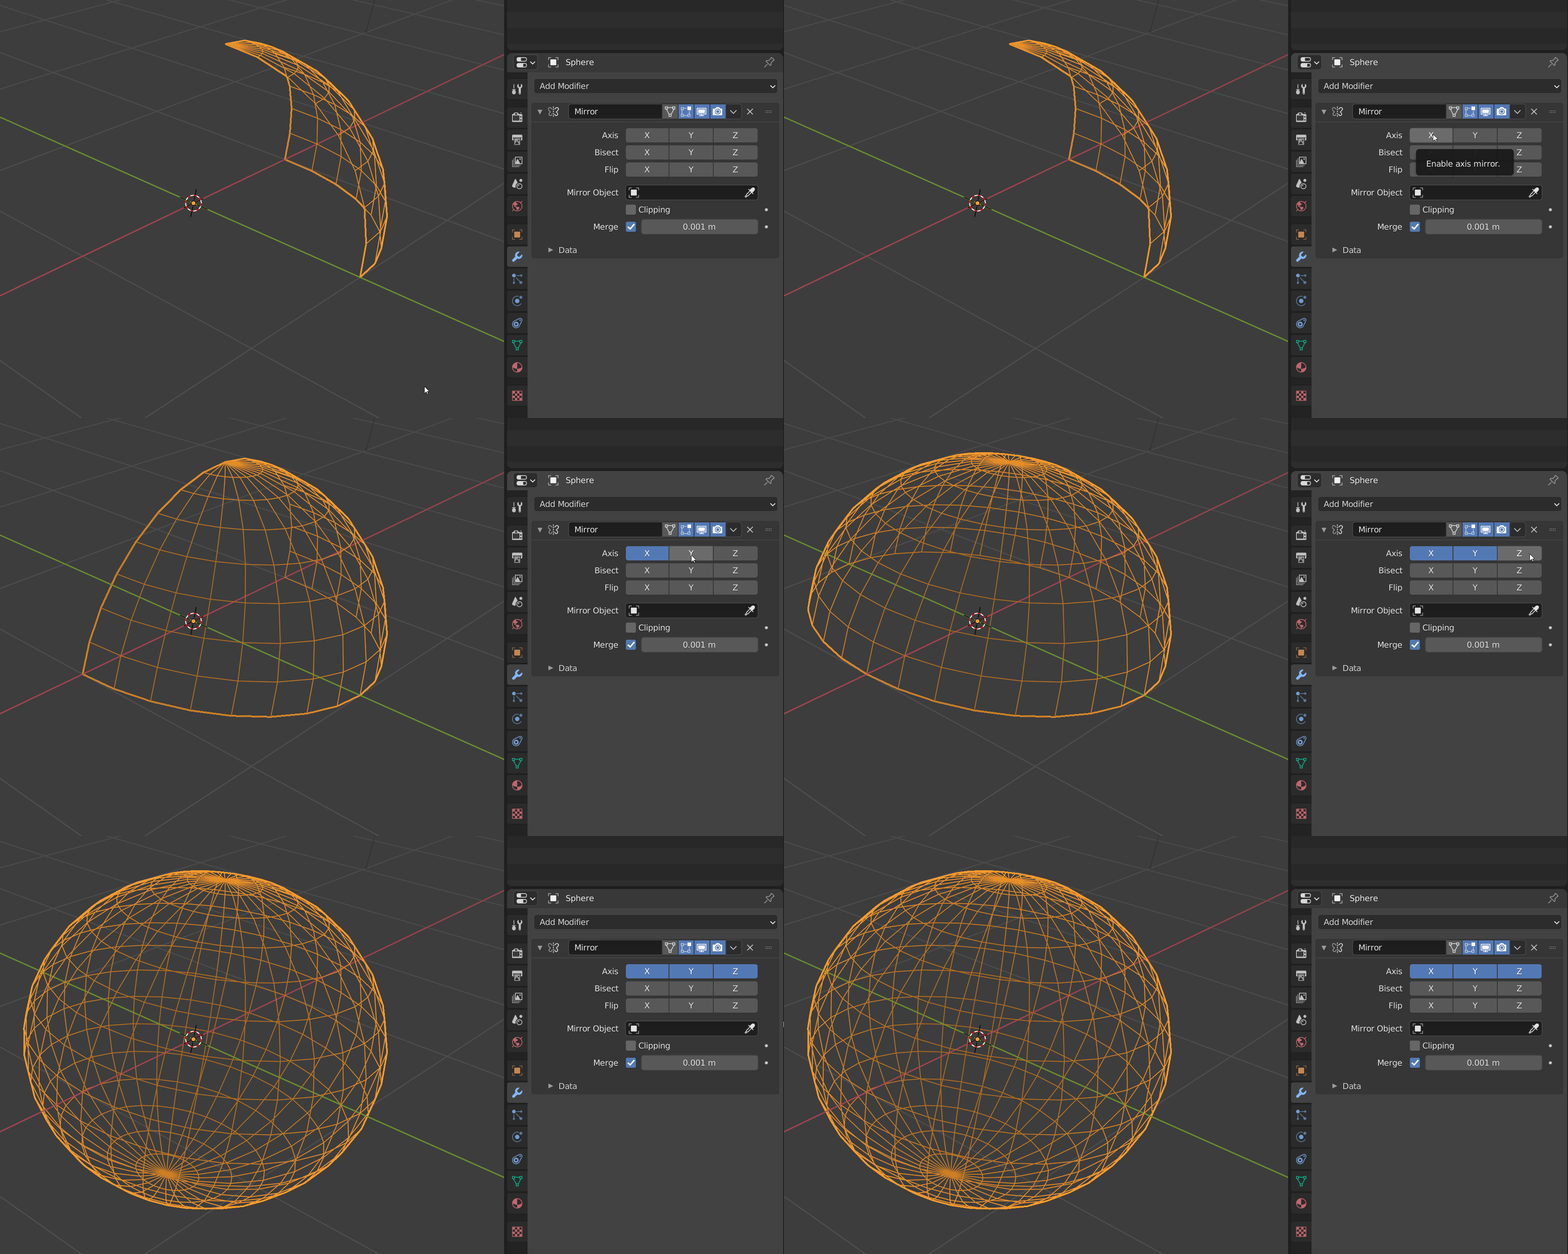
The axis settings dictates the axis we will mirror across. Note that we can mirror across one or more axis. Here is an example where we start with 1/8th of a sphere and turn on one axis at a time until we have mirrored the entire sphere around.
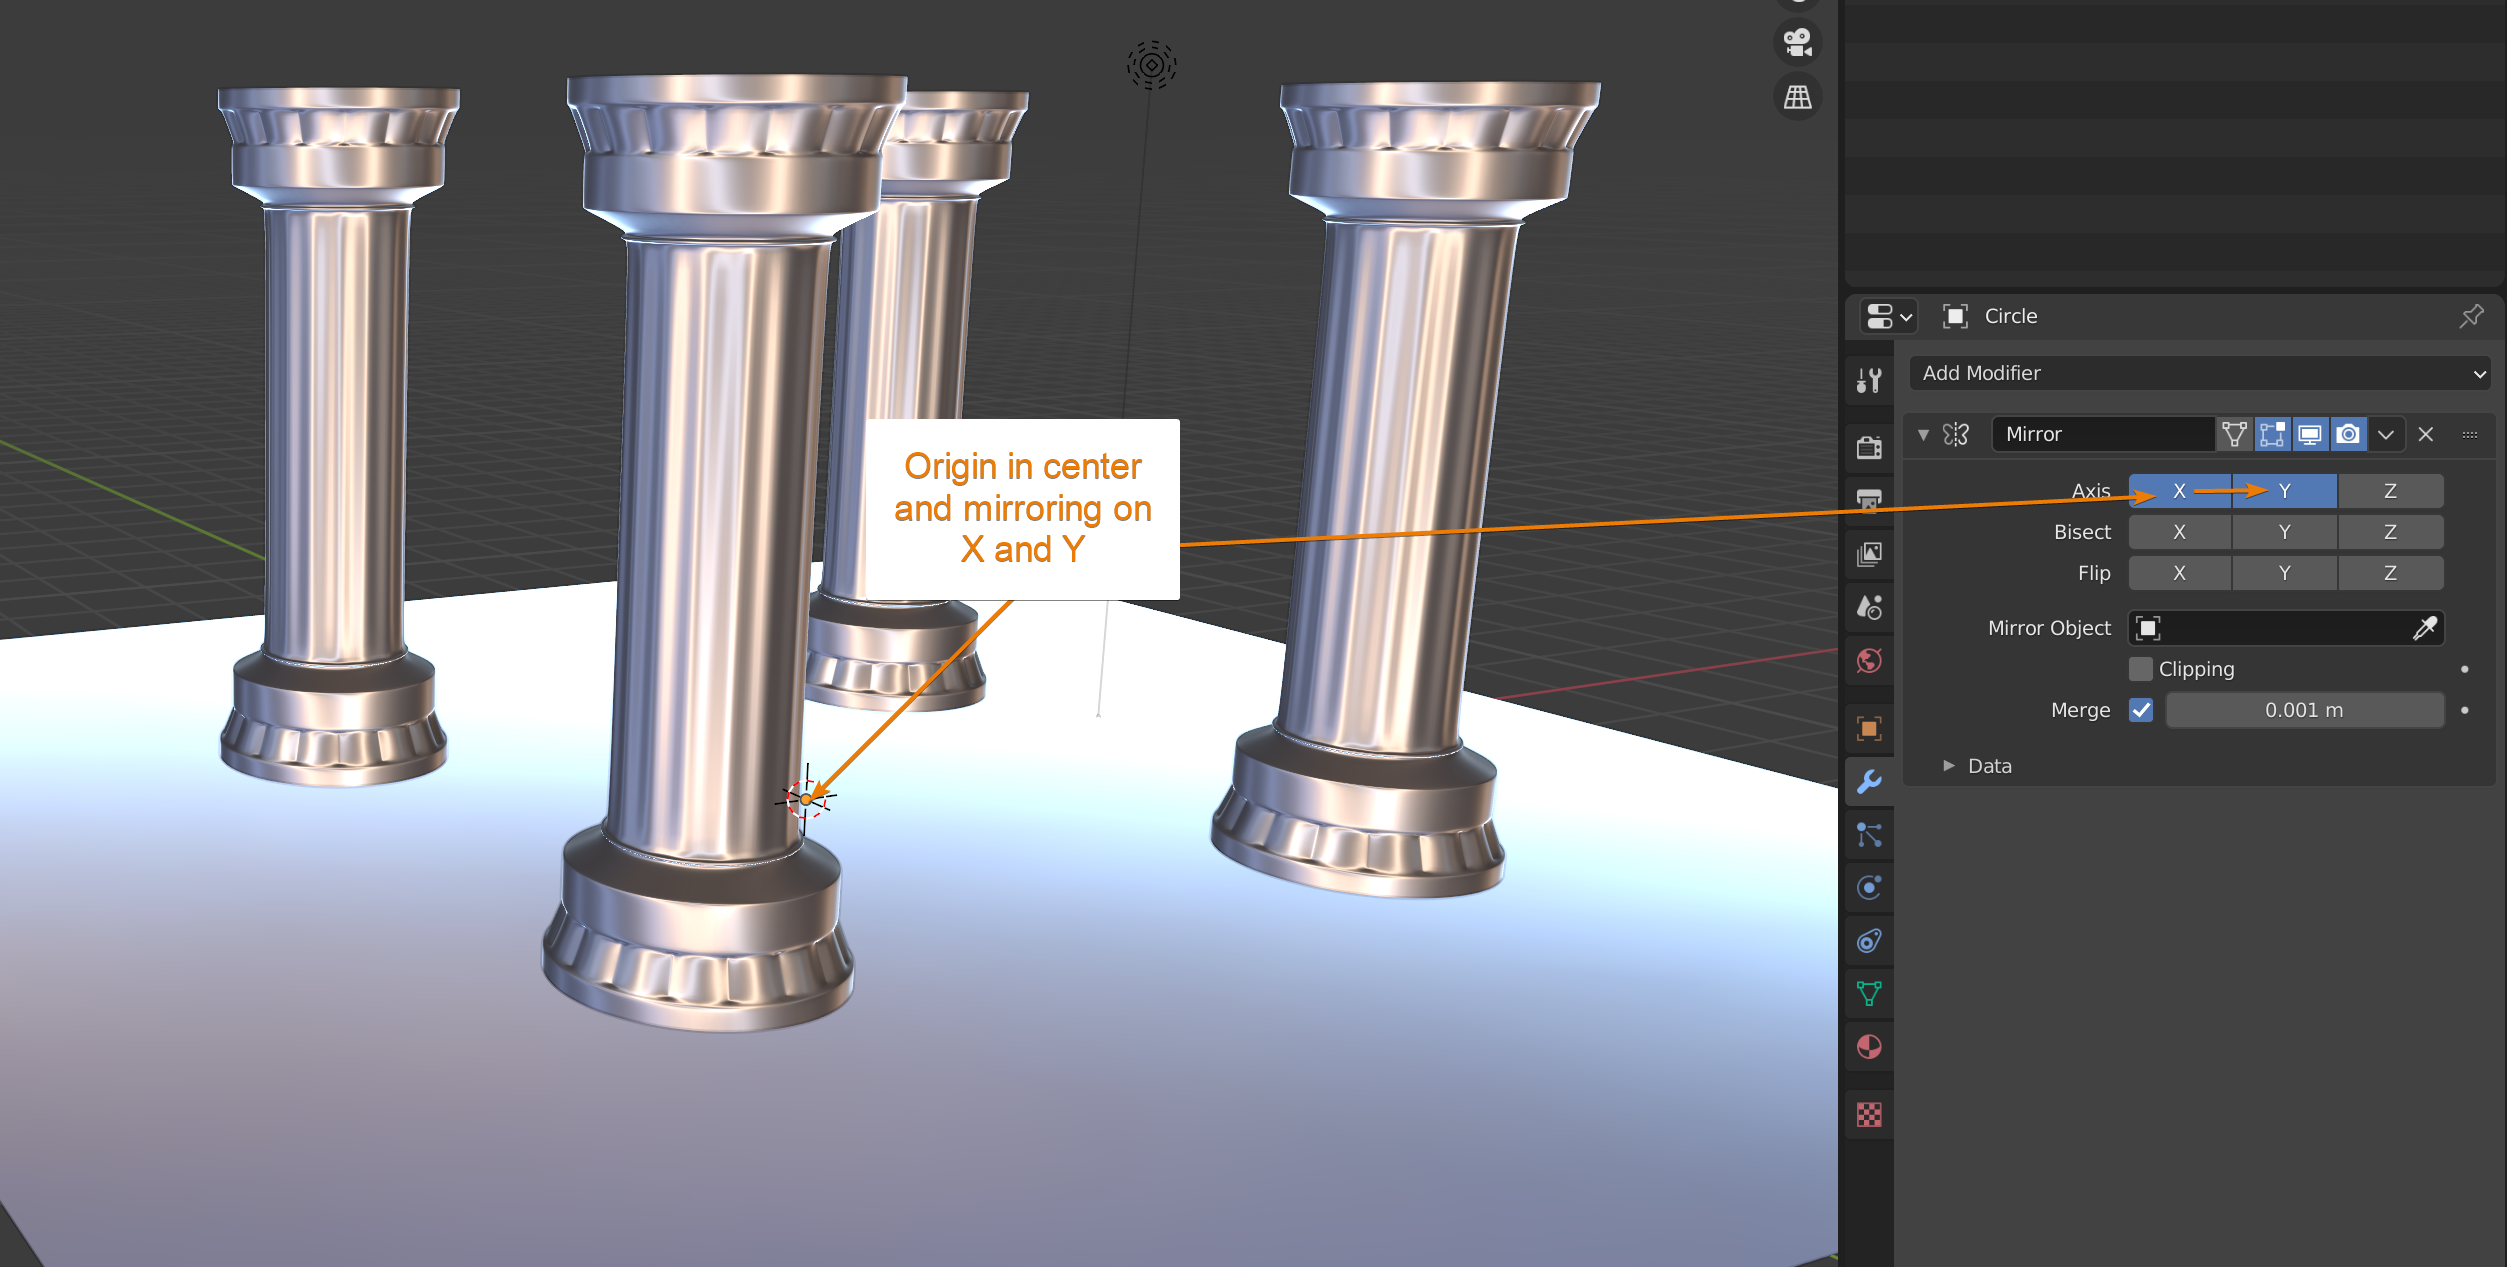
In most cases though we only mirror on one axis to create symmetry between a left and right side of an object. But we can also create a complete duplicate in symmetry if we keep the object's origin in the center.
For example, we can use the mirror modifier to create two or four pillars the exact same distance from the center.
You can learn more about how you can manipulate the origin and pivot point of an object here:
Related content: How to center objects, origins and pivot points in Blender
The point we mirror around is the object origin indicated by the yellow dot in the middle, and we mirror in local space. This means that we can move rotate and scale this object and the mirror will follow the object instead of being stuck to the axis of the world orientation.
Apart from the mirror axis we also have bisect and flip settings in the mirror modifier. Where geometry crosses the middle line bisect will cut it off and whatever is left on the other side will get mirrored. The flip toggle will simply flip this around.
Here is an example using the monkey.
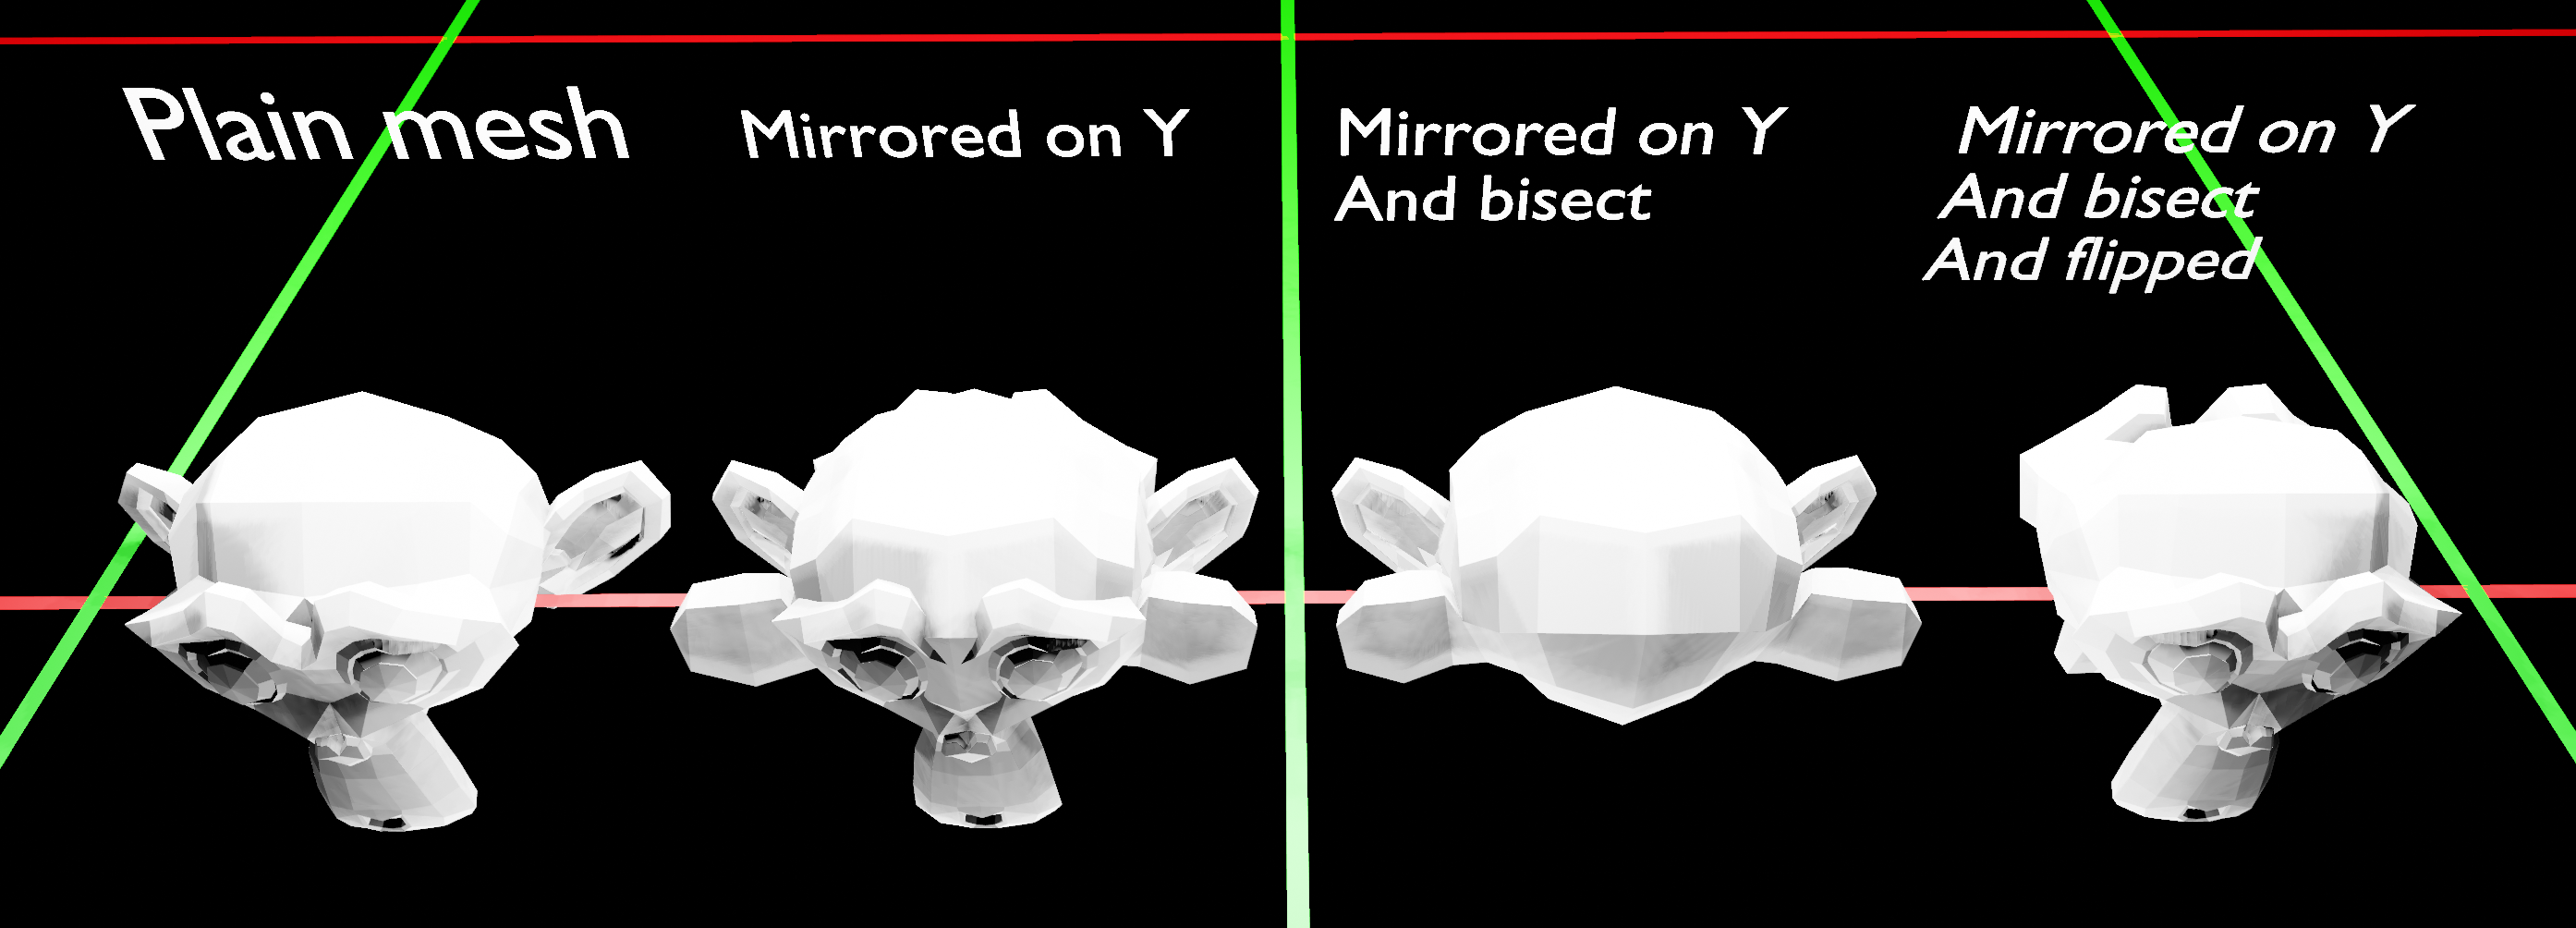
Any mesh that cross the local Y axis is simply deleted.
Further down we have the mirror object. This allows us to mirror across another objects coordinate system.
Imagine that I wanted to showcase my mad character modeling skills. In this case I would need some way of mirroring parts of the body across to the other side.
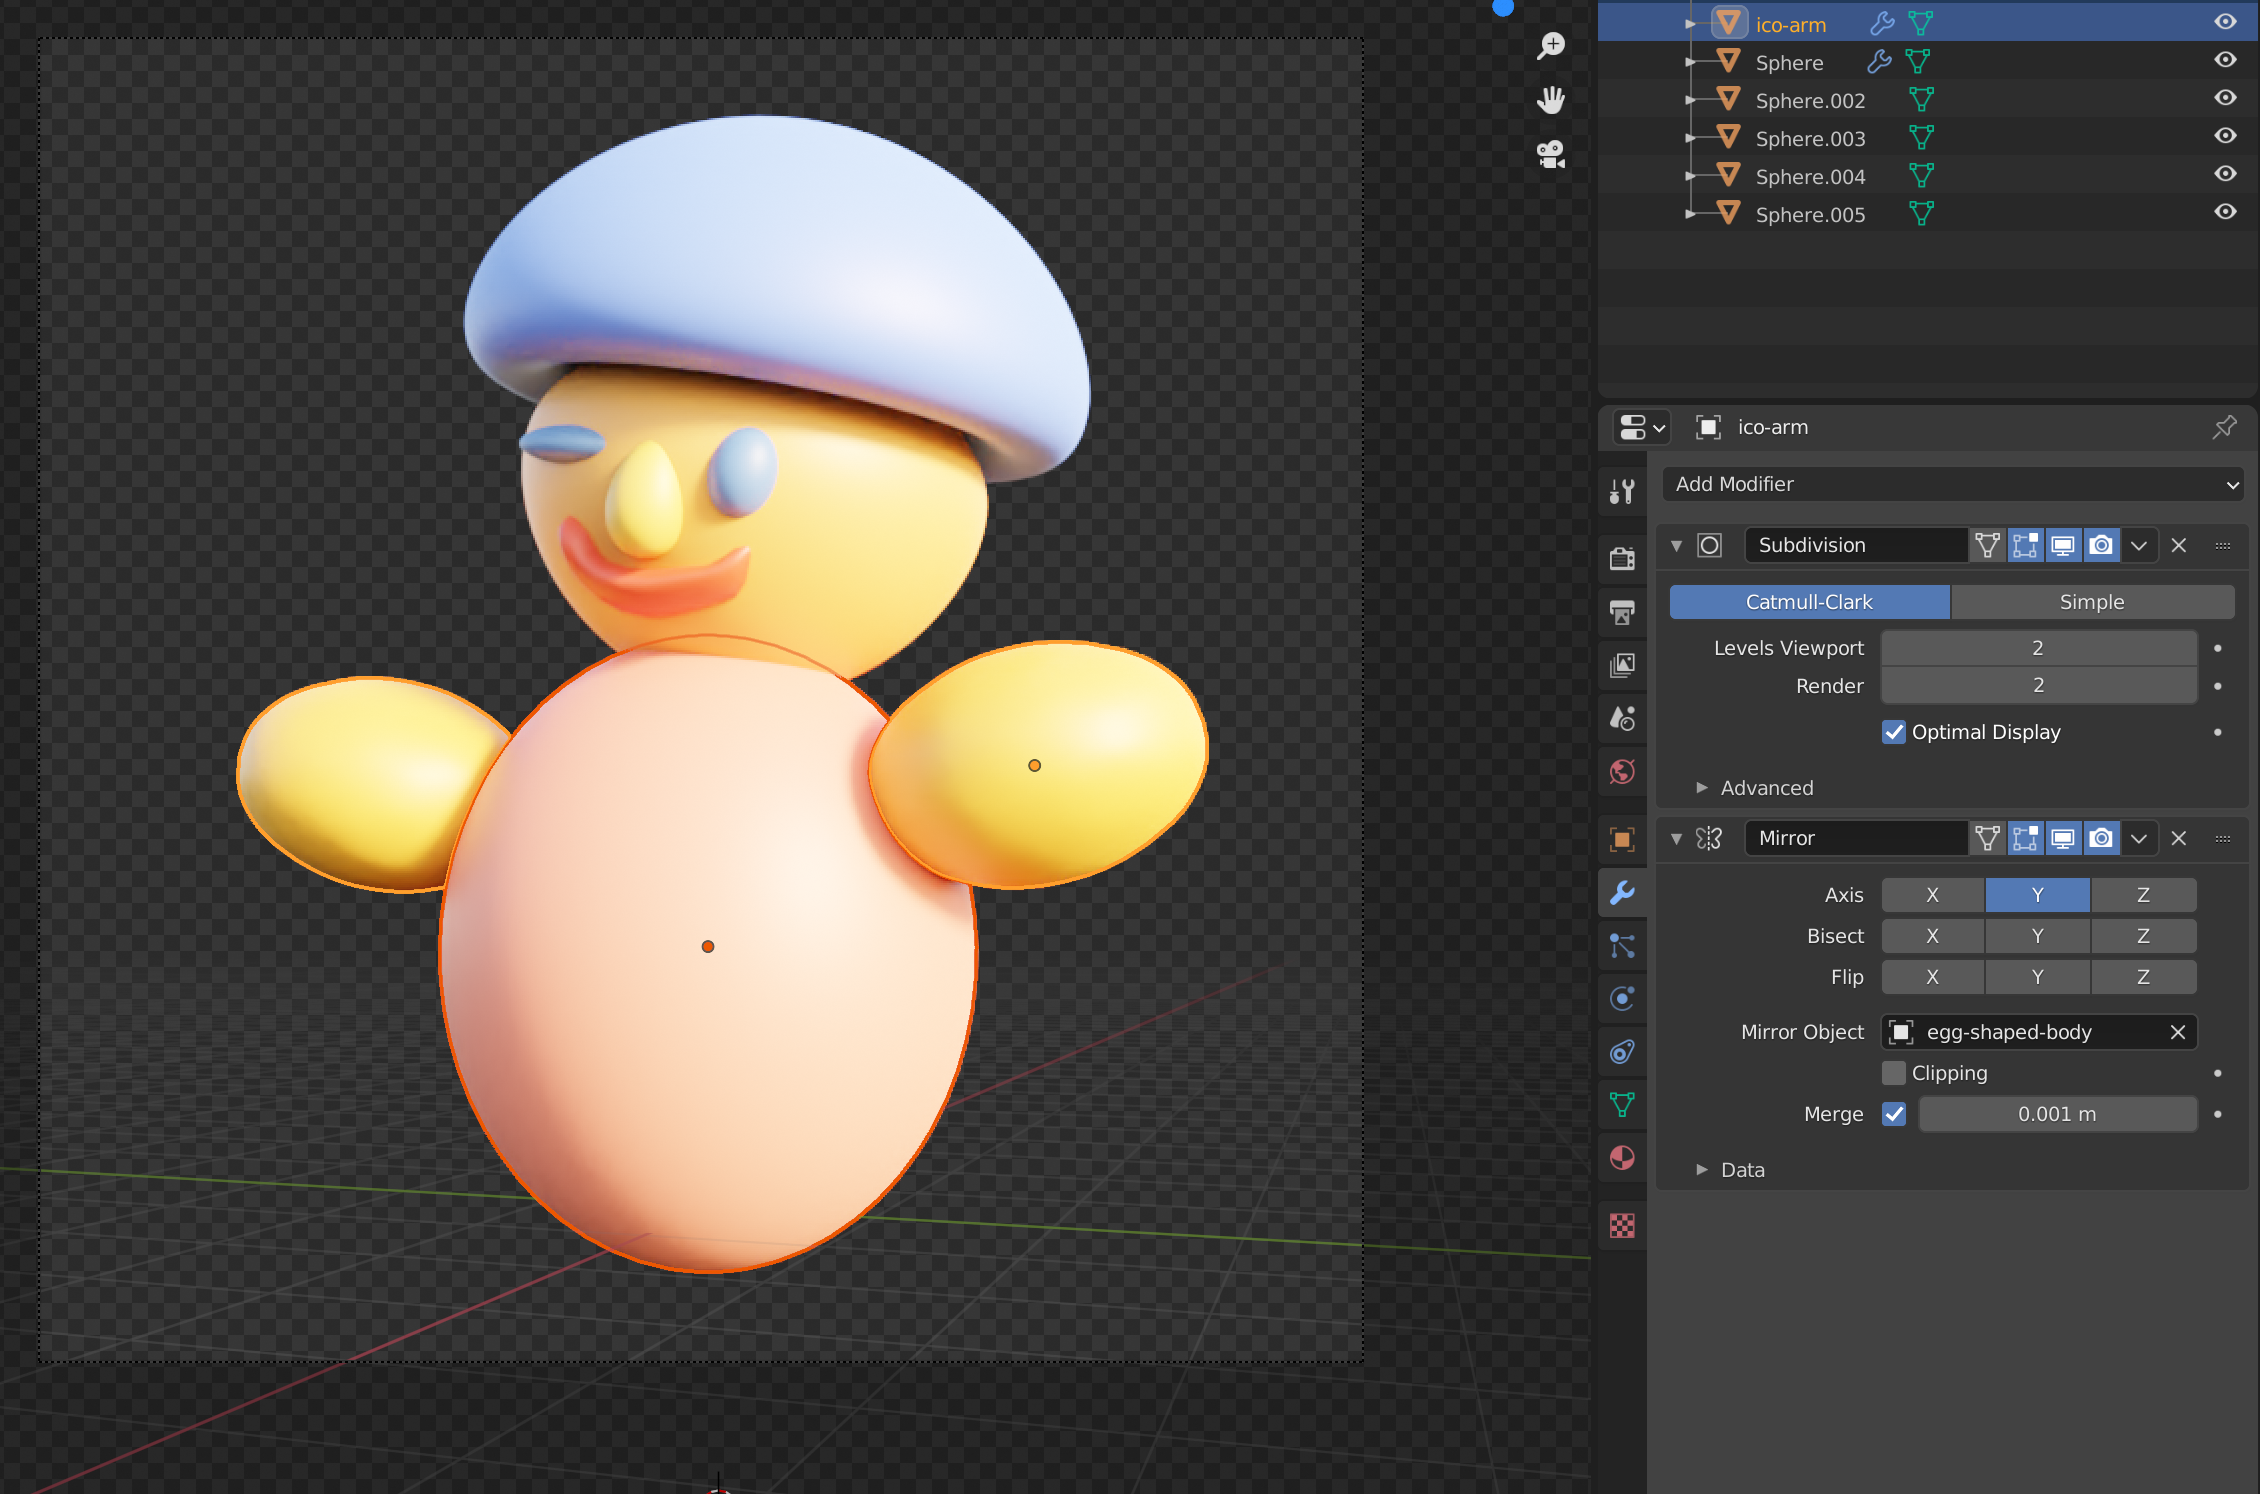
Here I can take the arm and add a mirror modifier to it and set the egg-shaped body as my mirror object.
You can see the origin point of the body is in the middle. This is the point we will mirror across instead of using the origin of the arm that is centered on the arm object.
This is a useful feature for any symmetrical model that we want to divide up into multiple objects.
The clipping setting will make sure that any vertex that cross from the positive side of the axis to the negative side will clip to the 0 position. In essence, we can only have mesh on one side and the mirror on the other side.
This is useful in a lot of cases where we want to model one side of an object that is directly connected to the other side. This way we know that we only have geometry on one side.
The merge setting will merge any vertex that come within the threshold of the 0 line between the positive and negative side of the axis with its mirrored version.
Then we have the data subsection. This portion mostly deal with how we mirror textures. I explain this towards the end of the video above.
In short though, these options allow us to offset any mirrored UV Map and copy over vertex groups to the mirrored side.
When starting out using the mirror modifier in Blender there are some things we can check.
The most common problem is that we are mirroring across the wrong axis. It is easy to think that we may mirror from one side to the other of the axis line. For instance, you may think that mirroring on the X(Red) axis would mirror like this:
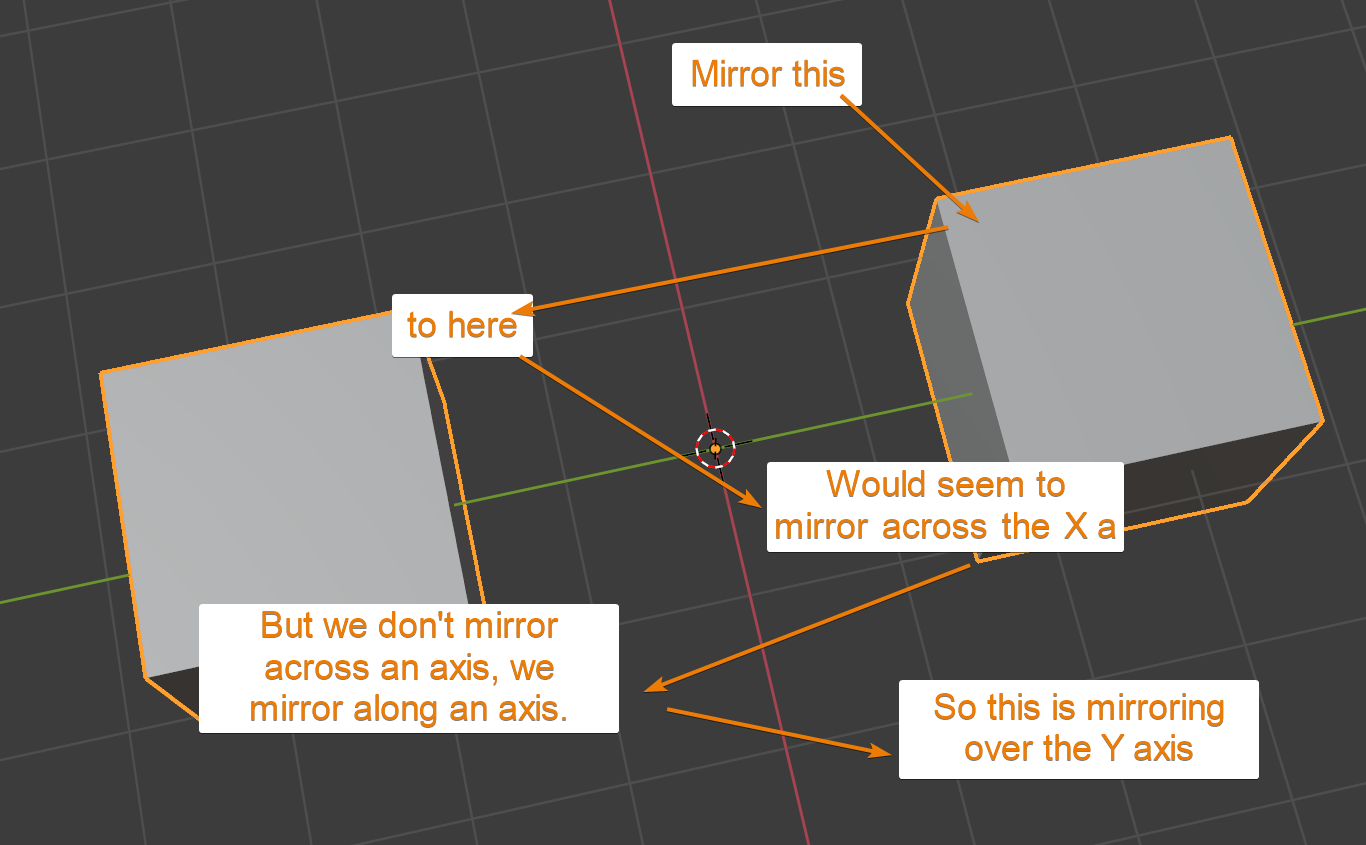
But this is really mirroring on the Y(Green) axis. We often say that we mirror "across" an axis. But what we really do is mirroring between the positive and the negative side of the same axis.
Another common problem is that we don't have our origin point in the correct position. We mirror from one side of the origin point to the other. The origin point decides where the positive side of an axis ends and the negative begins if you will.
You can learn more about manipulating the origin point in this article.
Related content: How to center objects, origins and pivot points in Blender
The last problem that we will discuss is that we are actually mirroring across the local axis of the object and not the global axis.
By default, our object coordinated are aligned with the world coordinates making them look and behave the same. But if our object is rotated in object mode, the local and global coordinates are no longer the same. This means that we can't follow the red and green line in our viewport to see where our axis are for the local object. These lines show the global coordinates.
To view the local coordinates I find that it is easiest to first select the local coordinates for our transform orientation and then enable the "move" widget from the gizmo menu in the 3D viewport.
The transform orientation can be found in the middle of the 3D viewport header.

Next we go to the gizmo menu and enable the move widget.
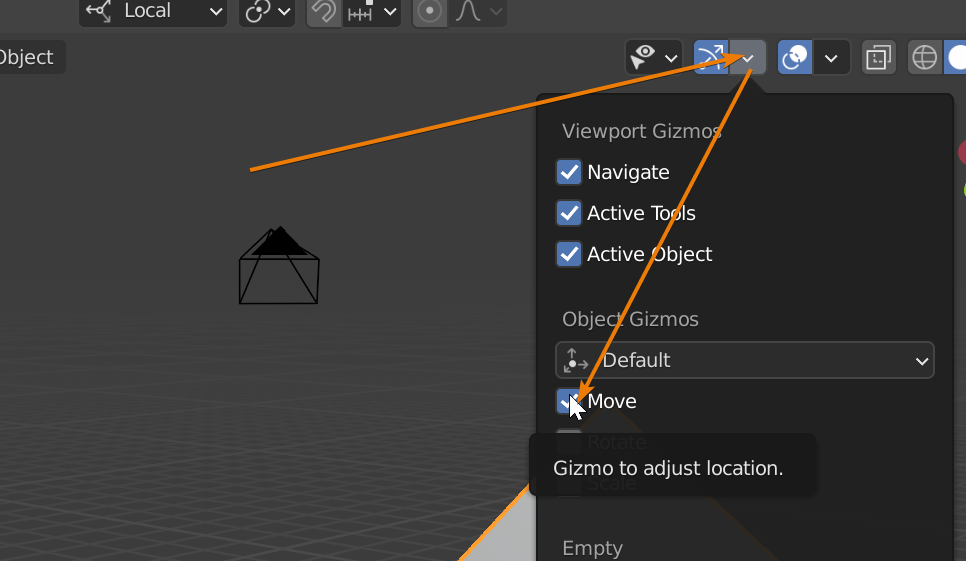
Now we will see the move widget in the 3D viewport with the local axis for our object, and we can set up the mirror modifier according to these coordinates. The arrow is pointing in the positive direction of the axis.
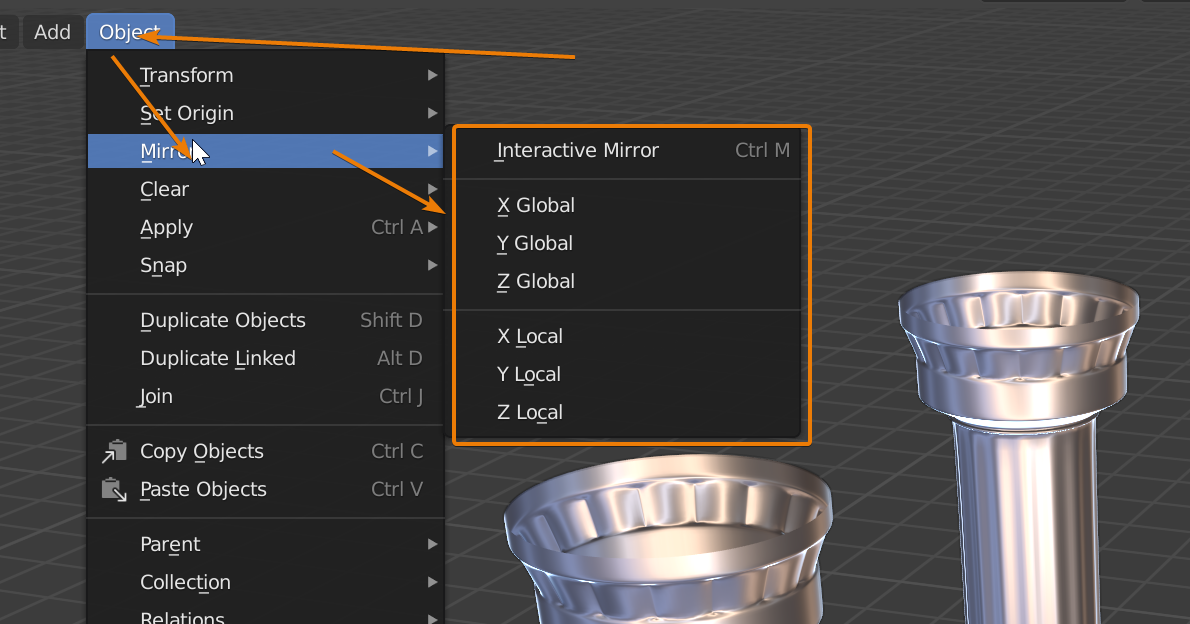
While the mirror modifier creates a duplicate on the other side of the axis, the mirror tools flips the object to it's mirrored version without creating any additional geometry.
We can use the mirror tool to flip an object from one side of the axis to the other, essentially creating the mirror image of whatever we mirror. The tool is available both in Object mode and edit mode and is similar to scaling an object by -1 on an axis.
The shortcut is Ctrl+M followed by the axis, X, Y or Z that we want to mirror across. If you double tap the axis you will mirror across the local axis instead of the global. We can also find this tool in the Object menu.
This tool also allow us to use different transform pivot points. For example, we can use individual origins for separate objects or separate selections.
We can also use the default median point or the 3D cursor as pivot point just to name a few examples.
When we enter sculpt mode, symmetry on the X axis is already turned on by default. This is probably because much of what is sculpted use symmetry. We can access these settings either in the properties panel by going to the "active tool and workspace settings". That is the first tab from the top. Then find the symmetry section and uncheck "X".
We can also find the symmetry settings for mirroring directly in the 3D viewport header while in sculpt mode. Here we can also find the same settings as in the symmetry section by pressing the down arrow to bring up the menu.
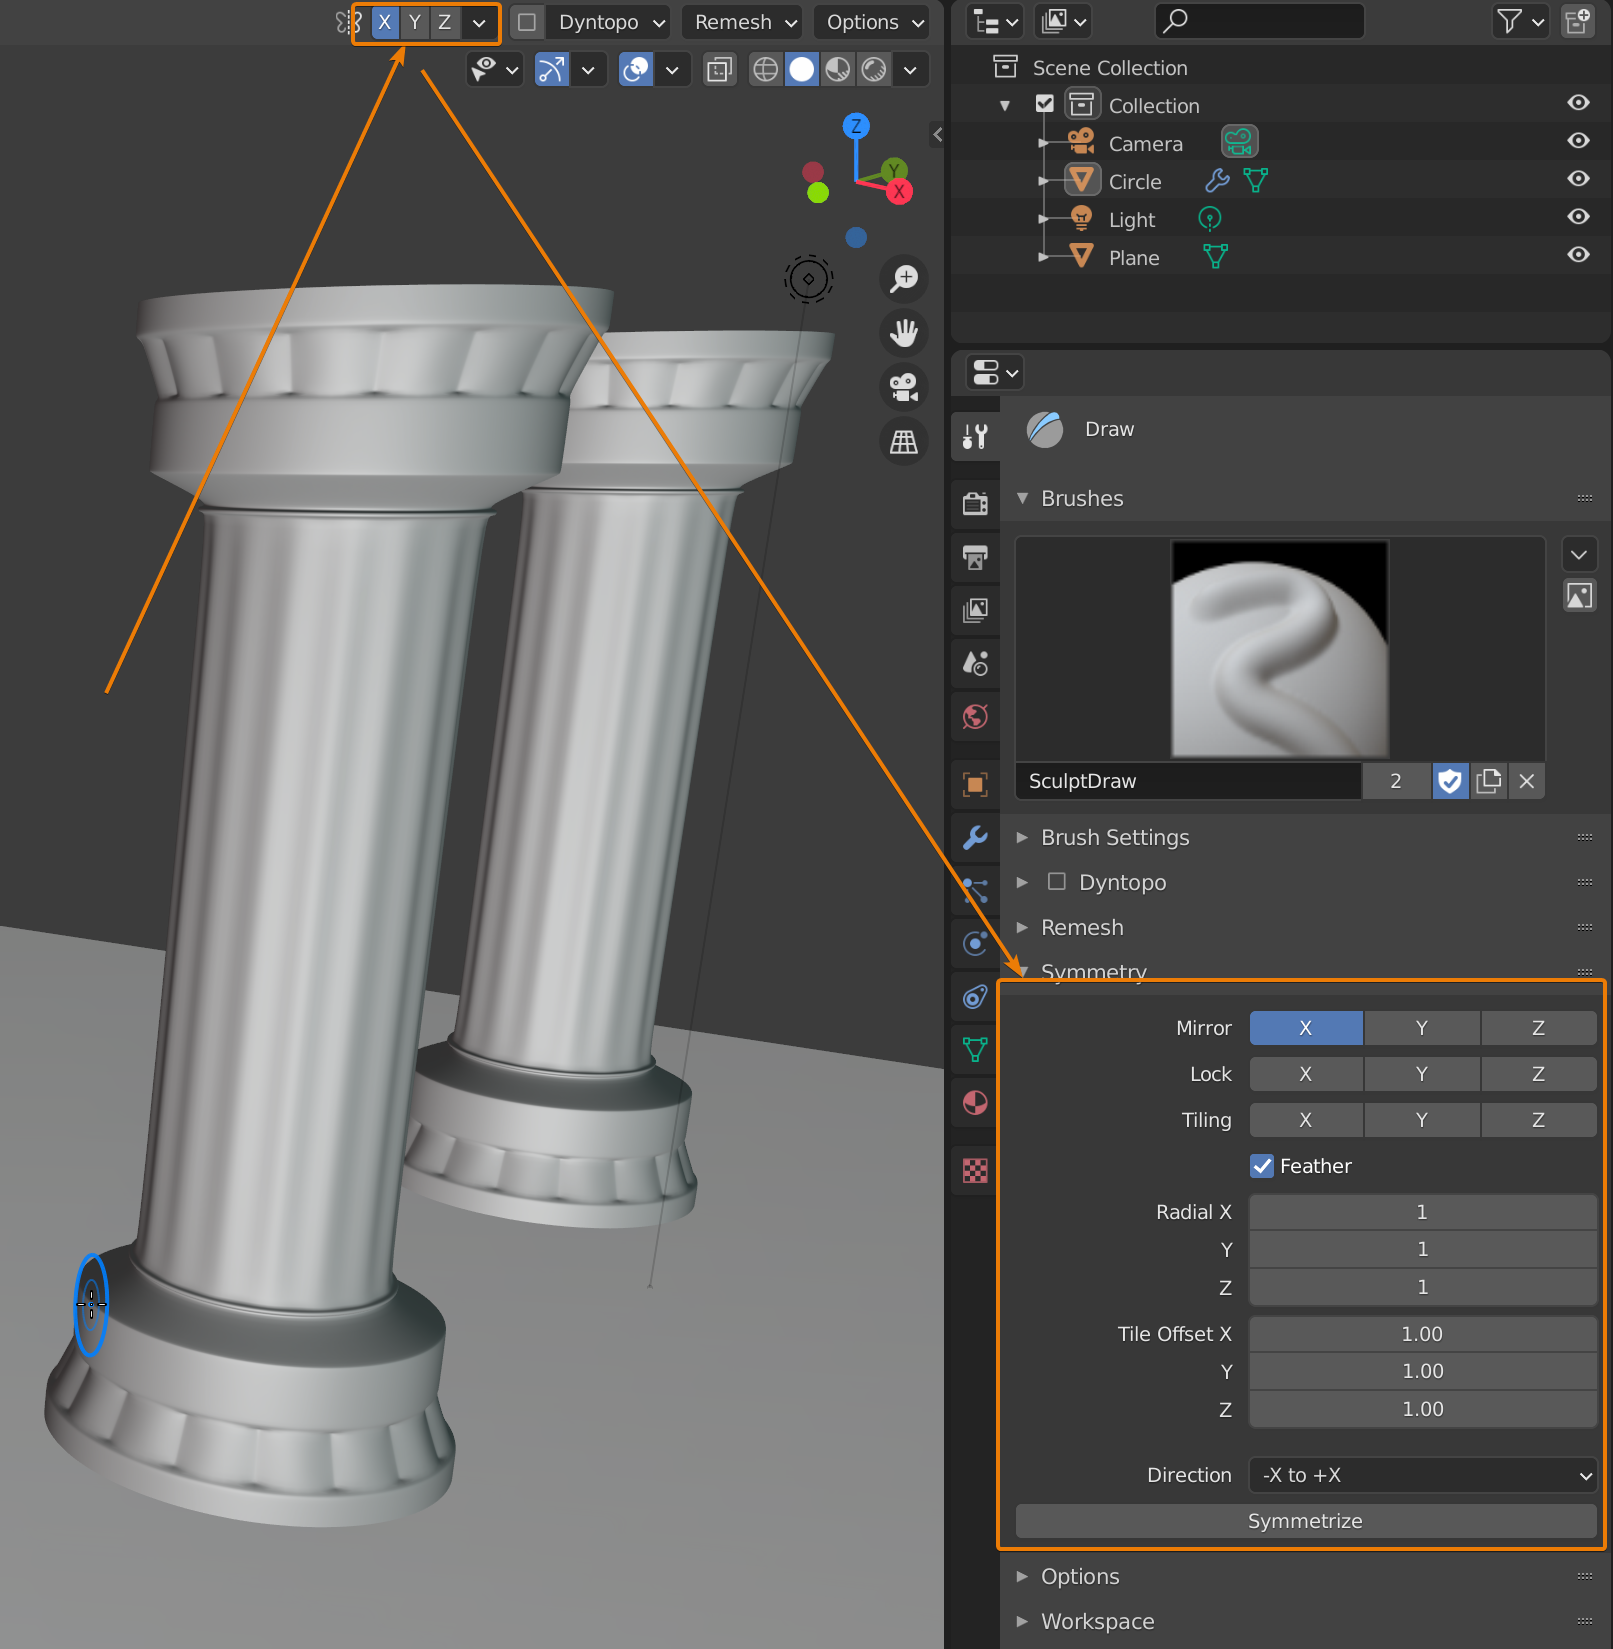
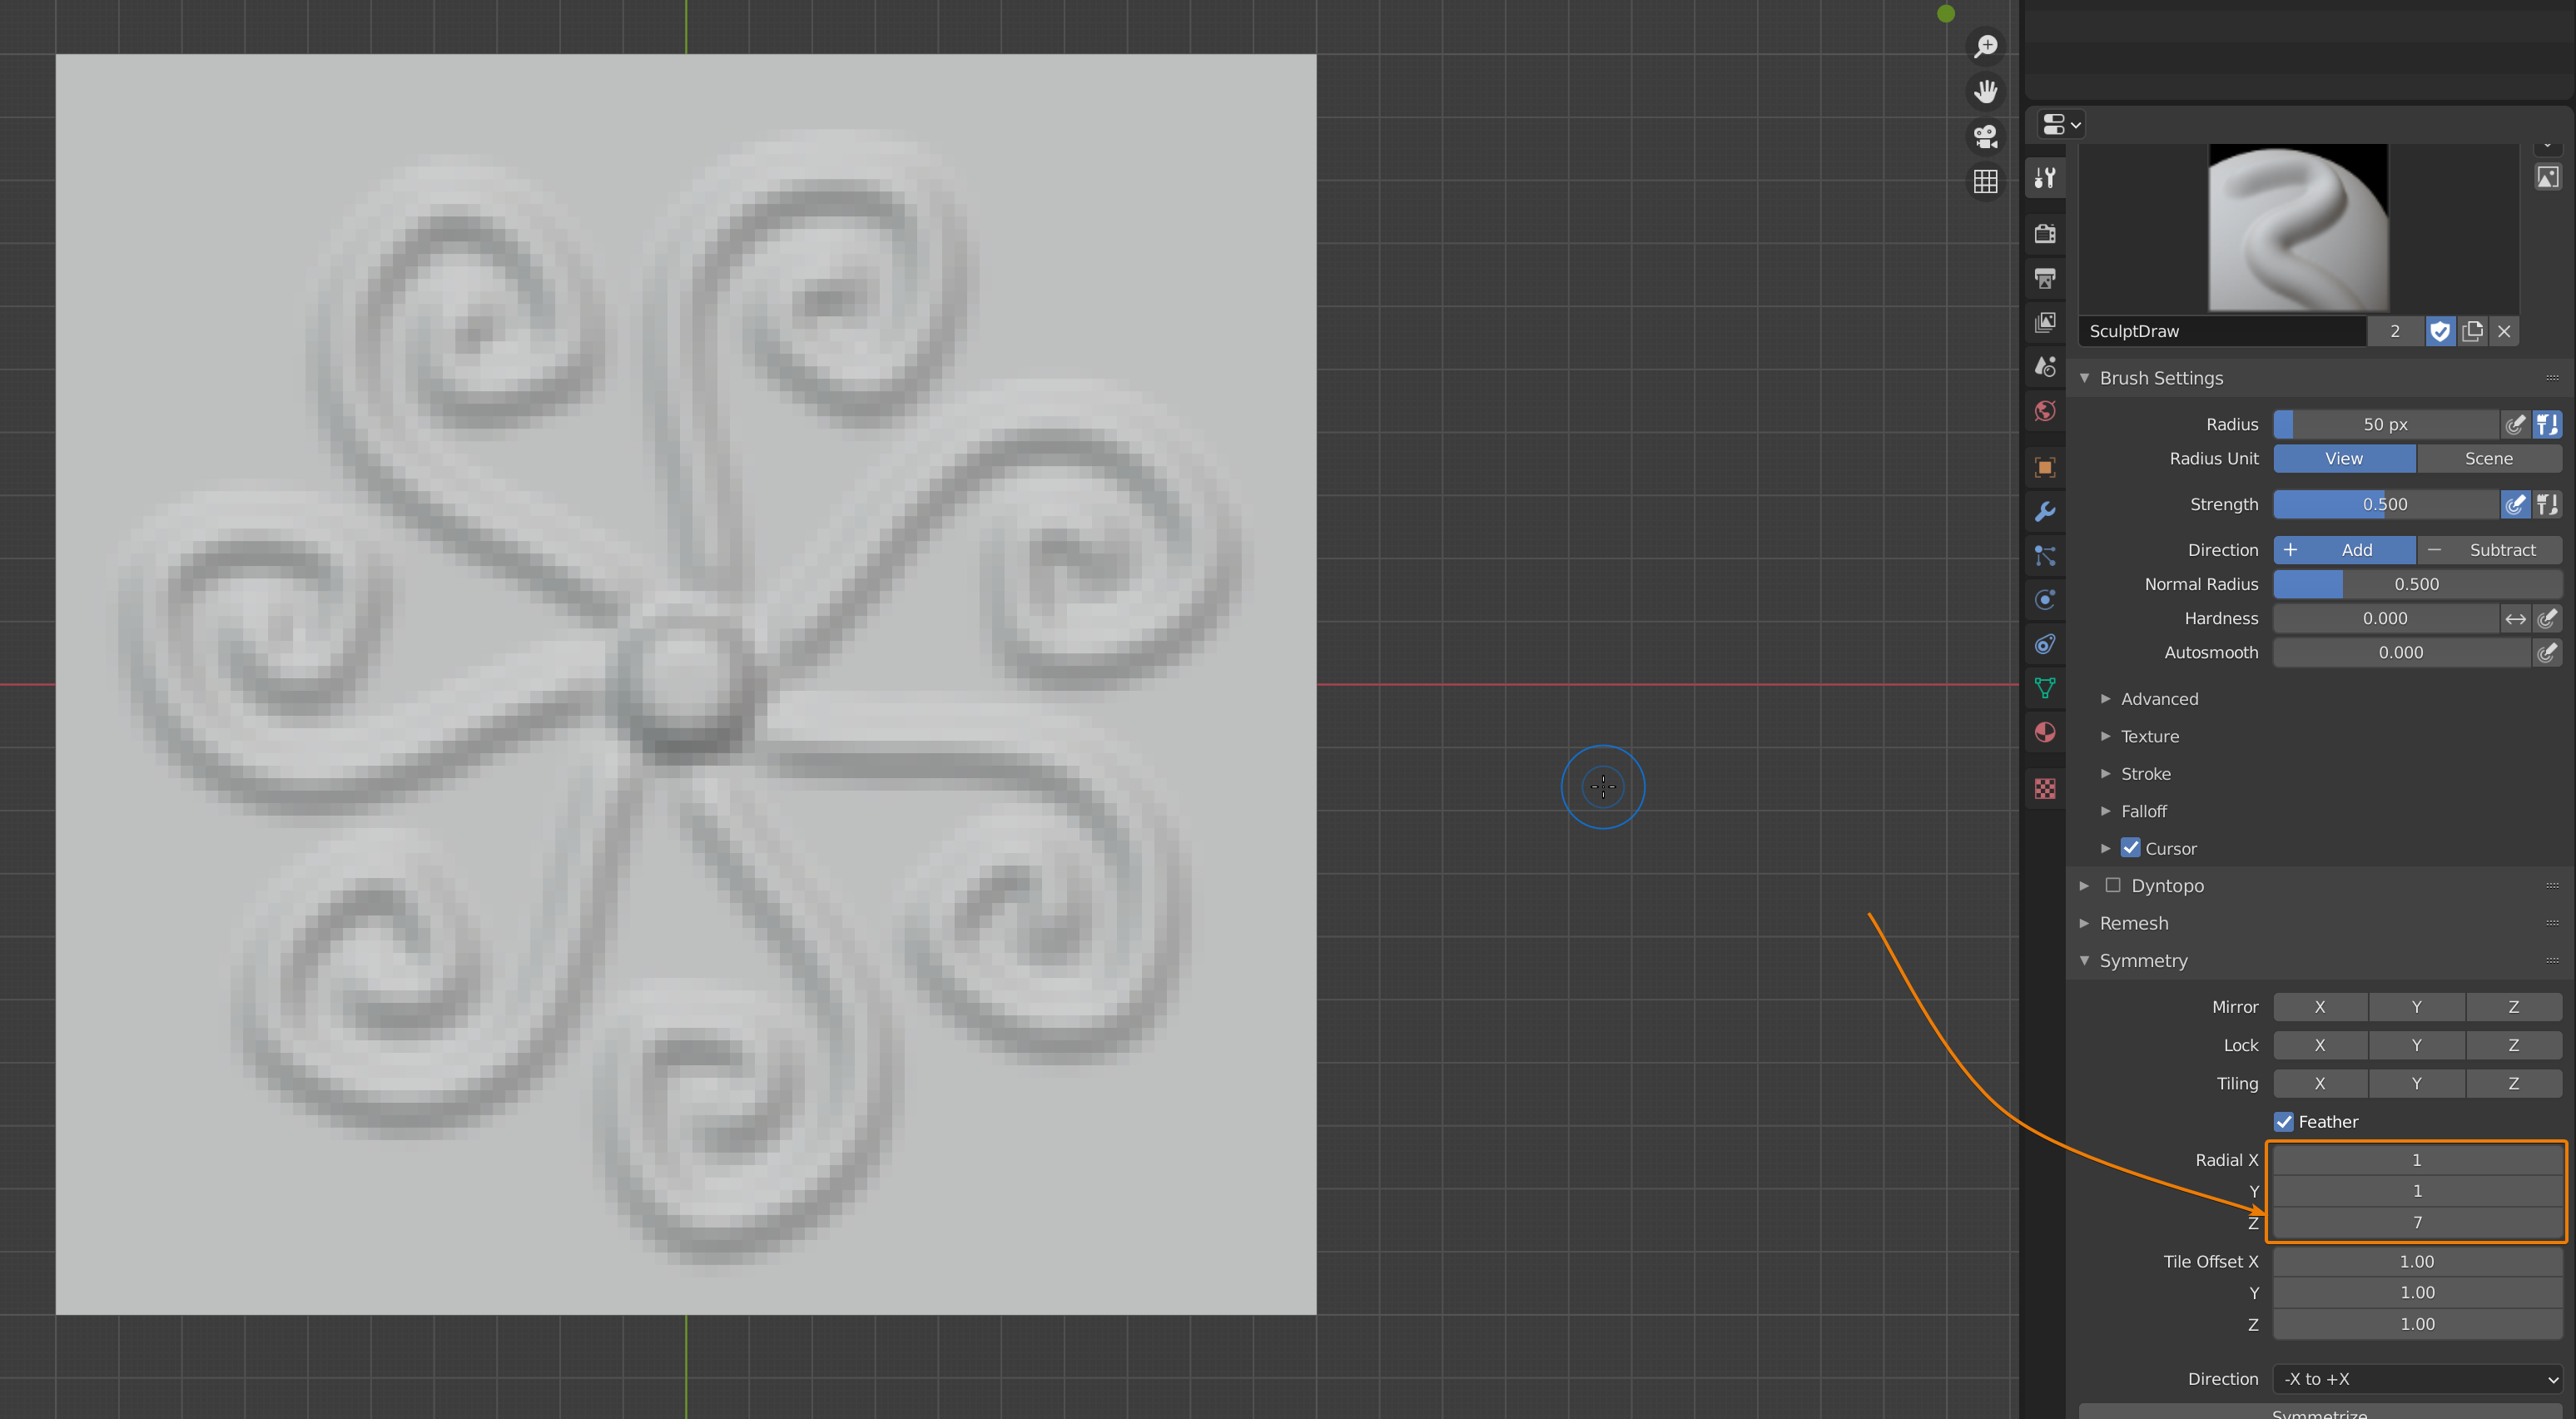
Besides mirroring we also have options for tiling and radial. Radial is basically radial mirroring, allowing us to sculpt as many "wings" as we would like.
Here is an example with radial for the Z axis set to 7.
So what if you found this article and wasn't interested in mirroring mesh at all, but instead you wanted to create a shader that acted as a mirror? In that case here is a node setup that you can use for both Eevee and Cycles.
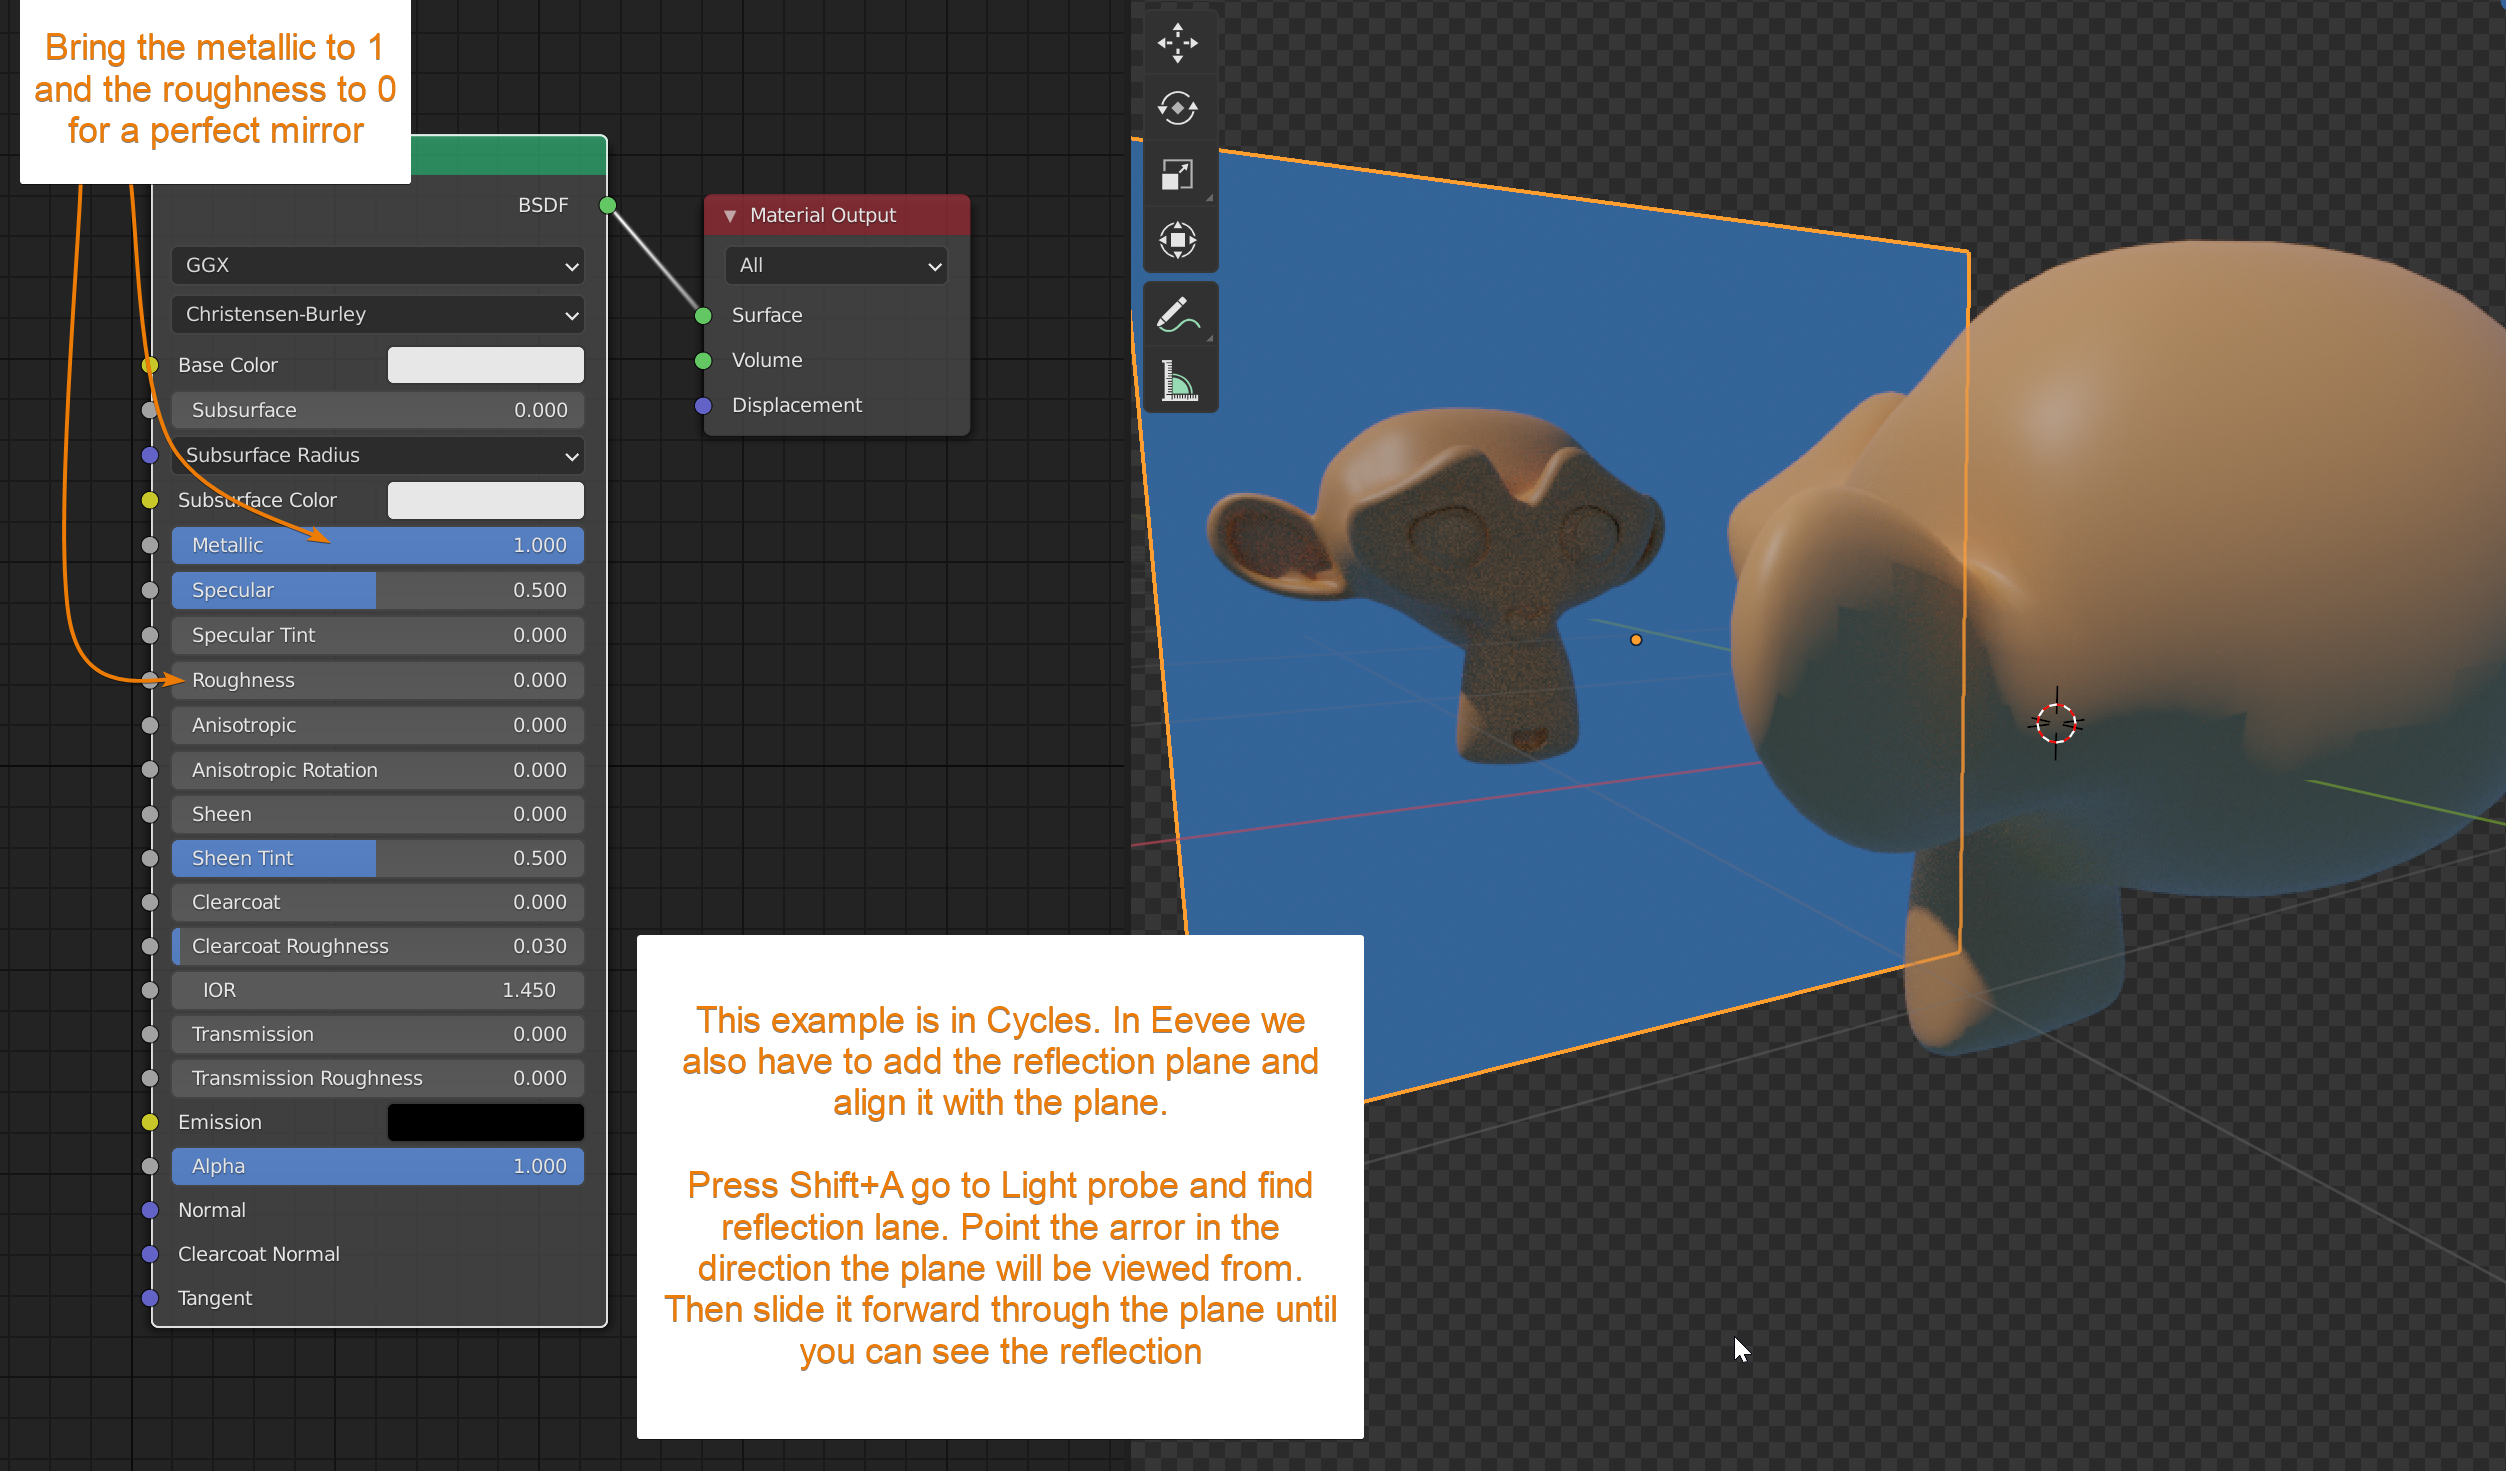
In Eevee we also need to add a reflection plane or our mirror won't reflect anything. We can do this by clicking Shift+A and go to Light probe and find reflection plane.
Align it with the reflective surface and have the arrow point in the direction the plane will be viewed from.
If you want to learn more about shading and the node editor, you can check out this article.
Related content: The complete beginners guide to Blender nodes, Eevee, Cycles and PBR
In this article we took a look at some common ways to use mirroring in Blender. Primarily to create mirrored geometry so that we may save time and don't have to model everything multiple times as well as getting an exact offset from a middle point.
Thanks for your time.
