


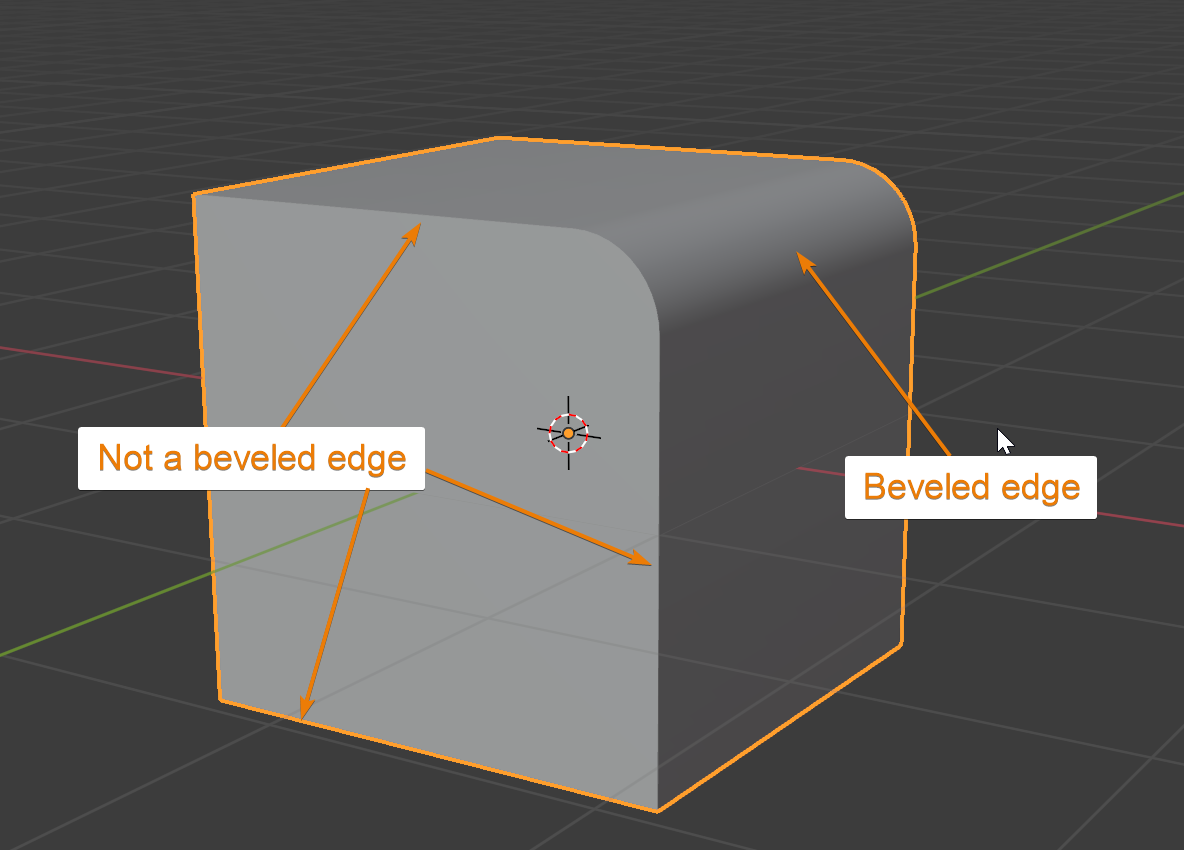
When you 3D model in Blender, you will soon realize that your edges are very sharp. To round them of, we can use a bevel. A bevel will add more geometry on the edges, giving us an angled area where light can interact more naturally. In most cases this improves the look and realism of our models a lot.
There are two primary ways we can bevel in Blender. The first option is through the bevel tool found in edit mode for a mesh object also accessed with the CTRL+B shortcut. The second method is by using the bevel modifier. Add it in object mode by going to the modifier tab and choose the bevel modifier from the dropdown menu.
In the rest of this article, we will explore both methods to give you a complete understanding on how to bevel and best practices for when to use the tool and when to use the modifier.
For more modeling tools, also check out this article:
Related content: More than 30 Blender modeling tools explained
Before we start, for those of you who come from another software package, if you are looking for a chamfer tool, chances are that beveling is what you are looking for in Blender.
So, what is beveling?
Beveling is a tool or modifier that changes the geometry so that we get one or more surfaces between two other surfaces. Often these two surfaces are on an angle, and we use beveling to smooth out the transition from one surface to another, creating a rounder profile.
A bevel can be made with one or more segments, each segment is just a loop of faces that goes around between the two faces that we bevel. With more segments, we can get a smoother transition between two surfaces, but we also add more geometry that leads to a higher performance cost.
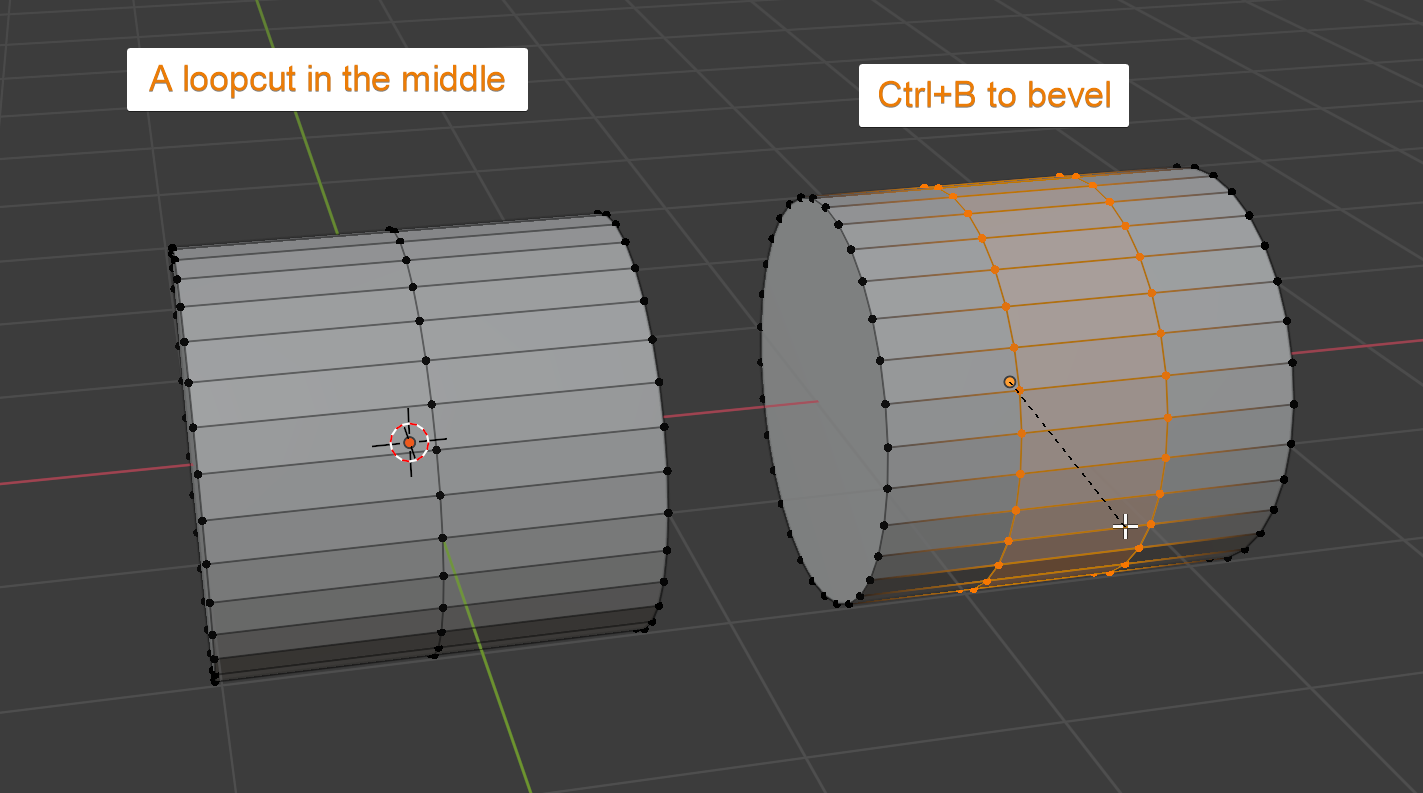
We usually use beveling in one of two ways, either as a tool to create smooth edges with nice transitions that can catch highlights and add realism. Or we use it to shape our object. In the latter example, we can think of the bevel tool as an extension to the loop cut tool that expands the loop cut in both directions and ads additional cuts as needed.
We should primarily use the bevel tool when we want to create shapes and expand geometry rather than when creating detail. We leave the detailing and making edges look good to the bevel modifier so that we can control the beveling procedurally and after it is applied if we need to make changes.
Here is an example. A cylinder with a loop cut running down the middle, if we use the bevel tool with Ctrl+B here we can quickly create more and symetrical geometry. From here we could use extrude or similar to continue developing our shape.
Related content: How the loop cut tool works in Blender
Related content: Extrude in Blender: Basics, along curve, circles, manifold and more
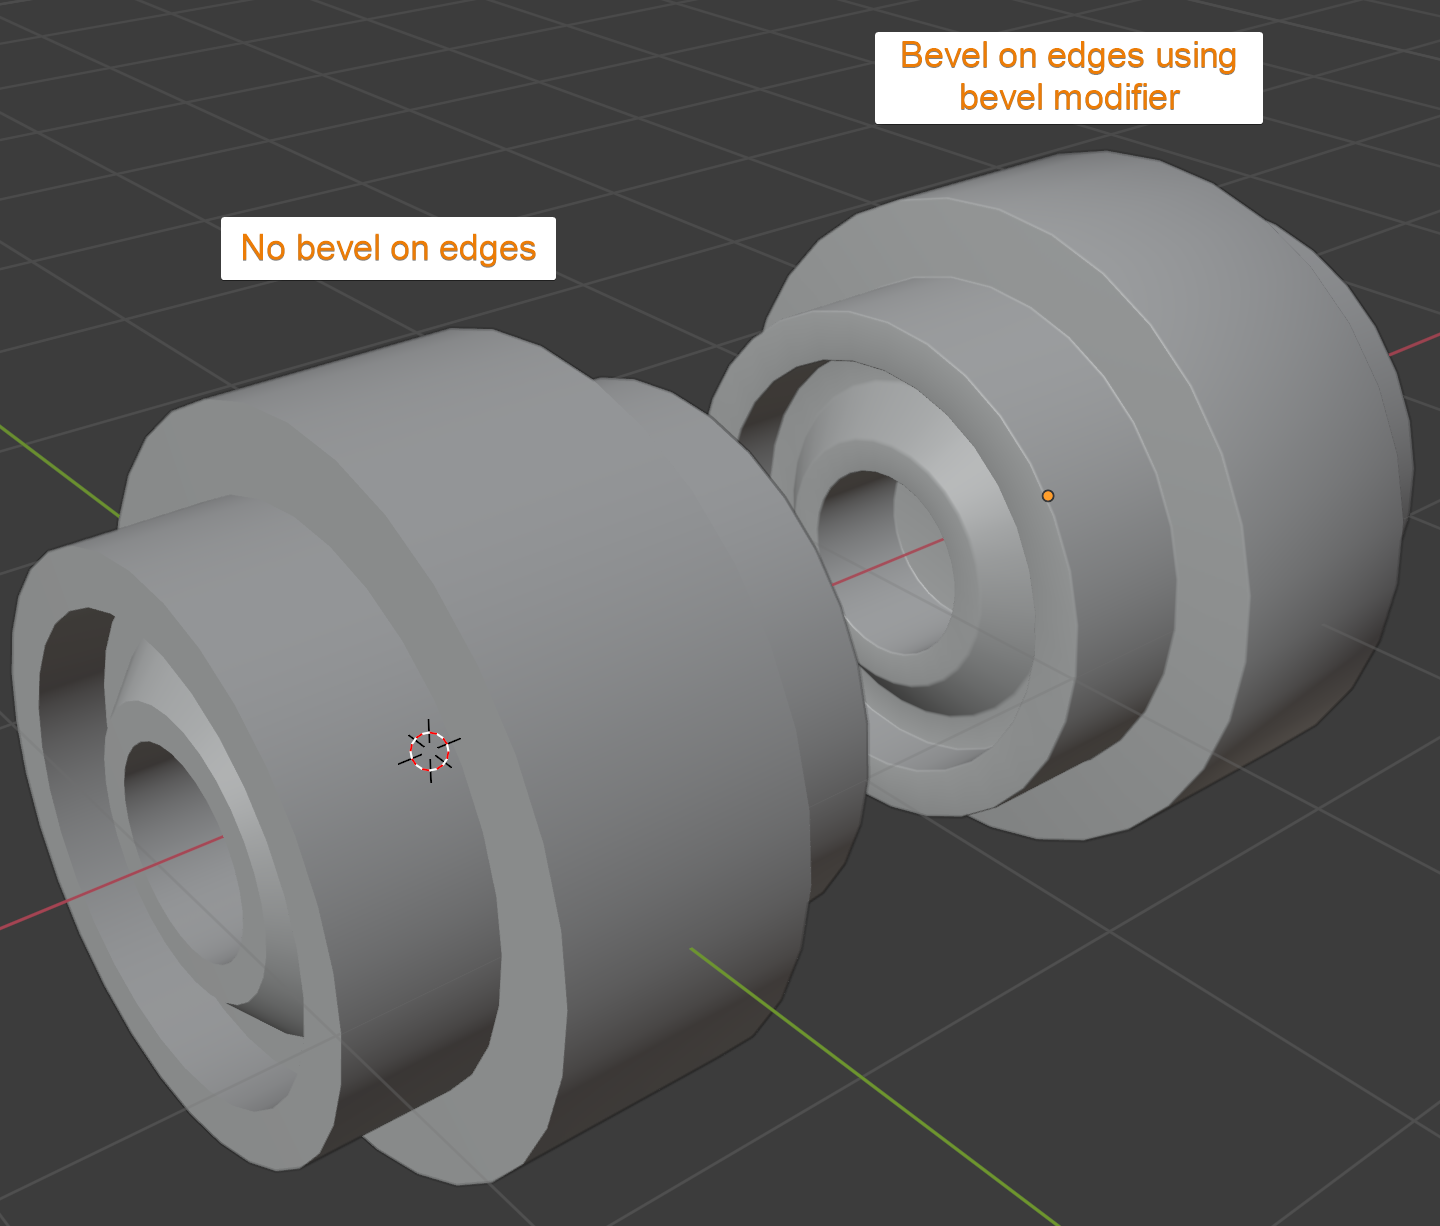
The bevel modifier on the other hand is much more geared towards adding detail to an object to create those nice highlights on a smooth mesh with corners.
Related content: How to smooth the shading on an object in Blender?
In this image I have developed our cylinders a bit more and added some detail. On the right side I also added a bevel modifier that you can see creates a highlight on the edges compared to the left model that has no such highlights.
It is much better to do this kind of changes with the bevel modifier because now we have all the controls of the modifier to be able to make adjustments if we need.
Here is an image of the bevel modifier and all of its features and settings. We will go through how they work together with the options for the bevel tool in the rest of this article.
Let's first go over our bevel tool options, it is simpler than the modifier but none of the methods are really rocket science even though there are a lot of options for both. At its core, they are both simple and most settings are only occasionally used in various edge cases. Heh, edge cases, funny, moving right along.
You can watch this video for a demonstration. But I will also continue to cover it in the article below.
Here is an example where I select an edge loop, press Ctrl+B to bevel and click to confirm. If I wanted to, I could add more segments by scrolling my mouse wheel.
The operation is simple enough, but in the operator panel we have a huge array of settings. Let's go over some of them.

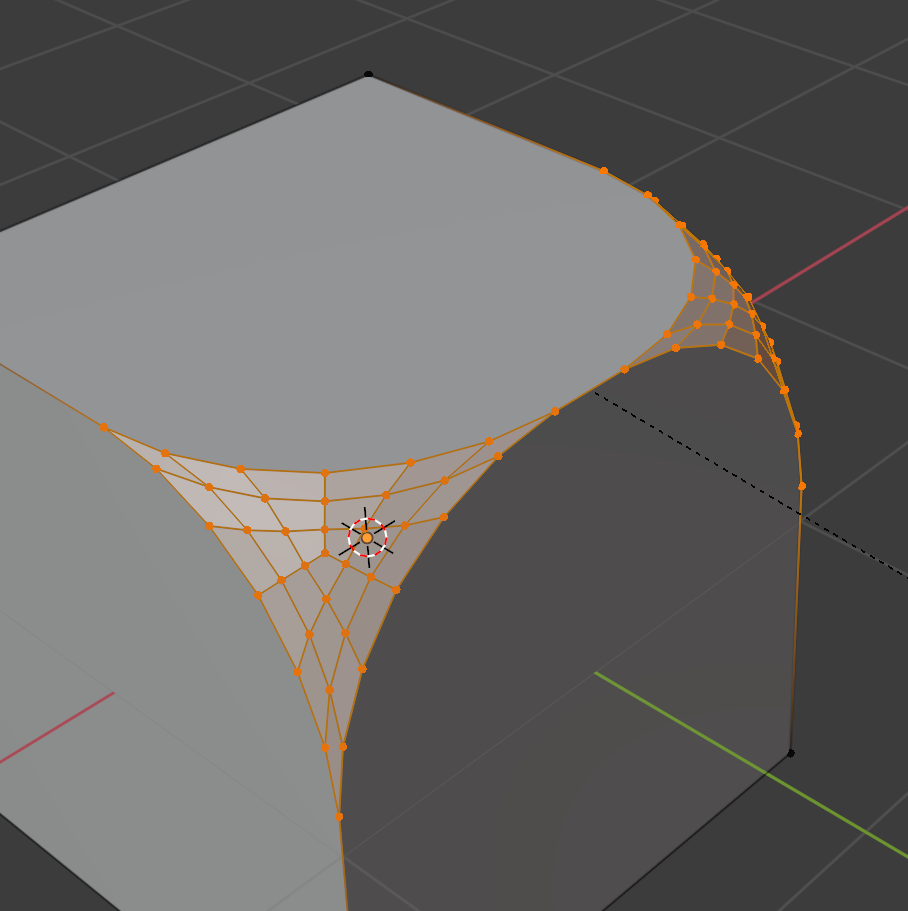
The first option is affect, giving us either vertices or edges. By default, this is set to edges. If we bevel vertices, we get this kind of effect instead. This is with a handful if added segments to round off the effect.
The width type together with the width slider determines how wide the bevel is. There are a handful of width types we can use to tell Blender how the width should be calculated.
The segments will tell how many subdivisions or loop cuts will be added along the bevel. We can change this value during transformation by scrolling our mouse wheel. Keep in mind that an uneven number produces triangles and ngons at intersections and corners.
The shape value changes the profile sharpness, and we can even make it go inwards. You can also say that it changes the profile.
At the bottom we can also set the profile type to custom to draw the profile we want in a curve widget.
The material index will use the material for the new faces that we give an index for here. Index is zero based, so the material first in the object's material list will be at index zero. With a value of -1 the material on adjacent faces is used.
The harden normals setting allow us to keep falt shading on adjacent faces while the bevel can get a smooth shade. Enabling this option also enables auto smooth from the object data properties normal section in the properties panel.
Next, we have clamp override, this makes sure that we don't overshoot the bevel and clamp it at the widest possible bevel. It sounds like something you always want to have but it can limit the bevel quite heavily. Often a slight overshoot isn't a big deal.
The loop slide option can be a bit hard to understand but basically, turning it off can lead to more even beveling if you have a problem with that were beveled edges meet non-beveled edges. Loop slide use some data from the position of the adjacent non-beveled edge to create a smoother transition.
After that we have the option to mark the bevel as seams or as sharp.
Next, the miter values. These values will determine how non beveled edges and beveled edges connect.
The intersection type can be changed to cutoff for the beveled intersection to simply not contain geometry. The other option, grid fill, creates a bridge between bevels at intersection vertices.
The face strength is for the normal weight modifier. It helps to even out smoothing and this option gives us the opportunity to control the weight or importance of the faces created by the bevel tool.
You can read more about the bevel tool in the blender manual found here:
External content: Blender manual edge bevel tool
If you need an overview of how the modifier stack works you can read this guide.
Related content: How modifiers work in Blender, an overview
If you are interested in learning more about other common modifiers and how to use them, you can learn a lot of that here:
Related content: Top 10 Blender modifiers and how they work
In this article there is also a video about the bevel modifier and how it works. You can watch it here as well to learn how the modifier works.
The settings on the bevel modifier are the same as for the bevel tool with one exception, the limit method. The limit method tells the bevel modifier what edges to bevel with the settings given in the rest of the modifier.
The interface has had some updates and changes lately while the underlying functionality is pretty much the same.
Related content: How to apply modifiers in Blender
This is what the settings looks like now.
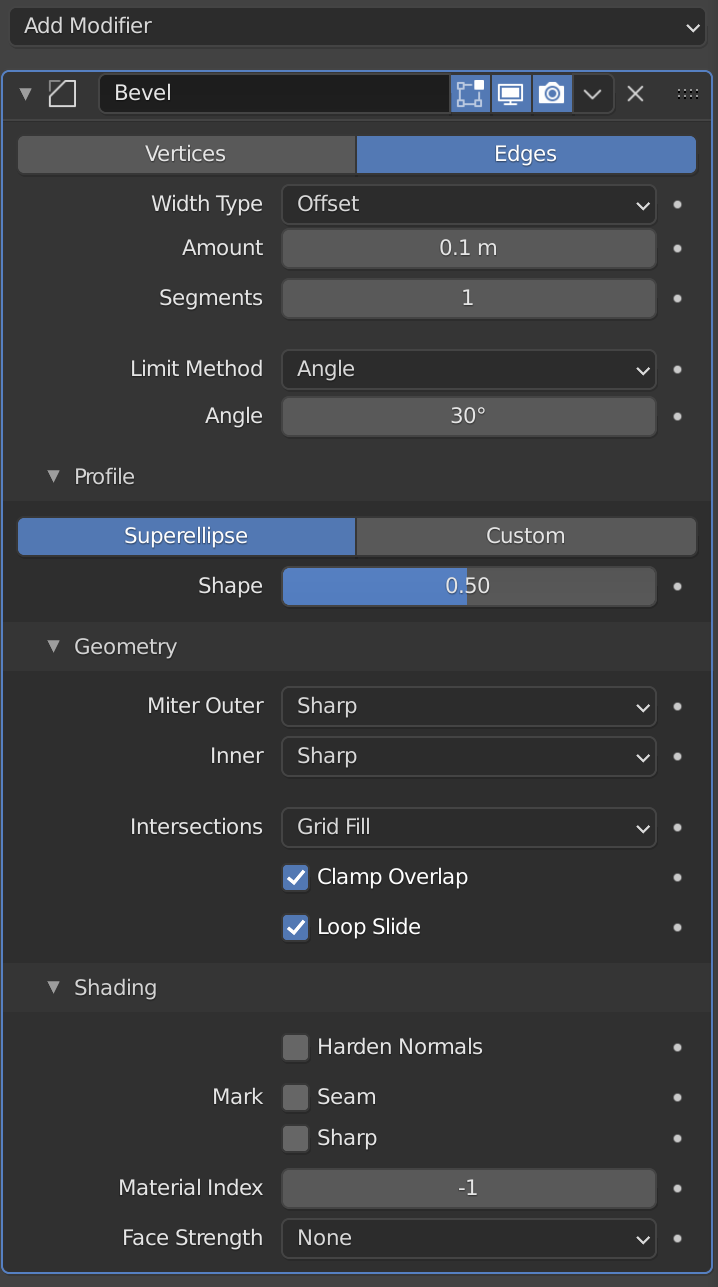
We will focus on the limit method here since we covered the other settings earlier.
By default, we limit what edges gets beveled by their angle. This is likely the most common way to limit beveling. The higher the angle limit the fewer edges are beveled.
The option giving you most control is weight. With this option we can mark edges with a value from 0-1. The amount will tell how wide the beveling will be according to the width type setting.
You can mark an edge by selecting it, press Ctrl+E and choose edge bevel weight. Then either drag your mouse and click to set a value or type the value with the numpad or number row.
You can also access the value from the right-side panel in the 3D viewport. Press N to open it, navigate to the item tab, and expand the transform section. The value you are looking for is bevel weight.
Another option is none. This simply bevels all edges.
We can also use a vertex group to tell what edges should be beveled. Notice here that we don't get complete control and some edges that wasn't intended for beveling might still be beveled. This is because we base beveling on vertex data rather than edge data directly.
The most common problem when the bevel modifier is not working is that the scale is not applied properly. To apply the scale to an object, select it, press Ctrl+A and choose scale. You can read more about what this does here:
Related content: How and why do we apply scale in Blender?
For a more detailed explanation on possible problems and solutions regarding bevels, you can read more here:
Related content: How to solve bevel problems in Blender
In this article we covered the two ways we bevel in Blender. The bevel tool and the bevel modifier. We learned that the bevel tool is accessed with Ctrl+B and it is best of creating shapes.
The bevel modifier is the better option if we intend to create detailed edges that catches highlights and make the edges of an object pop.
The modifier is a more involved feature, but it can also be quite simple, and we can just add it to our modifier stack to get an immediate effect.
Thanks for your time.
