


The baking system in Blender takes a lot of critiques for being unintuitive, hard to understand and error prone. In this article, I aim to untangle the confusion about baking in Blender with Cycles.
To bake from a material to an image texture in Blender, follow these steps:
In this article I will start by covering the background of baking and some original use cases, then continue with an example and discuss some limitations and more concepts around Blenders baking implementation.
We will cover baking as it is with no add-ons, but if you want an even better experience, I suggest you get Bake tools. You can read my review and guide here:
Related content: Blender add-on review: Baketools

Baking is when we calculate some data and store the result.
This can be simulation baking, animation baking, light baking or texture baking to name the most common ones.
The need we have is that we have some kind of calculation that needs to be done. The baking process moves that calculation away from the render process in order to save time during rendering.
For instance, we may have a material that contains many shaders, image textures, procedural textures, and calculations that the render engine needs to calculate a result for. We may also have hundreds of different materials that each needs to be calculated before we can determine the effects, they have on the light coming into the scene.
There could also be simulations or animations that move geometry around in the scene between frames. We could calculate all this information at render time, but it would take a very long time and it could be error prone.
Instead, we can bake this information beforehand so that the result of the textures, simulations and animation is readily available, and the render engine can just go grab the information.
Another way to put it is that we trade CPU cycles into data that we can store on disk. This way we redistribute the load from the CPU to memory.
For texture baking, we also save RAM since we can bundle a shader that may contain 10 or more image textures into a single texture set.
Only one diffuse, one roughness and one normal map if we are using a PBR workflow.
Related content: The complete beginners guide to Blender nodes, Eevee, Cycles and PBR
You can say that we save both CPU time but also RAM during rendering by making the calculations ahead of time. The data is not only calculated beforehand but also compressed into only the result that we need for the rendering process.
There are two kinds of texture baking we can do. One is when we bake a new texture from a material. This is the baking we will focus on in this article.
The other texture baking is when we use two objects. One with a dense mesh called the high poly and another object with fewer polygons but with a similar shape that we call the low poly.
We then bake the difference in geometry between these objects to a normal map texture.
The normal map texture contains angle data and tells the render engine what outgoing direction an incoming light ray should have.
This allows us to fake detail by controlling the direction of light rays based on texture information baked into the normal map rather than the original geometry that we had in the high poly object.
Both texture baking types will save memory and calculations during render time, but in different ways.
When we bake from a shader, we compress the shader into a single texture set, making CPU and Memory savings that would otherwise be used up by the shader.
When we bake from a high to a low poly object, we compress geometry into a normal map. We change the data from being a very dense mesh that can take a lot of time to process into a texture and lower resolution object that combined is much less resource intense.
We have already looked at some positives. We gain performance. But there are of course downsides as well.
Baking is a process that we need to go through. This takes time. We can make errors during the process and the quality of the output may decrease since we not only calculate the results beforehand, but we also compress it.
If we compress too much, the result may not hold up to our quality standards, but if we compress too little, we may not gain enough performance.
In an edge case scenario, we may even increase the load by baking if we are not careful.
The most common use of baking is when we are dealing with games and real-time applications. We need to see the result at the same time as we render it. Real-time rendering.
Performance is the number one priority, so we compress the data we need to render at render time.
But we can also use baking to minimize memory usage at render time. This may allow us to render scenes that we otherwise couldn't because the unbaked scene would not fit into memory.
Related content: Memory optimization for rendering in Blender
A term that we have heard through 2020 is to "flatten the curve". This means that we distribute the load over a longer period so that when we get to the peak, some of that load has already been dealt with.
In digital 3D art. Rendering is that peak, and baking is the flattening.
A third use of texture baking is that if we want to move a material from one application to another, we can use baking to store a material in a standardized format.
Blender's shader node system isn't compatible with any other software, so if we created a material using nodes, we need some way of exporting the result. Here we can use baking to store the material in a PBR texture set that is supported by the other application.
We can bake in many ways. It all depends on our needs and the situation.
For instance, we can bake with a ratio of 1 to 1 where each object gets its own unique UV Map with its own texture that only fit this one object.
In game design terms these objects are often called hero objects, and this allows important objects to get its own UV map that allows for a lot of unique detail.
But if every object has its own texture, we will quickly blow our texture memory budget.
Instead, we could bake multiple objects to the same UV map by placing UVs from multiple objects in different locations on the UV Map.
We can also use baking as part of creating trim sheets. A trim sheet is a texture that contains multiple texture elements that together make up all the different textures we need for a specific asset type.
For instance, a trim sheet can contain some brick texture, concrete, and ornament detail. Together this can be enough texture to create multiple modular building designs in a specific theme.
Baking can be part of the trim sheet creation process together with other techniques.
There are many more ways we can bake. We can include or exclude light. We can bake a texture that we later intend to texture paint to add more detail etc.
We need four primary components to bake a material to a texture, or texture set in Blender.
The information flow goes like this. We have a geometry with faces that each have a material assigned. It can be one material assigned to all faces or multiple materials that each is assigned to a subset of faces.
Each material may use one or more UV Maps and the material nodes can be set up in any way. It does not matter, as long as we have a valid output without errors.
The upper limit on how many UV maps can be used in a shader is 8. But we will need one UV Map that we intend to bake our texture to, so the object can, in reality "only" use 7 UV Maps across all its materials.
Related content: The definitive tutorial to UV mapping in Blender
We need to create one UV Map that is contained within the 1001 space if we use UDIM terms. In Blender, this space is the marked area in the UV editor. Either use no texture as the background or use a square size texture.
Related content: How UDIM works in Blender
We can use non-square textures, but they are slightly harder to work with and aren't as optimized for storing in RAM. The best is to use textures with sizes like these.
The process was outlined in the beginning of this post and the high-level workflow was described just above. Now we will explain each step in more detail with an example.
We will use two processes. One for PBR texture sets, including these maps.
Then we will learn how we can pick any part of our shader and bake it. It can be a mask, a procedural texture, or anything we want from the shader node setup that we can output.
We can even use this method to create our PBR texture maps or the metalness map that is missing from the list above.
We will use this basic modular asset that I created.

It contains four different materials that were imported using the Extreme PBR Evo add-on. Link below.
External content: Blendermarket Extreme PBR Evo
It does not matter how the materials are setup. They can be procedural, image based, or a combination.
Here they are based on image textures gathered from various material libraries on the internet.
Related content: Top 10 material libraries for Blender artists
I will start by creating a new UV Map.
Make sure that you keep this UV Map selected so that you don't make changes to any of the other ones.

We now need to set up this UV Map. Depending on your workflow and project, you may already have a UV Map setup for baking. The important part here is that you have a UV Map that is non-overlapping and contained within the image space.
Related content: The definitive tutorial to UV mapping in Blender


Here, I do a smart UV Project and then I use UV Packmaster Pro to quickly pack this UV Map.
Related content: Blender add-on review: UV Packmaster Pro 2
You can see how this step optimize the UV Map in a single click. It is not required, and we can make this manually, but UV Packmaster Pro 2 saves us a lot of time.

Next, I will go to the material tab in the properties panel to see the list of materials on my object. In this case, I have four materials.

Select the first material and open a shader editor if one is not already open.
Find some space in the node graph and add an image texture node. Also add a UV Map node and connect it to the vector input of the image texture node.
It is important that these nodes are not connected to anything else.
In the UV Map node, select the baker UV Map that we just created. Now press New on the image texture node to create the image we want to bake to.

Depending on the texture we create, we may want to use some different settings here. But start by giving it a name and a size.
The color can be black for any texture, but for normal maps we may want to use these RGB values:
We consider this flat in the world of normal maps.
We may also want to check 32-bit for normal maps and displacement maps. This is because a lower bitrate can cause banding when we use these textures later.
Related content: How to use displacement in Blender
Next, select the UV map node and the image texture node and press Ctrl+C.
Now go through each material in the list and paste these two nodes in each node graph. As you do so, also make sure that you select only the image texture node in each material.
At this point we have a UV Map and image texture node setup with a correct UV Map attached and a "blank" image to bake to for each material and the image texture node in each material is the only selected node in each graph.
Now, go to the render settings tab, make sure you are in Cycles render engine and open the bake section.
Related content: Blender: A Cycles render settings guide
If you can't see the bake section, you are likely using Optix as your compute device and a version of Blender prior to 2.92. Here, you need to change to Cuda since baking isn't supported on Optix.
Go to edit->Preferences, find the system settings, and change from Optix to Cuda at the top.
Alternative you can switch your device in the render settings from GPU to CPU, but this is likely going to take longer for each bake.

We are now ready to bake. We will need to bake three times. One for each map type.
Between each bake we need to save the baked texture to disk and setup the baker for the next bake type.
Once the first bake is done, you can open a UV Editor or Image editor and press Shift+Alt+S to "Save as..".

If an image or UV editor was open when you baked, Blender will select the newly baked image in that editor, automatically and you can simply hover the editor use the "Save As.." shortcut or go to "Image->save as" through the menu.
Give the image an appropriate name. I will name mine "medieval-door-modular-diff.png".
Next, go back to the bake settings and select roughness as the bake type. No additional settings need to change. Just hit bake and use "save as" in an image or UV editor to save it.
This time I name my file "medieval-door-modular-rough.png".
In this case, I will do the same for the normal map. Just select normal from the bake type drop-down and hit bake. Then save the file as "medieval-door-modular-normal.png".
With the normal map, you may have to do some changes though. If you are baking for Unreal engine, you should switch the green channel in the influence section from +Y to -Y. This is because Unreal engine use a DirectX type of normal map instead of the OpenGL type Blender uses.
So, for any external application, make sure that you find out what kind of normal map you need.
Also, you may want to create a new image and change the base color to the purple color given above and change the image to a 32-bit depth.
Let us just take a moment to further explain some questions that you may have:
Why do we need to have the image texture node selected?
This is how Blender knows what image to bake to. It uses the selected image texture for each material present on the selected object.
Why is it important that the image texture node is not connected to anything else?
If the image texture is connected to the rest of the node graph, it means that the texture we intend to bake to would contribute to the material and therefore to itself. If this is the case, we get a circular dependency error. We can't eat the cookie and keep it at the same time.
Why do we have to save the baked image each time?
Because we don't create a new texture each time. We just created one texture. This is a generated image that only lives in our RAM. We bake to it then we save it to disk under a new name. Next time we bake we overwrite it, but the saved copy on disk is safe.
We can make a couple of changes to the process explained above and be able to bake any output that can be produced by any part of our material. This can for instance be a mask, a metalness map or any other output that can be stored as an image output.
Instead of using any of the pre-defined bake type outputs we used during the example above, we can use the emit pass. We then take the output we want, pipe it through an emission shade and to the output node.
This way we can take any output and bake the raw information from it to an image texture.
Let's create a metalness map for the door model above.
Here I will add an emission shader, set it to black and plug it directly into the material output node for any material that isn't a metal.

Black means zero, so no metal for the metalness map in these materials.
For the metal materials, I will take the metalness map and pipe this to an emission shader before outputting it to the material output node.

Now we can go through our materials and select the image texture node we want to bake to. Then go to the bake settings and select emit as the bake type. Then press bake.
The emit pass is quick to bake and in this case we end up with a metalness map that looks like this.

We can use this method to bake diffuse and roughness maps as well as ambient occlusion or masks.
What we cannot use this technique for is normal maps. The normal map will come out in object space, and this is not the normal map we want.
So, for normal maps, use the normal bake type.
To test and use the baked textures we just created, start by duplicating the object and remove the materials from the copy.
Next, add a new material and add each of the baked textures.
Go to your UV Map list and delete all the UV Maps except the one you used for baking.
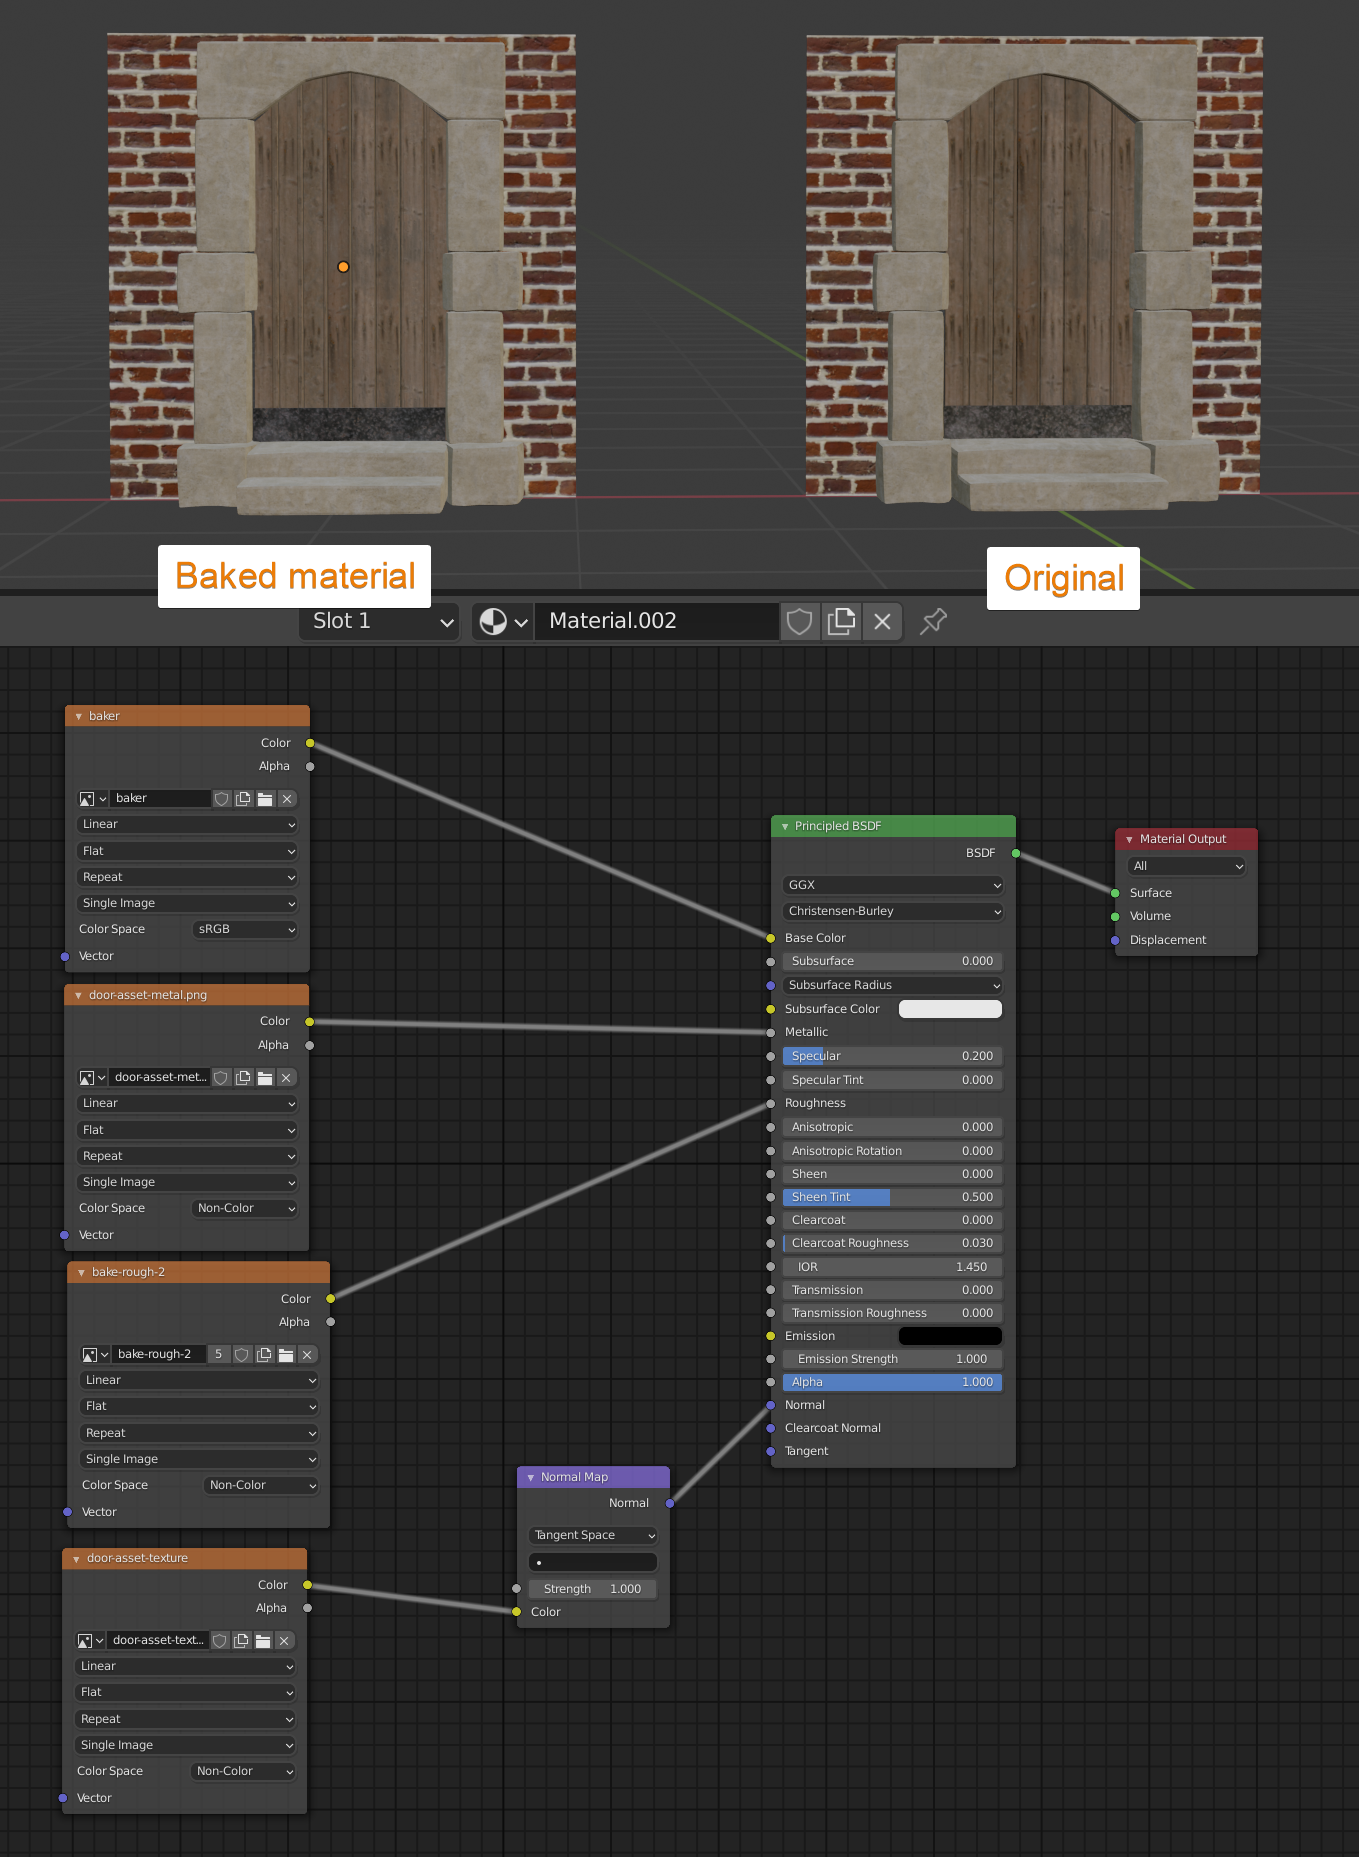
When there is only one UV Map left, we don't need to specify the UV Map we want to use. Instead, we can continue to add an image texture node for each texture map we baked and pipe them to the correct input slot of the principled BSDF shader and the material is complete.
Here is the node setup and the comparison between the baked and original objects.
Blender's baker has some limitations. For instance, we cannot get anti aliasing without baking a larger image and saving it in a lower resolution.
The baker is also missing a bulk processing feature. While there are many add-ons out there that solve this problem, it would be nice to have a more streamlined baking process natively.
It is hard to understand how the baker works behind the scenes, and there are so many possibilities that we really need to know what we want to achieve before we bake.
Another downside is that it is easy to accidently overwrite your data. Just by selecting another image texture node in the shader or by forgetting to save between each bake and we haven't even touched on baking from a high to low poly object.
You only need one baking add-on for Blender, and that is Baketools. You can read my review here:
Related content: Blender add-on review: Baketools
Apart from the bake types we have used so far, plus ambient occlusion that is also often part of a PBR workflow. We see bake types like combined, glossy and transmission.
These primarily corresponds to what we get through a typical render in Blender. You can read more about passes here.
Related content: Render passes in Blender Cycles: Complete guide
We can use them to create other types of bakes. For instance, the combined pass can bake light into your scene.
There is also ambient occlusion. Ambient occlusion can mean quite a few things in Blender. You can read more about it here.
Related content: Ambient occlusion in Blender: Everything you need to know
We also have the selected to active baking where we bake geometry and the multi resolution modifier that allow us to bake from a different detail levels of the same object.
I hope this article has sparked your interest in baking and given you a hint to how powerful it can be when used correctly.
thanks for your time.
