


When we start to learn modeling in Blender, we will come across multiple problems with our mesh. Anything from inverted normals, making our shading look off to lose geometry and gaping holes in the mesh.
Here is a list of the most common problems that you may come across.
Let's explore these mesh problems in turn and learn how we can solve each one of them.

In blender when we have inverted normals our mesh is going to look odd. Here is an example of some faces on a cylinder with flipped or inverted normals and smooth shading.
To solve inverted normals, in most cases, we can go to edit mode, press A to select everything and follow up by pressing Shift+N to let Blender automatically recalculate normals. This solves these kinds of errors in most cases.
Related content: How to smooth the shading on an object in Blender?
A face has two sides, one front and one back side. It is important for the shading that the faces point in the correct direction. We can visualize the direction of the normals in a couple of ways.
The easiest is to, in edit mode, go to the overlay menu in the top right corner of the 3D viewport and check "face orientation" located in the geometry section.
This will color the front side blue and the back side red of all faces.
If Blender can't automatically recalculate the normals, sometimes we need to manually select the faces causing problems and flip them manually. We can do this by selecting the faces we want to flip, press Alt+N to bring up the normals menu and choose flip.
Related content: How selecting works in Blender
Blender always tries to guess what direction a normal should be facing every time we add geometry, but sometimes it gets it wrong and in those cases this kind of problem can occur. Just be mindful of the shading and this shouldn't become a major problem that is hard to solve on even a complex mesh.
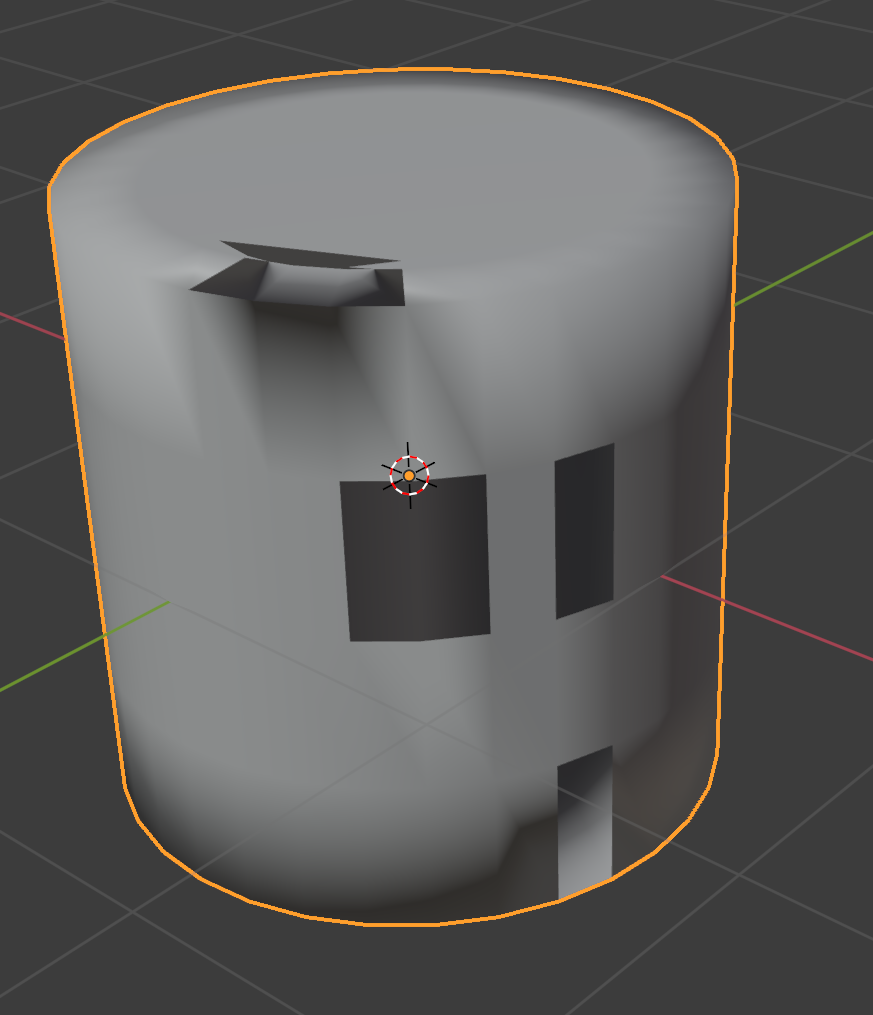
A zero-area face is a face that does not have any area. In Blenders default shading mode, we can't see them, but when we model, they will be taken into account during modeling.
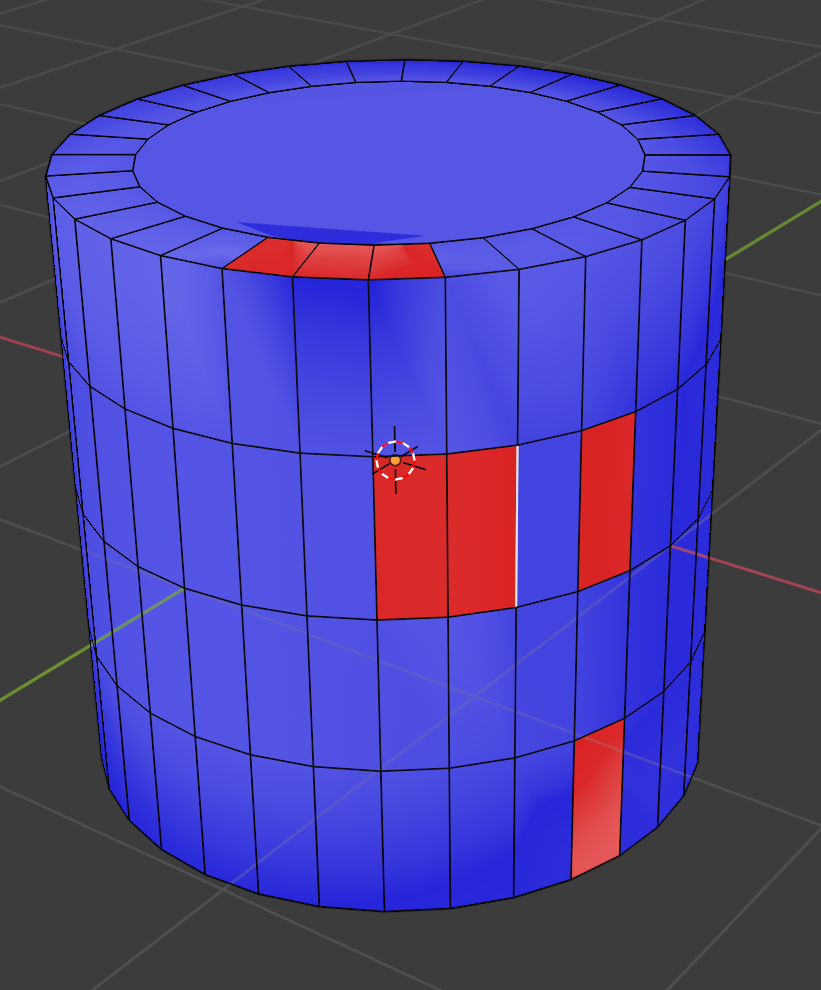
To detect zero area faces, follow these steps:
Related content: How to use 3D viewport overlays in Blender 3D
If you have detected at least one face with zero area you can follow these steps to find other zero area faces:
Now while we are in face select mode, we will see a dot in the center of each face. If a dot appears on an edge, it means that there is a face present there that doesn't have any area.
To resolve zero-area faces, select the face, press M to bring up the merge menu and choose by distance.
This will merge selected vertices that occupy the same space and dissolve any geometry dependent on the removed vertices. In this case, our zero-area face.
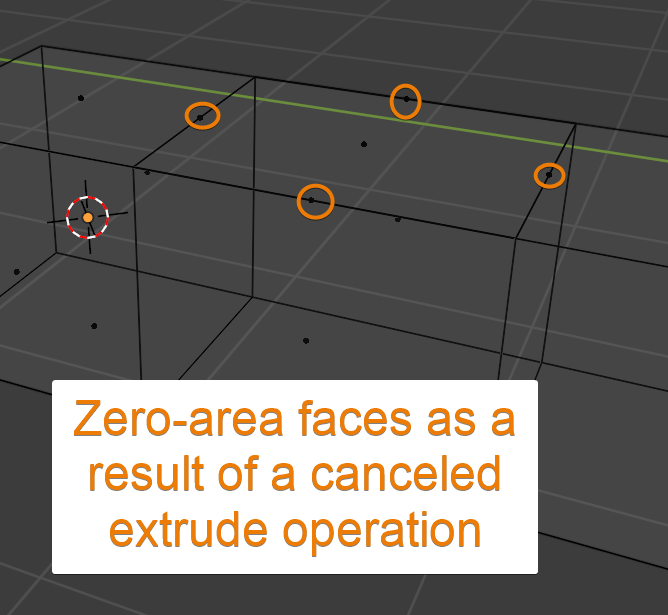
The most common way we accidently create zero area faces in our mesh is when we use the extrude tool.
Related content: Extrude in Blender: Basics, along curve, circles, manifold and more
The extrude tool is a macro consisting of multiple operations. It will both create geometry and transform this new geometry in one go. When we cancel an extrude operation, the geometry is still created but not moved, leaving geometry behind.
This is not a bug; it is a feature because seasoned modelers usually use this trick as part of a longer chain of tools to create certain shapes. But it is easy for beginners to fall into the trap of thinking that this geometry is deleted if the operation is canceled.
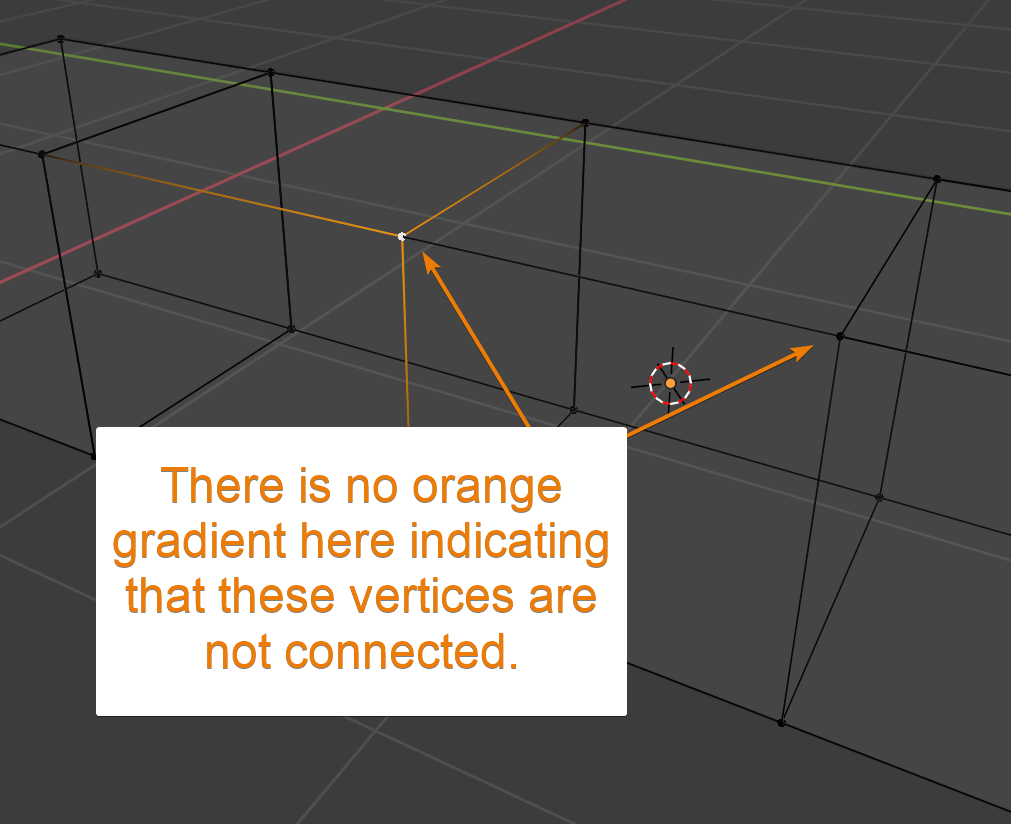
The most common issue here is that we simply have separate parts that are not connected correctly. Often and if there is no gap between the unconnected elements, we can connect edges, vertices or faces by selecting the parts that should be connected with box selection then press M and use "by distance" to merge the disconnected pieces together.
Related content: How selecting works in Blender
When selecting a vertex, Blender will highlight the connected edges, fading towards the connected vertices. If there is one direction the vertex is not highlighting, it is most likely because there are two vertices sitting on top of each that are not directly connected. It looks like this:
However, if there is a gap between the unconnected parts, it depends on what we want to do. Do we want to add geometry in between the disconnected portions or simply merge one into the other so that the faces share vertices?
If we want to merge the parts, the above solution should do it. If we want to create new geometry in-between, we can use the F key. Simply select one vertex from either side and press F to join the two vertices with an edge.
We can then select the edges that should contain a face and hit F again to create a face. To extend features and understand the F key, you can use the F2 add-on and take a look at this video that explains it's features.
Related content: Blender F2 Addon Tutorial
Just note that when the F2 add on is used incorrectly, it can lead to a few of the problems on this list.
We also cover gaps in the geometry further down in this article.
To get rid of loose geometry follow these steps:
Loose geometry is geometry that is floating around without a connection to any of the main pieces of our objects mesh. Or simply unwanted and unconnected geometry. Most often this geometry is only made up of vertices and edges and won't render inside your scene. But they can create other problems.
For instance, performance issues and bounding boxes larger than necessary. It can also lead to origin points ending up in the wrong location if we want to set them to the center of the mesh.
Intersecting geometry as equally a feature and a problem. If you are 3D printing something you will need a manifold mesh, meaning, a watertight mesh. No holes or geometry issues. can be present. It needs to be solid and have volume that can be calculated.
So, for 3D printing, intersecting geometry is a problem. There is a built-in add-on for Blender called 3D print toolbox. You can enable it just like any other add-on from the add-on section in the preferences.
After the add-on is enabled, you will find it on the right-hand side tool panel in the 3D viewport in its own tab named "3D print".
The 3D print toolbox isn't just for those that 3D prints. It can be useful for all artists. For instance, it can help you check if your mesh is manifold. Very useful when simulating things for instance.
For intersecting geometry, the 3D print toolbox has a check feature, helping us to see if there is intersecting geometry. Click the intersections button and Blender will spit out a number telling you how many faces are intersecting. Then click the number to select the intersecting faces.
From there you can choose how you want to deal with the problem and if it is a problem at all.
One way to deal with intersecting geometry is to use a Boolean operation to mold the pieces together.
Related content: How to use boolean modifier in Blender
If you have n-gons or quads that aren't flat, they can have multiple ways of bending. The easiest example is a quad that looks like this. There is only one face in this shape. Blender triangulate it behind the scenes to be able to represent it in 3D space. It can't bend both ways at the same time.

Then if we move one vertex, the triangulation can change like in this image.

All quads and n-gons need to be triangulated in order to be represented in 3D space. So, Blender does this behind the scenes. Sometimes though, Blender can get it wrong. In those cases, we can either move the shape so that it bends the way we intend it to, but we may not want to distort the shape. In those cases, we have to triangulate it manually.
We can either select the two vertices we want the bend to go across and presss J to join them. That creates an edge and converts the quad into two triangles.
Another alternative is to use the triangulate modifier.
Related content: How modifiers work in Blender, an overview
With it, the whole object is triangulated as part of the modifier stack, and we don't have to deal with the extra geometry in edit mode.
Another phrase for a manifold mesh is a watertight mesh, or one that has volume and doesn't have holes in the geometry. A non-manifold mesh is therefore a mesh object with holes, no volume or is in some other way an impossible real-world object. Self-intersection parts of the geometry would be another problem making an object non-manifold.
A non-manifold object isn't necessarily a bad thing. It just means that it isn't possible to represent the object in the real world, or reproduce it, for instance by 3D printing.
An example of a useful non-manifold object would be a plane. A landscape could be another example. The ground is rarely created manifold in a 3D scene, yet it serves its purpose.
Scenarios where we need to be aware about manifold or non-manifold is when we need to 3D print or when we simulate. Also, Boolean operations work best with manifold objects. Any scenario when we need to calculate something based on the objects volume usually requires a manifold object.
We can check if an object is manifold by using the 3D print toolbox add-on taht comes with Blender. Even if you don't intend to 3D print, this add-on can be useful.
Enable it just like any other add-on from the preferences add-on section. Once enabled, open the right-hand side tool panel in the 3D viewport by pressing N and find the "3D-Print" tab.
In the clean-up section, you will find a "make manifold" button that will help you solve several potential problems with your mesh object.
Sometimes we find ourselves with a hole in our mesh. It can be anything from an uncleaned photoscan or a poorly created mesh. I have also had it happen when sculpting. Sometimes there can be either a problem with the base mesh or it can accidentally happen through some operation.
Either way, there are several ways we can deal with this.
We can try to use the "make manifold" feature that we can find in the 3D print toolbox add-on. Enable it from user preferences and find it in the right-side tool panel in the 3D viewport. Go to the 3D print tab and expand the cleanup section and simply hit "make manifold"
Related content: 30 Blender addons (install, manage, free and paid)
In some cases, we can cover the hole in the mesh manually by simply using a combination of modeling tools. Often this includes new edge/face from verts, often referred to as the fill tool accessed with the F key. Also the join tool accessed with J is common usage when repairing mesh.
But other tools can also be helpful. For instance the grid fill tool.
Related content: More than 30 Blender modeling tools explained
We can also just fill holes with an n-gon and then tap the mesh with a brush in sculpt mode using dynamic topology. This can help us regenerate the mesh semi-automatically.
Related content: Blender Dynamic topology: What, where, how and problem solving
The last resort if there are a lot of holes that would be time consuming to repair and that doesn't get resolved with the make manifold tool could be to let Blender remesh either with the remesh modifier or one of the more recent remesh tools.
Related content: Remeshing in Blender
Sometimes an object has a particularly messy topology. It can be an automatically generated object, photoscan or a sculpted object for example. To make a more uniform mesh that is easier to work with. We primarily have two options. Remesh or retopology.
Retopology is the manual way of creating a new topology on top of the old mesh to make it more workable and ready for other parts of the pipeline. For instance, shading and animation.
There are several tools we can use to retopology an object. For instance, using a third-party add-on like the retopoflow add-on. It greatly reduces the time it takes to retopology a model thanks to its smart tools.
External content: Blendermarket: Retopoflow
Other methods that are built into Blender includes use of the polybuild tool and clever snapping settings.
Related content: How to use snapping tools in Blender
We can also use remesh to recreate a quad topology.
Related content: Remeshing in Blender
To remove internal faces in Blender, follow these steps:
Preferably you can go to wireframe view by pressing Shift+Z so that you can easily see what is selected before you delete and geometry. Also if you happened to delete the wrong geometry, you can press Ctrl+Z to undo the operation.
Related content: Blender 3D: undo, redo and history
In this article we covered several common mesh and topology issues that we may come across at some point in our 3D modeling career.
Everything from closing gaps to removing internal faces or recalculating normals. All of these are common errors that are often solved multiple times during the modeling workflow. Sometimes it is a result of how we use a tool and sometimes it is the result of not understanding the tools we use properly yet.
Either way, developing a good habit of detecting and solving geometry and topology issues as we go is essential for 3D modelers.
Thanks for your time.
