


When we learn about materials and texturing in Blender it is easy to get stuck on tasks that for senior artists have become obvious and even hard to cover. Scaling textures is one such task that often is done without thinking. But for beginner artists it can be a challenge to find the right place in the interface to adjust.
There are primarily two ways we can scale or stretch a texture in Blender. Either through the mapping node in the shader editor or for image textures, we can also adjust the UV map directly by scaling it in one or two axes.
Related content: How to fix stretching textures and materials in Blender?
Let's look at how we can scale and stretch procedural and image textures and what the difference is depending on what way we choose to use.
Most often we want to scale an image texture that is applied to an object. But there are also procedural textures. Environment textures and textures that we can use together with particle systems, brushes, or modifiers in Blender. We will take a look at an example from this family of textures as well.
Let's cover scaling of image textures that are mapped to objects first.
There are primarily two ways we can scale a texture in Blender. Either with the mapping node in the shader editor or by scaling the UV map itself if we are using an image texture and UV coordinates to map the texture on to the object.
Related content: The definitive tutorial to UV mapping in Blender
Let's start with the UV map as it is the more direct way.
I will use the default cube to describe what is happening. It comes with default UV coordinates, and I have added a color test grid as an image texture and connected it to the principled BSDF in the default material.
To setup a similar test scene follow these steps:
Related content: The complete beginners guide to Blender nodes, Eevee, Cycles and PBR
To scale an image texture by scaling the UV map follow these steps:
To scale the UV map precisely you can type a number while the scale tool is active. For instance, press S followed by two on the number row to scale the UV map two times. Note that this makes the texture appear smaller on the object and the UV map is expanding beyond the original texture space.

By default, the texture is tiling or repeating in all directions even if we can't see that in the UV editor. To see how the image texture is repeating you can follow these steps in the UV editor.
Now the image will repeat and you can see how the scaled texture is mapped to the surface on the object even when it expands beyond the original texture.
Related content: 10 tips for UV unwrapping in Blender
Note that we are not scaling the texture itself. We are not changing the resolution of the image. We are only changing how it is mapped on the different faces of the object.
Let's say that we scaled our UV coordinates by two. To scale it back to the original size we can scale it by 0.5 by following this sequence.
This will multiply the scale in the X and Y coordinates by 0.5. As an alternative we can also divide by following this sequence.
We get the same result either way.
The only difference between scaling a texture and stretching it is that we scale it on a single axis instead of both axes. We can do this by pressing X or Y while the scale tool is active. For instance, follow these steps to stretch the UV mapping to twice the size in the horizontal direction.
We can also change the origin we scale from.
By default, we scale from the center of the selected portion of the UV map. We can change this and scale from a number of different points.
In the middle of the header in the UV map editor, you will find the pivot menu dropdown. This dictates what point our transformations are calculated from. By default, it is set to bounding box center.
For instance, we can set the pivot point to be the 2D cursor. By default, it is in the lower left corner of the image texture space. If you press S to scale with this as your pivot, you will see that it scales from this position instead.
We can move the 2D cursor either by pressing T to bring up the left side tool panel and select the cursor tool. You can now click anywhere to position the 2D cursor and scale from that point.
To move the 2D cursor more precisely. For instance, to the center of a face or to a vertex, select the element you want to scale from and press Shift+S to bring up the snap pie menu. Choose cursor to selected at the 6'o clock position to move the 2D cursor to the selection.
Another way to move the 2D cursor is to press N to open the right-side panel and go to the view tab. Here you can expand the 2D cursor section and set the location by inserting the coordinates you want and scale from there.
To reset the 2D cursor position, set the X and Y value here to 0.0.
Another useful pivot option is individual origins. If we have multiple loose islands in our UV map and we want to scale them individually we can use this option.
We can also use the mapping node to scale an image texture. This allows us to keep the UV map the same and adjust it only for a specific purpose. For instance, we may want to use the same UV map for different textures at different scales in the same or different materials assigned to different faces of our object. We can do that by using the mapping node in the shader editor instead.
Let's turn our attention to the shader editor. By default, an image texture node uses the default UV map as it's texture coordinates, meaning the way it will be mapped onto the surface of the object. But now we will need to add a mapping node before our image texture node.
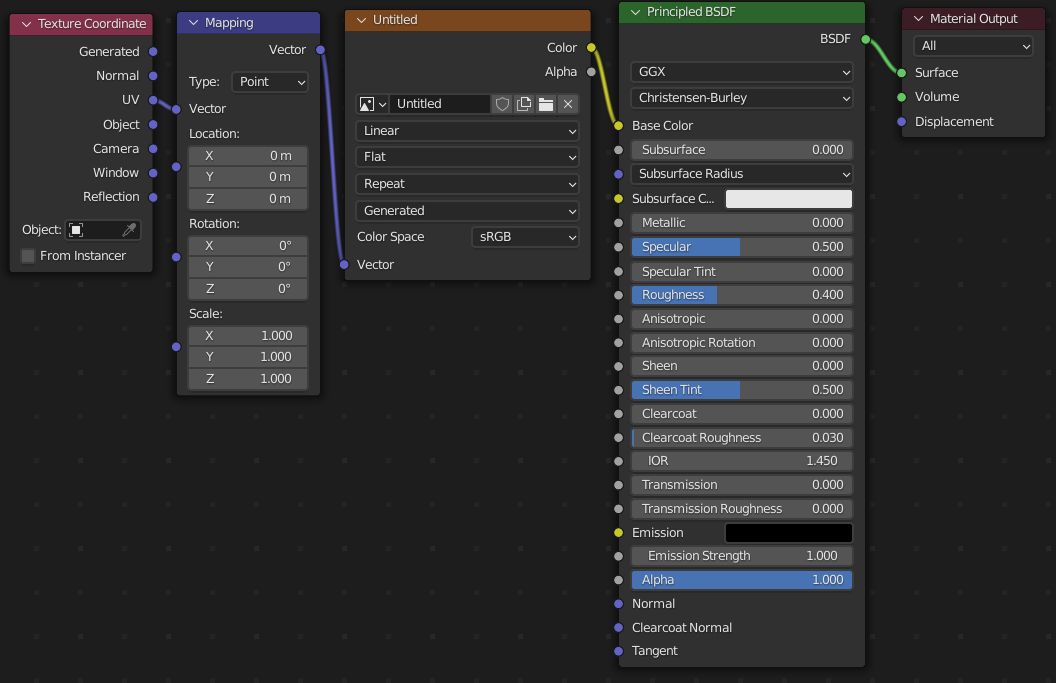
The mapping node in turn does not have a default texture coordinate, so we need to add two nodes. Both the mapping node and a texture coordinate node to give the mapping node the input that is otherwise fed to the image texture node by default without any node input.
Follow these steps to setup the nodes necessary for scaling with the mapping node:
With this setup, we can now turn our attention to the mapping node itself. Here we find three vectors, each with three values. One for each axis in 3D space.
The bottom vector represents the scale. For image textures the Z direction is not used. So, to change the scale we use the X and Y values.
Similarly, to the UV map, we can scale by inputting a different value. The resting value for scale is 1.0. If we change this to 2.0, we will double the scale of the mapping, making the texture appear half the size compared to a scale of 1.0. If we want the texture to appear larger on the object, we can input a value lower than 1.0. For instance, 0.5 to half the size of the mapping, meaning that we zoom in on the texture and it appears twice as mig from the original scale.
We can use math operations in these scale values. We can, for instance input "2*5" without the quotes to scale ten times.
We can also use other nodes in the shader editor to calculate a value and input into the input socket for the scale value to manipulate the scale that way.
So far, we have been using an image texture as an example. There are two major differences between procedural textures and image textures. The first one is that procedural textures are 3D or even 4D. This means that we can scale in the Z direction as well as the W direction. They are also infinite in resolution, meaning that we can scale them as much as we want without losing any detail as opposed to image textures where the lines between pixels will start to show if we scale the image up too much.
Using the mapping node we can scale a procedural texture similarly to an image texture, but instead of using UV mapping, we often use generated or object coordinates.
For image textures there is also an alternative to UV mapping that you can read about here.
Related content: Blender box mapping workflow, a quick look
The difference between object coordinates and generated coordinates is like the difference between scaling from different pivot points. They use different scales and origins to calculate how the texture spread across the surface.
In this example I have used object coordinates. They start at the center of our objects as opposed to the generated that start from the bottom left corner as seen from the front view. I also replaced the image texture with a noise texture. I also changed the noise texture from 3D to 4D. This exposes the W value.
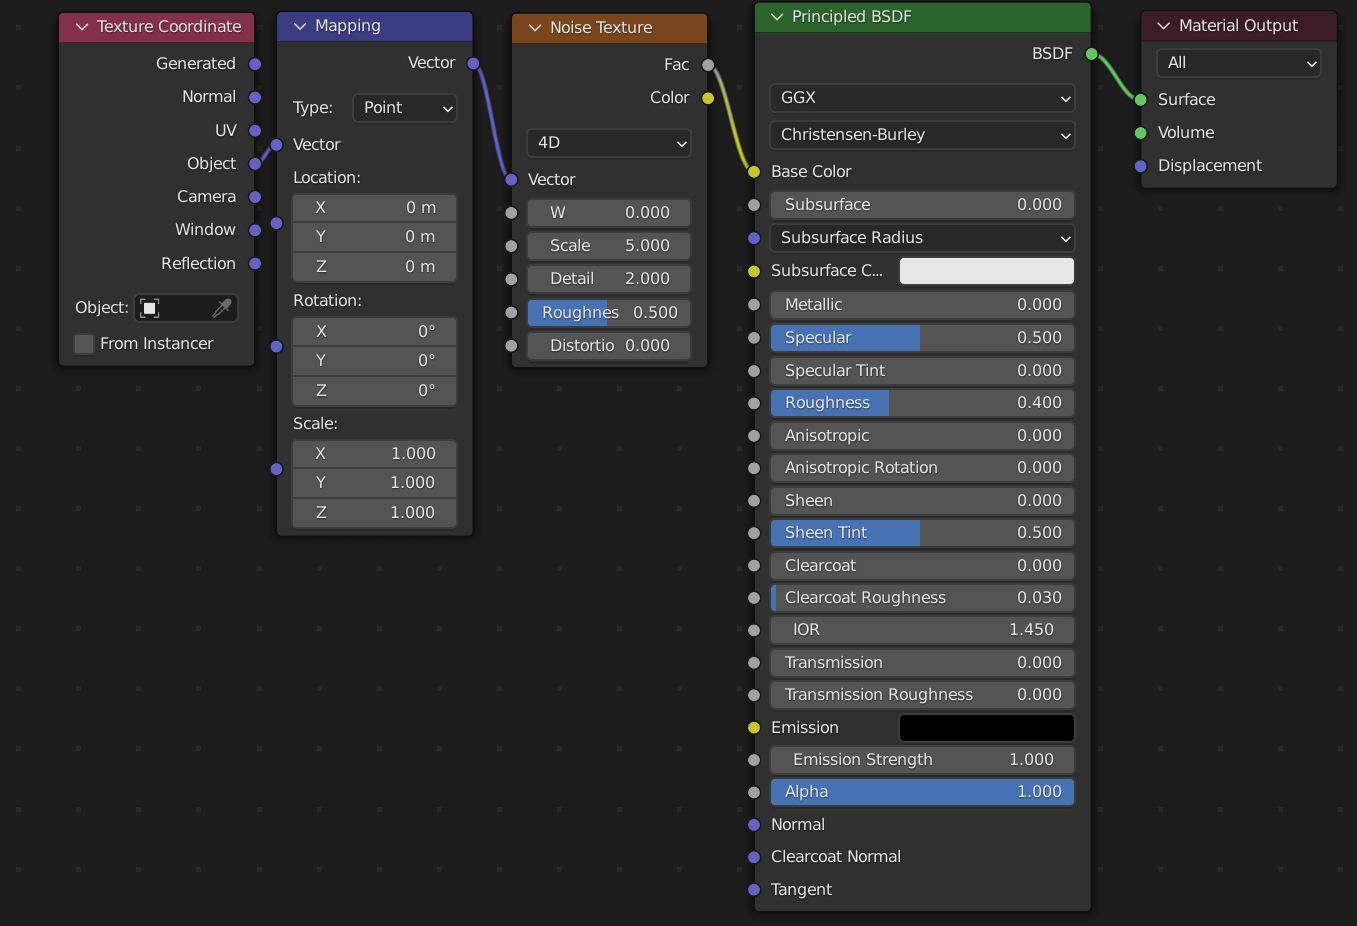
You can see that we have a scale value on the noise texture. This will scale the texture uniformly on three axes. A lower value will make the pattern appear bigger while a higher value will increase the frequency of the noise.
The W value represents the fourth dimension. Normally we have X, Y and Z as our axes in 3D space. W is the fourth axis. Even if this is a scale value of the fourth dimension, we can think of it as a seed value.
If we turn our attention back to the mapping node and change the X and Y values to 2.0. You can see that the texture starts to stretch along the Z axis. This is because the procedural textures are 3D as opposed to our image textures that only exist in 2D space.
Let's now look at a couple of problems we commonly run into that we can solve by using the techniques and tools discussed so far.
As we have learned so far, we don't scale or make changes to the texture itself. Instead, we change the way the texture is mapped onto our object.
To make a texture take up a smaller part of the object's surface, we can scale the texture mapping up either by scaling the UV map or with the mapping node. For procedural textures, we need to use the mapping node in the shader editor. We also need to scale all three axes, or the texture will stretch in the third dimension. For an image texture, it is enough to scale on the X and Y axes.
If we want to make a texture appear smaller and possibly tile on the surface of our object, follow these steps in the shader editor:
This will work for both procedural textures and image textures. For image textures, we can also use the UV editor as discussed before.
In the UV editor, we scale the texture by a factor of two to make it appear twice as many times on the object. This makes the texture appear smaller and repeat more on the object.
We can also go the other way around and scale the UV map by a number that is smaller than 1.0. The UV map will then become smaller but each pixel on the image texture will occupy a larger area on the object.
Stretching textures occur when our scale is not uniform or when there is a mismatch between the scale of the object surface and the UV map. To remove the stretching, we should scale our UV map or adjust the mapping node controlling the texture so that we remove the stretching or at least counter its effect.
For a detailed guide with multiple examples, you can read the guide below to learn how to avoid and fix stretching textures. Here we will cover the most common examples.
Related content: How to fix stretching textures and materials in Blender?
With a stretched texture we can manually scale the X or Y coordinates in the UV editor or change the scale vector in the mapping node using the shader editor. The key is to scale only one axis.
To do this in the UV editor, follow these steps.
Related content: How selecting works in Blender
In some cases it may be easier to unwrap the stretched parts of the textures again. In many cases we can do this with the unwrap method found in the unwrap menu. To unwrap a section of the UV map select it in edit mode, press U and choose unwrap and Blender will make a new unwrap of the selected faces.
If the newly unwrapped faces appear stretched, follow these steps to apply the scale.
You can read more about applying scale and why it is necessary in this article.
Related content: How and why do we apply scale in Blender?
Sometimes stretching can be desired. For instance, if we have a procedural texture that is part of a larger node tree that needs a directional pattern. Let's say that we want to create a wood texture, a good starting point could be a noise or Voronoi texture that we stretch in one direction to start to create the stretched grain patterns that are common in wood.
There are primarily two ways we can scale a texture in Blender, either in the shader, using the mapping node or by adjusting the UV map itself. For procedural textures we are limited to adjusting the scale in the shader editor. But for image textures we can go either way.
We don't adjust the texture itself, but instead we adjust the way the texture is mapped on to our object.
I hope this was helpful.
Thanks for your time.
