Blender-OSM let's you import map data from the OpenStreetMap service directly into Blender. Are you a cartographer or Blender artist? I think both groups can enjoy Blender-OSM. I hope I qualify for the artist group, but really, I just want a 3D representation of my hometown in a couple of clicks.
The goal of this review is twofold. I want to give you good information to decide if this is for you. I also want to give you plenty of information on how the add-on works so you can dive right in and have a decent understanding from the start.
As always, here is the short version.
You can get it here: Blender-OSM Standard and premium
How to import OpenStreetMap data with Blender-OSM?
This is the quickest way to get started and have something in Blender ASAP.
There are two versions available that enjoy continued development. There is also a free version that I recently took the liberty to update for 2.80 available in the download section here on artisticrender.com. But that version has very limited features, yet available. Not covered here though.
I have access to the premium version so I will focus on that.
There are many use cases for real world map data. Whenever you need to recreate a real world location, this add-on is useful. Just think about it, any terrain in the world at your fingertips ready to be imported into Blender.
I guess most people who try this add-on will import their hometown and a major city like New York. That is what I did, anyway.
Note: If you use the data that this add-on import, you will have to give attribution accordingly. The OpenStreetMap data also goes under the CC BY-SA license.
There are two editions of the add-on. They are available on Gumroad.
You can get it here: Blender-OSM Standard and premium
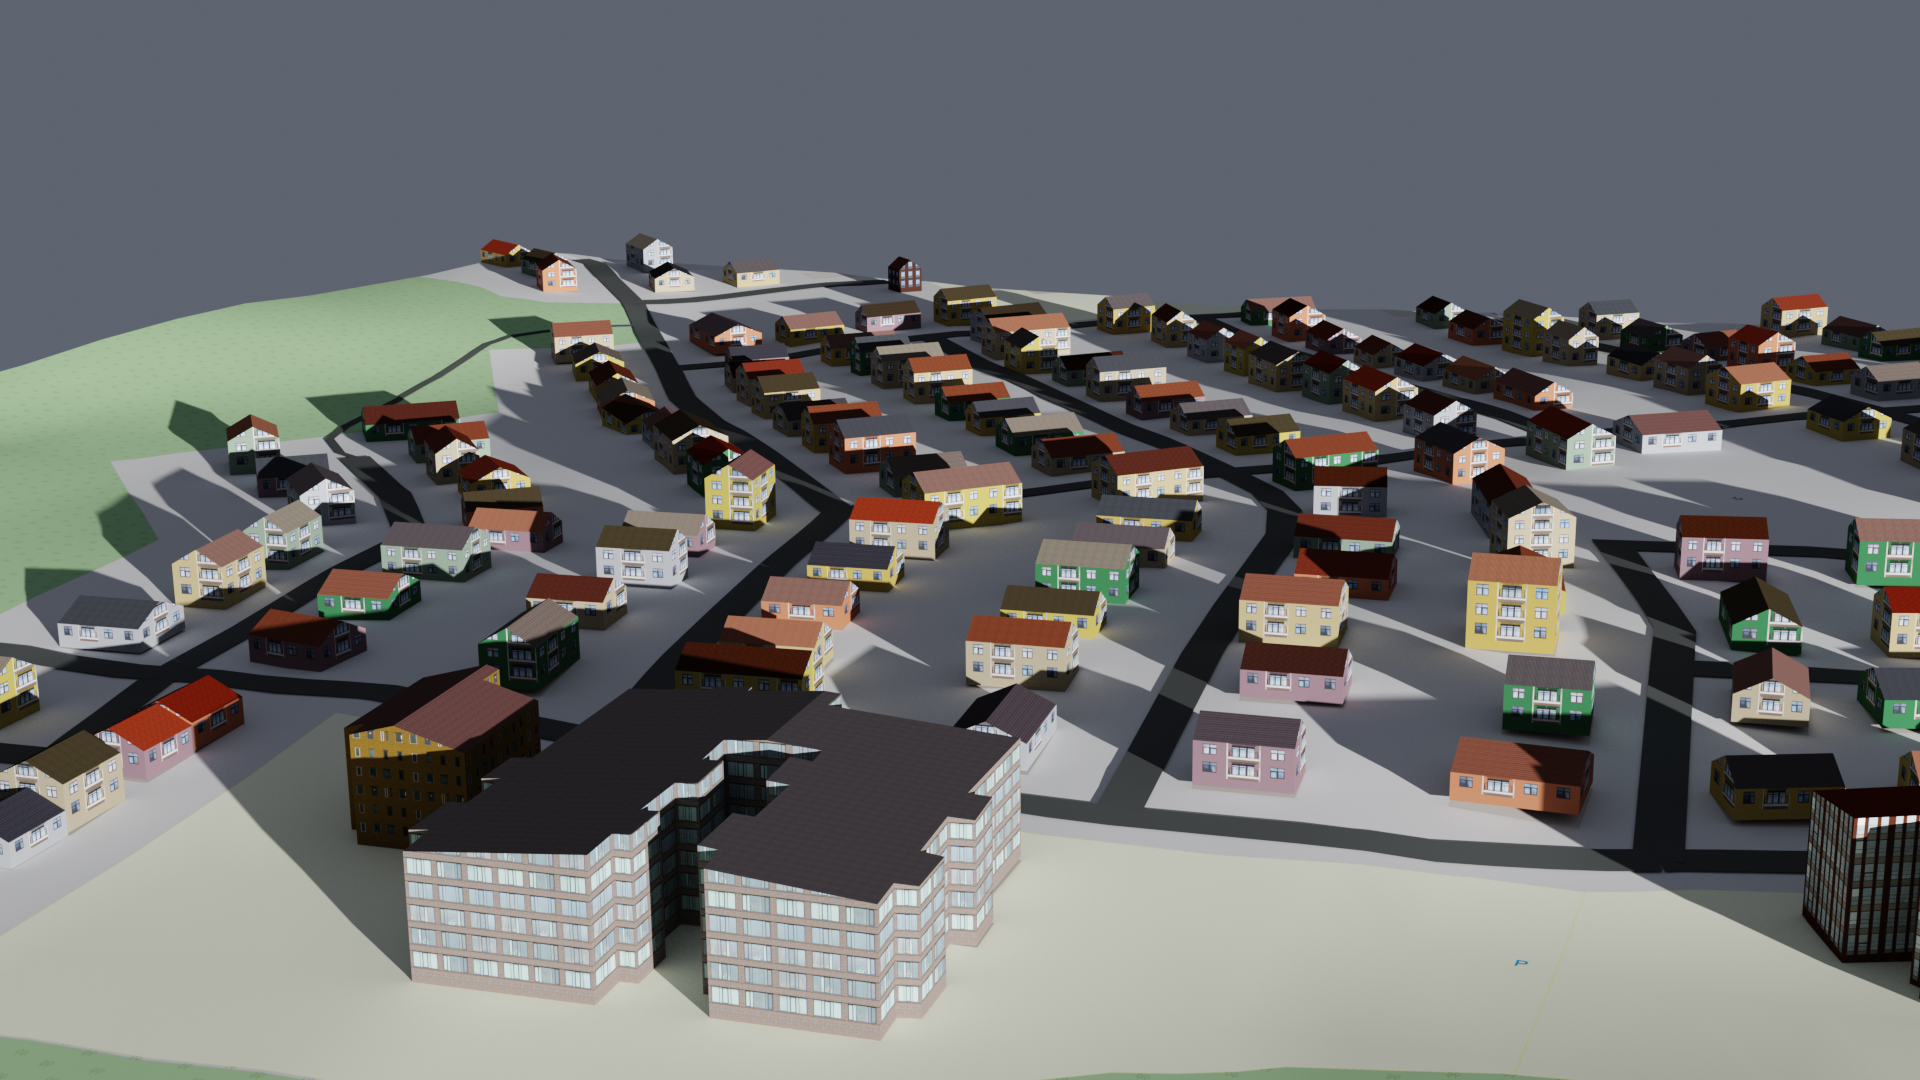
The standard version can import terrain data and street map data. From the street map data, we get primitive shapes that represent the buildings, streets and some other city related features. For country side areas, we get flat polygons for rivers lakes and forest areas, etc.
The terrain data has a resolution of about 30 meters. This means that for every 30 meters in the real world, we can have height differences between the vertices that make up the imported terrain.
The premium version builds upon the standard edition but adds more features. It imports the same data with the addition of satellite images and styled maps that can be projected on the terrain.
There are also some default assets that come with the premium add-on, like building facades and a simple tree model to populate forests. But the biggest difference is what the premium version does to the imported data.
With the premium version Blender-OSM create UV maps automatically for buildings and assign a basic material. We can also get particle systems added for forests.
This means we need not spend time on UV mapping, which can be a tough job when you need it done for a whole city. Instead, we can set up the lighting we want and head straight to the node editor and tweak the material if we need.
Having particle systems added for forests is also a nice benefit. It is the same deal here, the particle system is set up already and if we need more detail, we can swap out the default model for a collection of trees.
You get two zip files with the premium add-on. One asset file and one file for the add-on. We can install the add-on just like any other. If you don't know how to do that, you can check out this article.
30 Blender addons (install, manage, free and paid)
Once we installed the add-on and press the little arrow next to the enable checkbox in the user preferences to expand it. Here you see that we need to input more settings. We need to set a folder for the data we download from OpenStreetMap and an asset folder where we unzip the asset zip that came with the add-on.
For me, I made a dedicated folder with two sub-folders for Blender-OSM. One where I extract the assets and the other for the downloaded data from Openstreetmap.
Next, we need a Mapbox access token for some features of the add-on to work. We can create a free account and get an access token that we paste into this field. There is a limit of how much data we can access through this account, but through my testings I haven't even used 10% of the limit. I think the free account will be enough for most users.
That is it, we are now done with the setup. A little more work to be done than your average add-on but nothing too overwhelming or hard to understand. I think the documentation also makes a good job at explaining how this is done.
We will start with the interface. There are two parts to it. First, in the right side properties panel in the 3D viewport. Access it with the "N" hotkey. There is a new tab called "osm" when the add-on is enabled. This is the part of the interface we will use 95% of the time.
The other part is in the node editor properties panel. Here we can set up materials that the add-on will use when we import Openstreetmap data. I do this in the asset file that Blender-OSM uses to import data into our actual scene.
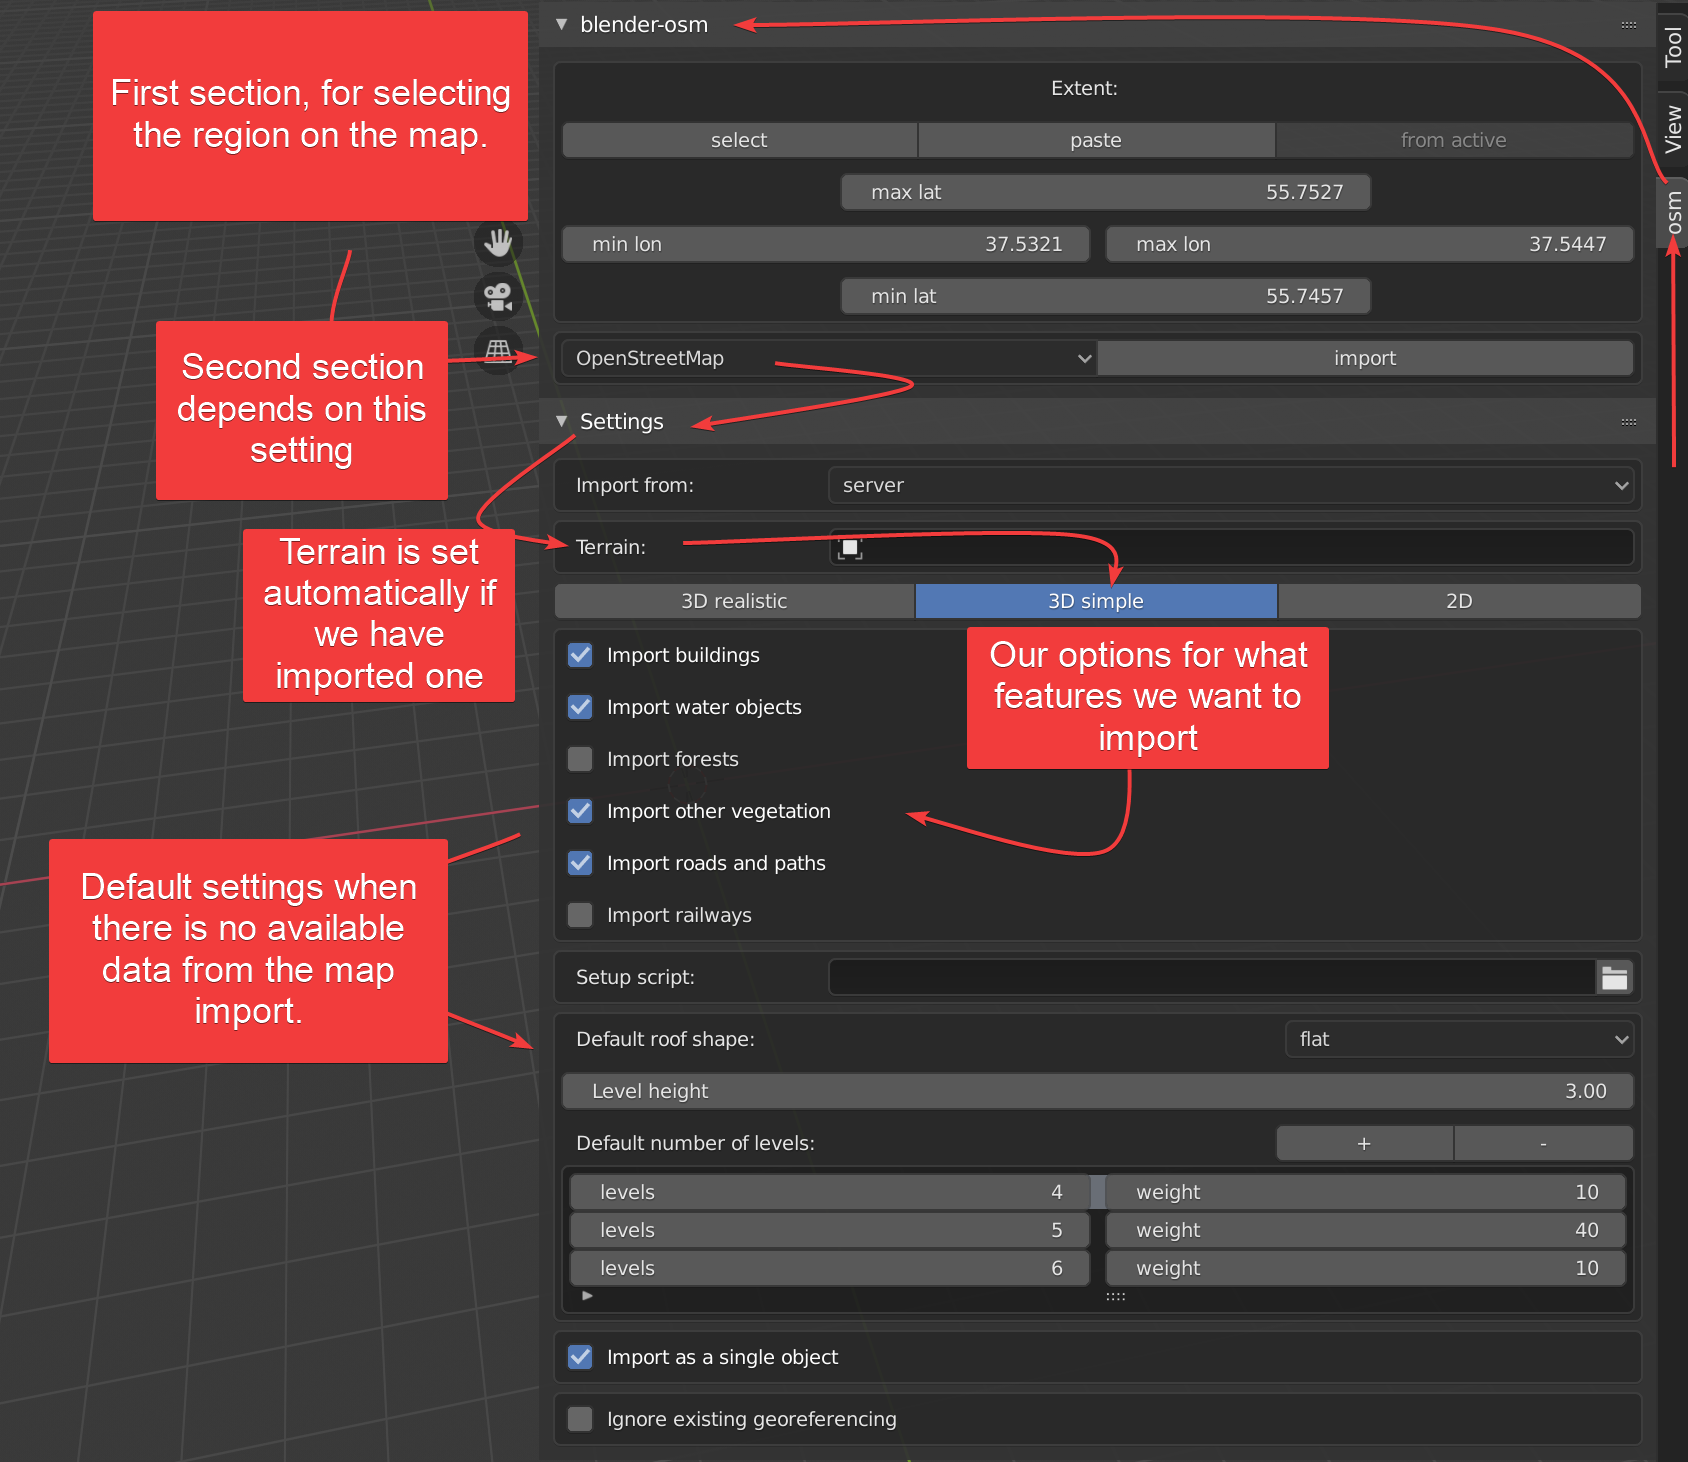
If we look at the main interface in the 3D viewport, it has two sections. The upper section lets us select an area of the world we want to import from and what data we want to import.
The drop-down where we choose the data we want to import into Blender dictates how the second section called "Settings" will look like. It changes dynamically as we select different data. In the premium version, these are the available types.
In the top section we can set coordinates manually using latitude and longitude parameters. But the easiest is to click "select". That will bring up your default browser and open a webpage where we can pick any part of the world.
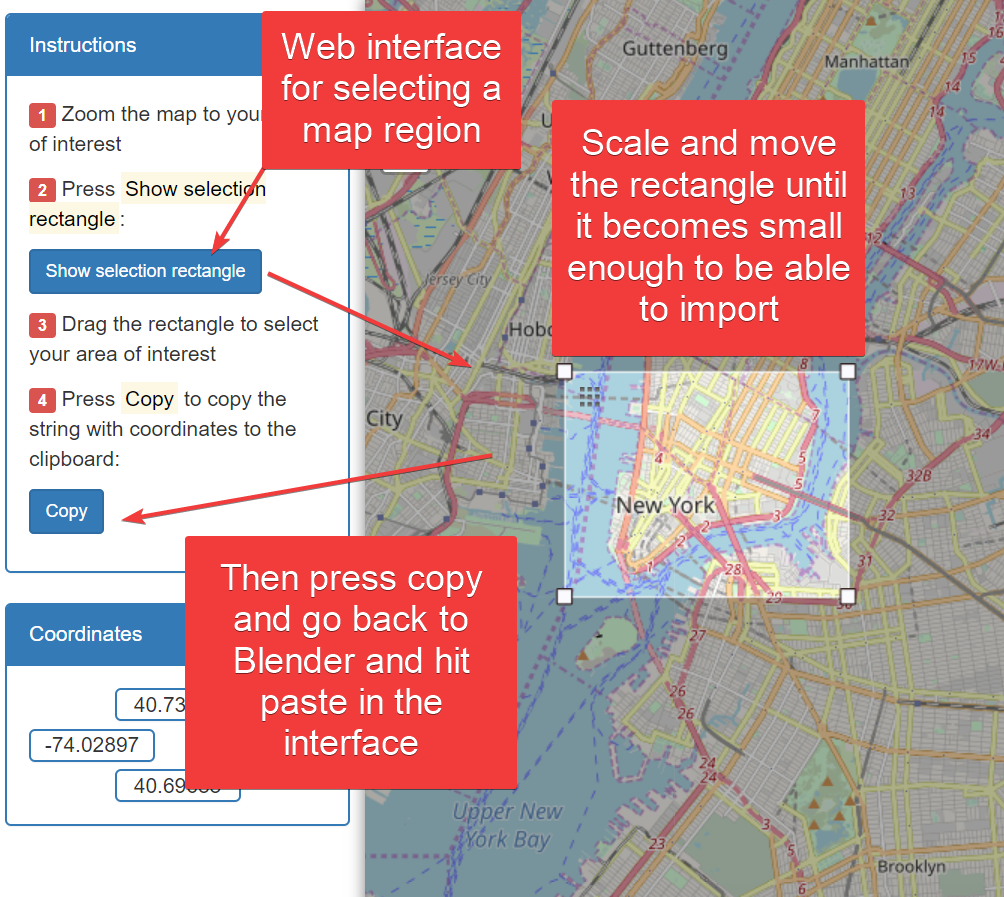
When we have chosen the area that we want we can hit "copy", go back to Blender and hit "paste" and it will populate all required fields.
We can now import the different data for this area if we are fine with the default settings.
Keep in mind that the import setting is set to OpenStreetMap by default. I would very much like this to be set to terrain by default instead. The OpenStreetMap import need the terrain to get proper elevation for all the buildings, roads, forest areas etc that it imports. So it would make sense to import the terrain first in most cases.
Appart from that, I think this part of the interface is spot on. Easy to understand and the most essential functions at the top from left to right.
Let's move on to look at the different data we can import and what you can expect. I will cover them in the order I think most people will import them in.
The terrain import is the easiest. It has only one setting. According to the product description, the terrain we import has an accuracy of about 30 meters. This is not a limitation of the add-on, instead, it is a limitation of the imported data. This data comes from Mapzen.
The only setting for terrain is "Ignore existing Geo-referencing". So, what is that?
Checking this box will ensure that additional imports will get in the center of the scene instead of a real world distance away.
The naming of this setting is a bit confusing and there is nothing written about it in the documentation for the premium version of the add-on. I think they could improve the naming and information for the end user. A simple tooltip with an explanation would probably be enough.
There are two other things we need to keep in mind when importing. When you import, you may not see that anything got added in the 3D viewport. You can look in the outliner and see that you have an object called "terrain". This is because the data gets imported at real world scale and by default Blender is set up for much smaller scenes.
In the 3D viewport, with your terrain selected, you can hit the dot on your keyboard to focus on the terrain object.
Then go to the "view" tab and adjust the clipping start and end values in the "view" section. I would suggest testing something like 1.0 meters for clipping start and 5000 meters for clipping end.
The clipping start is important because if we have a too low value, we may see glitching geometry in the viewport when dealing with this huge scale.
These things can't really be blamed on the add-on. It is Blenders default settings at play, but I feel that it is important to know some of this when you get started.
This is a premium feature only. It allows you to import a texture from the map that is projected on to the terrain. This can be satellite imagery, vector information, or a combination. There are three presets. Two of them come from Mapbox and my guess is that this is where we need that account.
The presets are:
We can also use a custom URL to bring in a custom style or another style template from an external source. I have not got around to test this yet though, but there is a section in the documentation on how this works.
The maps that get loaded have a pretty low resolution and are not meant for closeup viewing. As an overview shot, it is nice to be able to add this.
The overlay images take a while to download, since there are multiple tiles downloaded that get stitched together for the final image. While the download is progressing, you get some feedback in the 3D viewport.
Openstreet map import is the way we import map features like buildings, forests, roads and rivers, etc.
There are three different import modes.
The first two modes are available in the standard edition of the product, while they add 3D realistic in the premium version.
In 2D and 3D simple modes, we have the same settings. The difference is that the 2D variation will only import planes. This means that the setup script and default roof shape have no effect in the 2D mode. This leaves us with the option of what we should import.
The options are:
Keep in mind that roads and railways will be imported as curve objects and other types will be mesh objects. For instance, water and forests will always be imported as planes covering the surface they were covering on the map.
When we import the buildings in 2D mode, the addon creates a grid then use a boolean on that grid to cut out the shape of each building.
The result is a topology that is difficult to work with. Instead, if you want to start with a 2D shape for each building, I would suggest that you use 3D simple and follow these steps.
After the import, in edit mode with edge select, you can select one edge at the base of one building. Then hit "Shift+G" and select "Amount of faces around an edge" Then switch to face select, invert the selection with "Ctrl+I" and "X" to delete. This will leave you with a single face for each building.
Let's continue talking about our options in the 3D simple mode. Just like I said before, we have the same settings as in 2D mode. Therefore, we can import the same data types we listed above.
The rest of the settings for "3D simple" imports has to do with defaults when data is not available for import. We can change the default roof shape between flat and gabled. Gabled being a standard angled roof shape.
We can also change the default height of a floor and how many floors each building should have.
we can randomize The number of floors. You add the number of floors you want and how much "weight" you want to put towards that number of floors. Then you add additional floor numbers and assign a "weight" to each one.
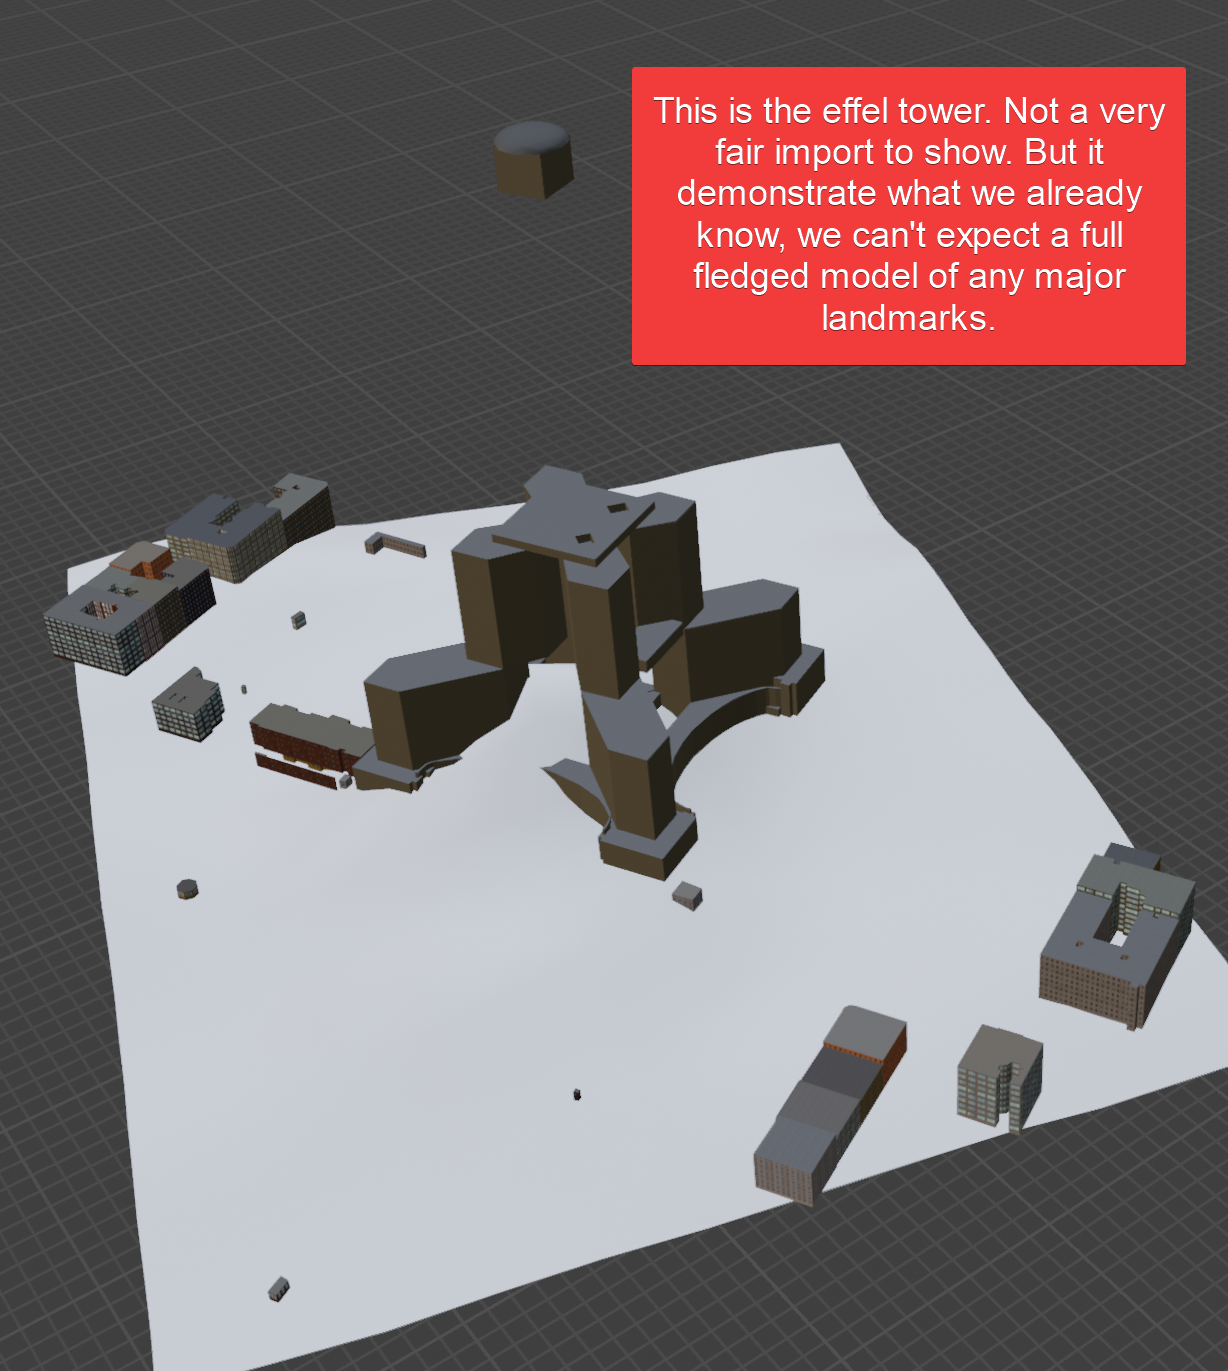
There will be more data available for large city areas. For small towns, count on most building heights to be randomized.
I realized that a lot of skyscrapers in major cities don't have preassigned roof shapes. Therefore, I could not have a default roof shape of "gabled" and still have flat rooftops on any skyscrapers in the area. Another limitation of the data.
We should also note that it supports both server and file import. If you have a .osm file downloaded, you can use it to import instead of connecting to the OpenStreetMap servers.
I also realized that there is a low limit on the amount of data I can import. OpenStreetMap will pretty quickly throw a warning letting you know that you made too many requests. This can be felt during testing. Not a dealbreaker though, but something to keep in mind if you intend to import a lot. Better space those imports out a bit to ease the load on the OpenStreetMap server.
In the premium version, there is also a realistic mode for import. In this mode, we can import buildings and forests only. But you can import the other assets using the simple mode. 3D Realistic mode makes use of the assets that come with the premium version and we can use our own custom textures and assets.
In this mode, they add a setting to the default settings that is called "Percentage of lit windows". If this is anything other than 0, Blender OSM will assume a nighttime scene and import textures based on that.
We can also import trees for the forest areas. There is only one tree asset that will be distributed. But the benefit is that the particle system is added and set up. This means that we can import any tree or collection and replace the default one.
Next we can assign our own custom asset folder if we want different textures and assets loaded by default.
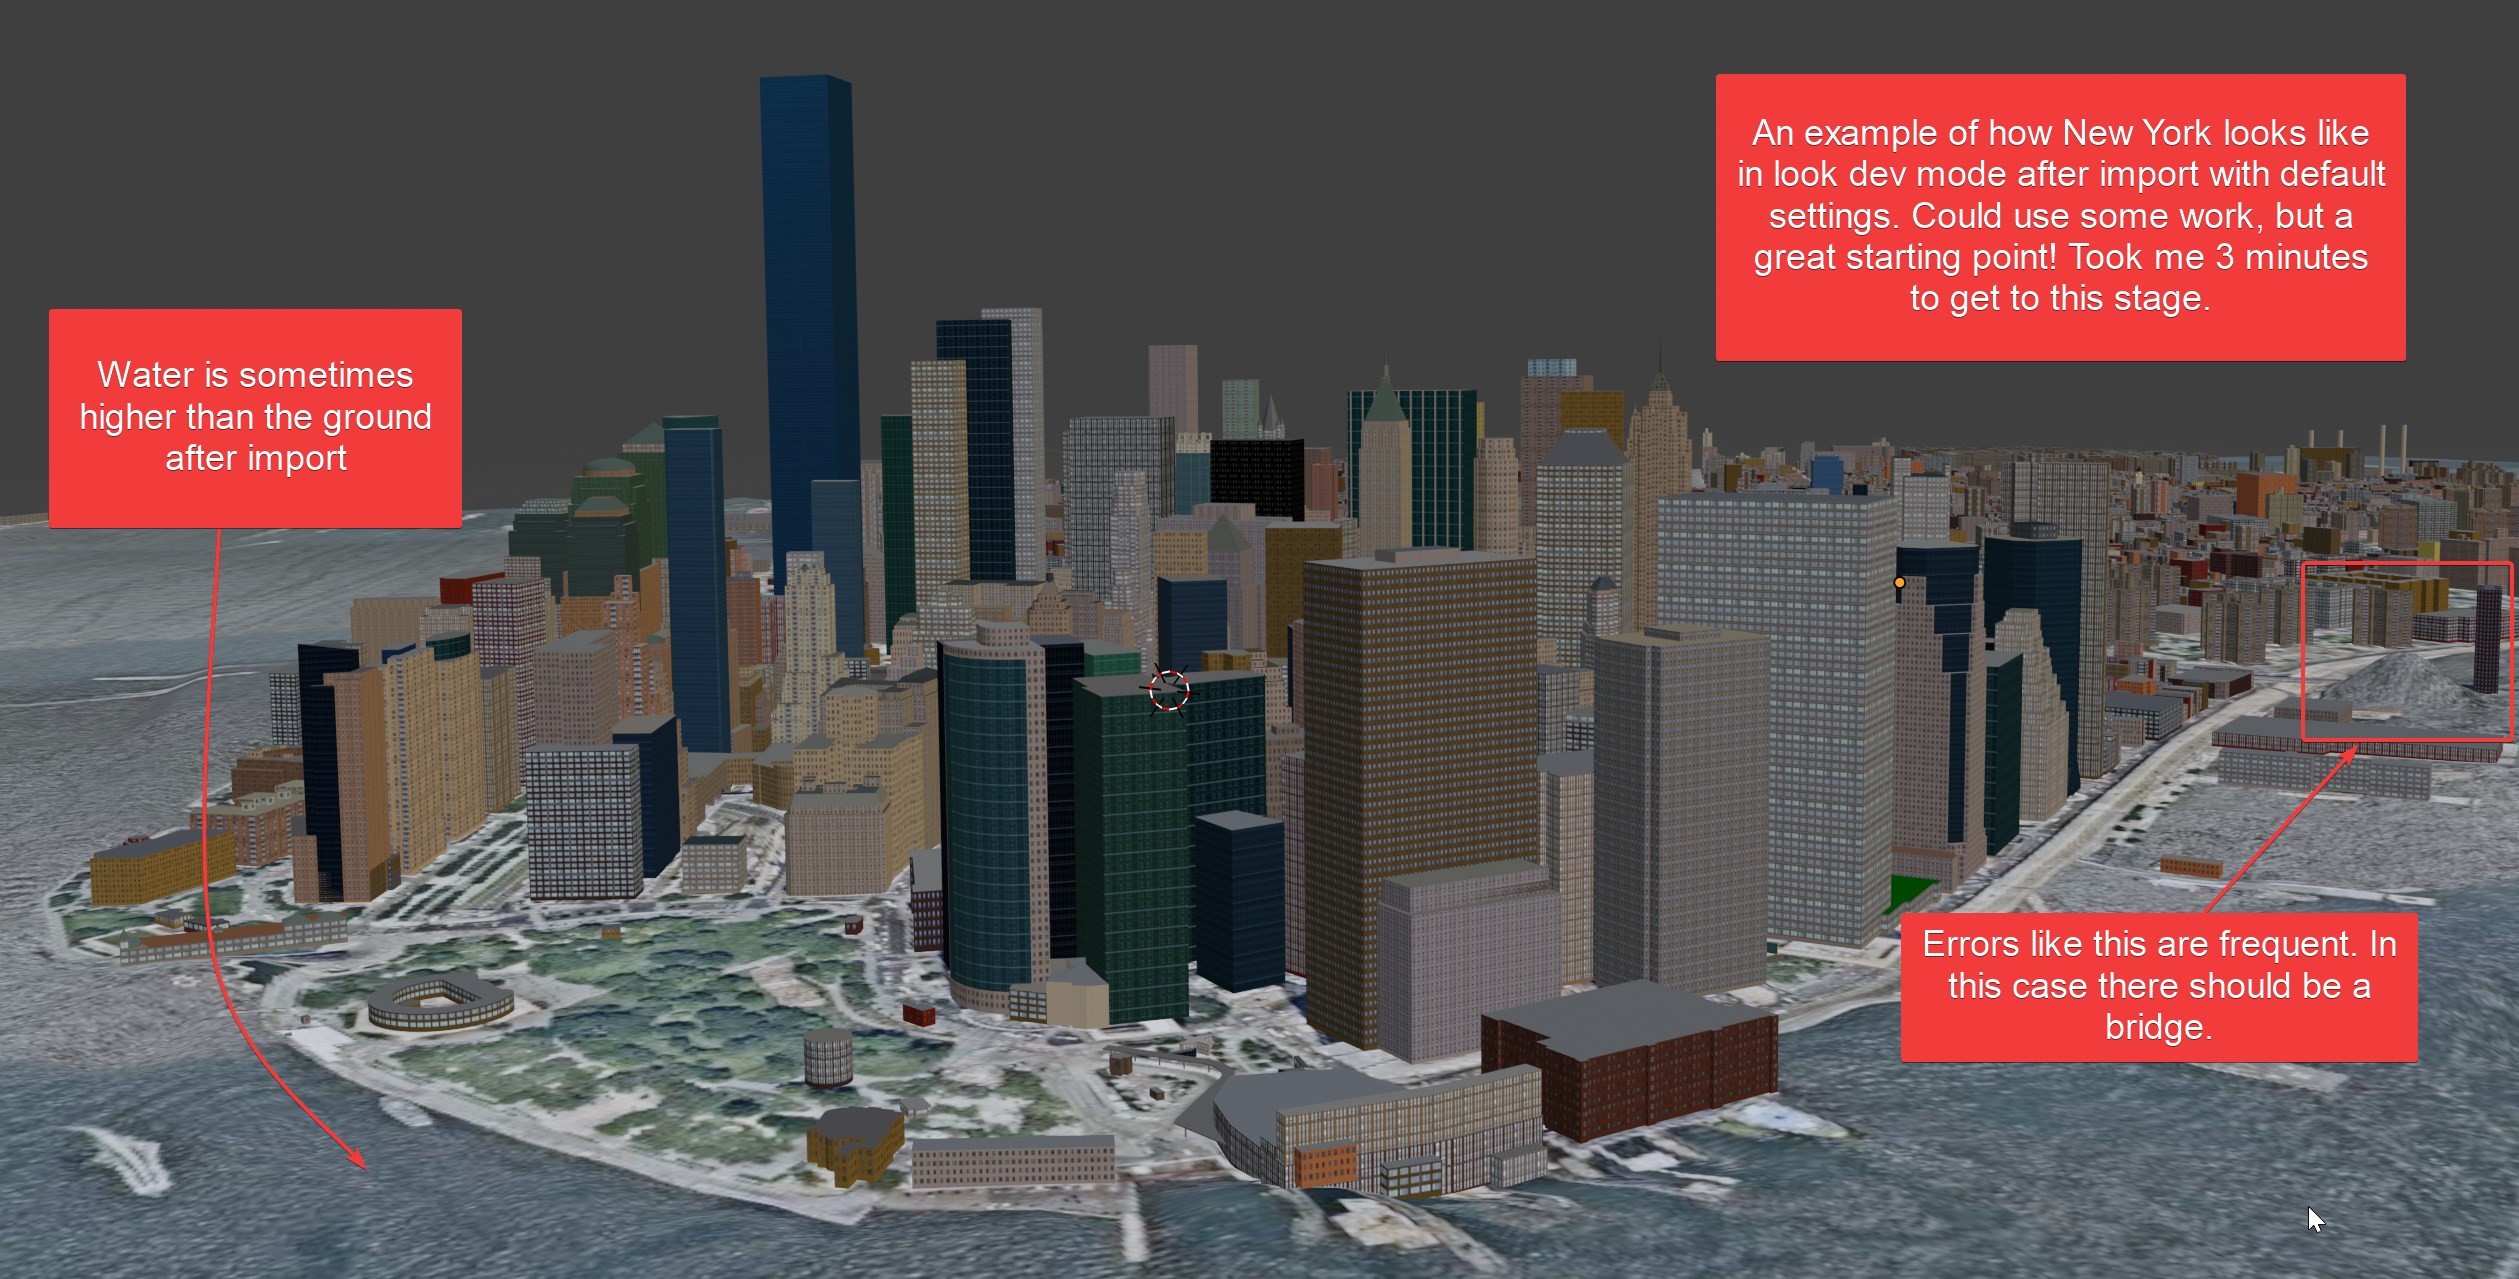
To set up custom materials you can go to this page of the manual.
In the manual, I read many of the textures in the high rise category on textures.com is recommended for use with the add-on.
It is quite a process, but it works and you can set up different textures for different buildings.
The documentation for Blender-OSM is very well made. There are easy to follow guides to do every task that the add-on is designed for. It has clear images with markings that correspond to markings in the text so you know exactly what the next step is as you follow along.
I think the documentation together with the interface are strong points of this add-on.
The fact that you can hit a button, get a map, select location, and start importing data almost instantly is a key ingredient for me.
Then there will be settings that could be ordered in a lot of ways. The way Blender-osm handles this though is well balanced. But I don't think many people will understand "georeferencing" at first glance or that the setup script actually has to do with material setups.
This is a well made add-on that is very useful for anyone who needs real world map data. The main limitation is the amount of data available on OpenStreetMap and the relatively strict licensing. But for many cases, it will be enough.
You can get it here: Blender-OSM Standard and premium
Attributions:
OpenStreet map data attribution
* © OpenStreetMap contributors
OpenStreetMap maps are available under CC BY-SA license and map tiles under the Open Database license
Maptiles attribution
* © Mapbox © OpenStreetMap
Terrain data attribution
* Mapzen
* © OpenStreetMap contributors
