


Creating trees is often a very much-needed part of creating realistic renders in Blender. Especially when working with architecture visualization. Nature in your scene is essential and even if you are creating interior scenes you will often need some kind of greenery.
After you enabled the sapling add-on press Shift+A and add a "curve->Sapling tree gen" In the operator panel, choose a preset and change the seed number. Go to leaves and enable it. Go to armature and enable it. Go to animation and enable it. You now have an animated tree from a few clicks that animate if you play with Shift+space.
In the rest of this article we will go much deeper into creating trees with Blender using the sapling add-on.
Trees are just one part of nature. The good thing about learning how to create realistic 3D trees are that they take up much space without being too distracting since we are so used to them. They help to easily fill our scenes when we need it.
They bring a sense of familiarity, comfort, and calmness. Therefore, they are so important in many 3D renders.

The solutions for creating trees in 3D come in many shapes and sizes. From advanced software like Speedtree to simpler alternatives like the sapling add-on for Blender.
The good thing with the sapling add-on is that it is so accessible, yet can create good-looking trees.
We just have to combine it with some other tools within Blender to elevate them to the next level.
However, keep in mind that some kinds of trees can be very hard to create with the sapling add-on. But for the most part, it can do the job very well.
To enable the add-on go to the Edit menu and find preferences. In this new window you can find the "add-on" section and search for "sapling" Enable the add-on by checking the box on the left side of the add-on name then close the window.
Let's start to look at how it works.
We can create a tree by going to the add menu. In the curve sub-menu, you will find “sapling tree gen”. This will add a tree as an operation. This means that the settings we have to change our tree are in the operator panel in the lower left corner of the 3D viewport.
The settings are only available for as long as we don’t make another operation. Adding another object or a translation would be examples of this.
However, we can still move the camera around and select/deselect our tree.
The menu will disappear from the bottom left corner in this case, but we can access it again with F9. This time as a floating window that we can move by click and dragging the heading area of the window.
This is important to know, so we can view our tree from all angles while still having access to the settings.
If we intend to use the sapling add-on to create an animated tree, we can also play animation without losing the settings. But once we continue on, these settings are no longer available, and our only option is to continue changing it as a regular curve object.
Before we jump into each category, I want to give you this table. These are, what I consider being the most important settings for a regular creation of trees. But don’t let this list limit you. Instead, use it as a starting point and explore further from there.
At the top of the sapling tree add-on interface, you can choose from multiple sub-categories of settings. I list these as “section” in the table below so you may easily navigate according to the table.
Above anything else, make sure that “bevel” is checked in the geometry section or you won’t see any geometry
List of the 10 most important settings
| Section | Setting name | Description |
| Geometry | Shape drop-down menu | Here you can select from some basic shapes to use as starting points. |
| Geometry | Load preset | Here you will find a list of presets that can also be used as starting points. |
| Geometry | Random seed | Change the random value used in the background they generate the tree to get another variation. |
| Branch Radius | Ratio | The base thickness of the tree. |
| Branch Radius | Branch Radius ratio | Thickness ratio of a branch compared to the branch it grew on. The problem with this setting though, is that it does not have one setting for each branch level. |
| Branch Splitting | Base splits | Determines how many times the trunk should split. |
| Branch Splitting | Trunk height | How far from the ground branches can grow. |
| Branch Splitting | Branches, second value | The first value does nothing, because this is basically the trunk split, the second value is the second level of branches. This value tells how many branches we want for the second level. By default, we only have two values and since the first one does nothing, this is the only branch value we need to care about. |
| Branch Splitting | Split angle, first and second value | The maximum angle a branch can split from its parent branch. |
| Branch growth | Length, first and second value | Decides the length of the level. With this you can decide if you want a tall or short tree, But you will have to adjust the ratio in the branch radius section accordingly. |
| Branch growth | Down angle, first and second level | This setting is like split angle but works between the ground and where the branch grows from. |
| Branch growth | Curvature, first and second value | This value determines how curvy a branch can be. The higher the value the curvier. |
Now we have broken down the creation of trees into 12 settings. This will not enable you to create all types of tree in the world, but it is a good starting point when you want to get going.
You can play with these settings and see how your tree shape changes and branches impact the look of the tree.
Below we will dive deeper into each section and explain the settings in more detail. Then we will continue and walk through an example.
Just keep in mind that we won’t cover every single setting. Some we will cover in groups to simplify things. There are, after all, a lot of settings in this add-on.
If we start in the geometry section. Here we can turn on geometry for our tree, work with resolution, and give the tree a general shape.
The bevel checkbox turns on the geometry. You may want to leave this off while you work on your tree for better performance.
Below beveling we got two resolution settings that sets the resolution around the branch and along it.

The handle type is the kind of points we have along the curve. Generally, “auto” gives a smoother result.
The shape setting is important. It gives us some basic settings for the branch length on different parts of the tree. There are several presets, and if we set this to custom, the four values below become active, and we can set our own shape.
The first custom shape value sets the length for the lowest most branches and it keeps going upwards the lower the setting is in the interface.
Keep in mind that this is the only place we can adjust the difference in branch length between different parts of the tree in the sapling add-on, except for the pruning section where we get some options to cut away at our tree.
We will see sets of four values in many places through the interface. However, all the other sets of four values correspond to the branch level instead of the position on the tree. A branch level is how many times a branch can grow on a branch.
When we start we have two levels by default if we didn’t change the preset at the bottom of the geometry settings.
The branch distribution will put more branches closer to the top or bottom of the tree depending on the value.
Then branch rings is interesting. It will put branches on the number of levels. Use zero to have branches on separate layers. This means that if you just change this to 1, most likely you won't see many branches. So you need this to be 0 or a higher number like 10 or above. 0 just means that the branches will rotate around the tree instead of using rings.
The random seed number will give you a new random tree within the same random number settings. Enabling us to generate many trees once we got our settings right.
The tree scale and scale variation is just what it says. The base scale of the tree. A scale value of 5 will correspond to a tree of 5 meters. A scale variation of 2 means that the 5-meter tree can be anywhere from 3 to 7 meters.
Just keep in mind that you can’t count on these exact numbers because other values dictate how tall the tree gets as well.
We will deal with presets later, for now, just know that there are a handful of presets that you can choose from as a starting point at the bottom of this settings' menu.
In this section we also got a bevel checkbox. It has the same function as in the geometry section. It is just duplicated here for easier access. Same with the bevel resolution.
Below the duplicated bevel settings is the ratio. I almost never adjust this value. It is a tiny sensitive value that I guess is a base value for the branch thickness, including the trunk.
Below that it says Radius scale twice. The left value is the actual radius scale and the right one is radius scale variation. You can confirm this by hovering the value to see the tool tip.

Branch radius ratio is an important value. If you read in the table above, you might remember that this value decides how thick the next level of branches will be. This allows us to have a very equal branch thickness throughout our tree or slim down each level of branches more.
The minimum radius sets a limit to how thin the thinnest branches can be.
Next we have tip and tapering settings. The close tip checkbox might seem like something we want to do to close off the tip of each branch. However, this creates a cone at each end and I found it to sometimes be troublesome when texturing, so I would recommend this unchecked since we won’t see much of the tips, anyway.
The root flare is a tapering effect on the root of the tree. It is very basic and just creates a cone shape at the root. Instead of using this I generally adjust the tree manually after the tree has been converted to mesh to create a more organic feel.
The taper settings at the bottom gives us a setting per branch level to taper in the tip to become thinner and thinner.
The tweak radius is an important setting. Here we can set a value that the “branch radius ratio” should be multiplied with. This gives us control of the branch thickness per branch level.
In this section of the sapling add-on settings we have levels at the top. This is where we tell the add-on how many levels of branches we want.
Any set of four settings will only work on its corresponding level. By default, as we said earlier, we only have two levels enabled. This means that only the first and second value is active. The third and forth value only becomes active as we increase this number to 3 or 4.
Keep in mind that the first level may behave differently for some settings since this is the trunk level. The trunk level also got its own settings throughout the interface.

Generally, I stick to two levels even for a finished tree. This is because instead of adding multiple levels here and leaves at the end, I usually create my own twigs that I use a particle system to apply to the tree. We will look at this process in the example below.
Moving on.
The base split is one of those settings that affect the trunk only. However, this is not the only value splitting the trunk. You also have to monitor the Segment split below. In contrast, the branches setting on the first level has no effect on the trunk. The base split is a much more limited value than the segment split.
Moving back to the trunk settings now. The Trunk height is a percentage value telling how much of the trunk should be bare before branches are added.
Then we have split height. It is easy to assume that this would change the position of the base split. But that is not the case. Instead, it sets the height of the segment split.
In turn, split Bias will change the distribution of splits, splitting closer to the top or bottom of the tree.
The branches settings will set the actual number of branches on each level. Each level may both split and will also have new branches growing from them. Splitting can be done on a branch while we still consider it the same level. But a new branch is essentially a new split as well. This distinction is important to make, so we don’t assume that every split is the same as a new branch.
If we can’t see the effect of some setting on a particular branch, maybe it is not actually a new branch, but just a split of the same branch. Confusing, I know.
The split angle therefore only affect the split that happens thanks to splits from the segment splits setting and not the angle from new branches. Keep in mind that a branch can split multiple times without having another branch growing on it. This means that the splits within the same branch can’t be separated further by different settings. However, we can use split angle variation to give the angles some variation.
Next up is rotate angle. This is interesting because if we put the rotate angle to 0 all the branches for that level will grow in the same direction if we also set the rotate angle variation to 0. By increasing this value we can see how the branches spin around.
You may have noticed that the default number is 137.5. This is no coincidence. It is the golden angle. You can find it everywhere in nature and if you want to make 3D art nature, this is the most important number to learn. You can also try 222 if it is easier to remember.
If you look at a plant from above as you distribute branches with these angles, you realize that they just fall into place.
Okay, back to settings now.
The outward attraction will be most prominent with trees that split lower on the trunk. A base split usually gives a good effect, and they closely relate to the branch mode.
So let’s start with the branch mode instead. The default of rotation means that the branches have a middle point that they grow outwards from. When we only have one trunk, the point the branches grow from and the trunk aligns in this mode. But if we split the trunk and look from above you realize that the branches are just growing outwards and not towards the other trunks in the tree.
Changing the mode to original will make each trunk its own point to grow around, and we can once again have branches growing “into” the tree.
We can also set this to random, and then branches will grow at random basically.
The outward attraction then curves the branches outwards from the center of the tree for the level you change.
At the bottom we have curve resolution. Here we can adjust the number of segments on each branch. I leave this at default if I don’t want very curvy branches.
At the very top we have Taper Crown this is somewhat misleading because what it does is that it reduces the length of our base split and the split segments of the first level. Bringing the whole tree closer in towards the ground by reducing the size of the trunk and its attached splits.
Just below trunk split we have the length and length variation settings. These do exactly what you think. Increase or decrease the length of each level. This works for the trunk as well on the first level, to the fourth if we add branches that far.

Next we have the down angle. This though does not work for the trunk since this setting is in relation to the branch above it. And we have none for the trunk. The down angle will pull the branch back, creating a greater angle between it and the branch it grows on. This is in relation to the normal of the parent branch and not to the ground.
To pull branches towards the ground use the vertical attraction at the bottom of the settings instead.
The curvature settings will also pull the branches, but it will also curve them inwards at the same time. It curves mostly at the root and middle of the branch. The back curvature curves the tip of the branches, making it possible to have branches curve up again.
Sometimes it's hard to create the shape that we want by just growing. In these situations, pruning can help to cut away at our tree to create the perfect shape instead.
Just keep in mind that if you plan to animate your tree, it is not compatible with pruning. The sapling add-on will throw an error if you add an armature to a pruned tree.
We need to first enable pruning. When we do we get a visual representation of the area that we are pruning in. We can then adjust this area with the settings in this section of the interface.

Just remember that the helper object will often not match exactly with the cutting of the tree, but it still gives us an idea of the general shape we are pruning away. So here we go.
The prune ratio is a kind of effectiveness slider. If we set this to 0, there will be no pruning. But the tree will slightly change shape as we play with the other settings. Pulling this towards 1 makes the pruning be more and more impactful.
The width will just widen or shrink the prune area while prune base will raise and lower the bottom of the area.
Now, the next three settings is where we can adjust the curvature of this shape. The prune width peak is the height of where we want to curve to/from. The “prune width peak” is not really a percentage value, but we can think of it as one. A value of 1 will put the peak at the very top and 0 will put the peak at the bottom. But we can go above 1. Going above 1 will bring the pruning area closer to the center of the tree but will also make the “prune power” to the left unusable. In most cases we therefore want to stay within 0 to 1.
You probably see that we have two prune powers and depending on your interface settings you may or may not see more or less of the wording. But the full names are Prune power high to the left and prune power low to the right.
If you are familiar with math, what we are dealing with here are known as power curves. A prune power above 1 will bring the curve inwards in the middle while a value between 0 and 1 will bulge the middle outwards. So it is a question about a concave or a convex curve.
The same goes for both prune power values, but we got one for the lower part and one for the upper part.
Now for the fun part! Adding leaves so we can complete our tree! Not so fast though. Most times making a separate twig object is a better approach. In the example that I create below we will do just that and skip this section.
However, there are cases when this is useful. For instance, we can use our leaves to distribute twigs, or other objects around the tree. Perhaps we are not creating a tree at all. Maybe we are creating a flower, bush, or something different that is like a tree, and we need some way of distributing something across our creation.
So, lets explore this section anyway, so we know what options we have.
First, we have the enable/disable checkbox. We already know what that does so let’s move on.

Just below it, we can choose what kind of shape the leaf should have. This is crucial, depending on the goal we have. The hexagonal is mostly useful for creating previews or for placeholder trees in a preproduction phase.
The next level up is to use a rectangle. We can use these rectangles to map a leaf texture with a transparent background on it. We will get a UV map created for us and a material of this kind is not very complex to create. However, transparency is expensive to process during rendering and if we have hundreds or thousands of leaves that use transparency it will not be efficient or as good-looking as creating our own twigs. But the option is there.
We also have dupliverts and duplifaces. These add a network of faces or vertices instead of leaves. We can then use these to instance another object, like a twig to the position of these vertices or faces.
When using dupliverts or duplifaces we choose the object we want to duplicate in the “leaf object” drop-down just below the “leaf shape”. The object we choose should be aligned on the positive Y axis.
Both dupliverts and duplifaces take advantage of instancing that we can find settings for in the object properties tab in the properties panel. Look for the instancing section on the “leaves” object that is a child of “tree” in the outliner.
Dupliverts and duplifaces work slightly differently. A vertex can point in a direction, but it can’t have scale, so if we choose dupliverts none of the scale parameters will have an effect except for the “leaf scale taper”. If this is below 1, the objects will point outwards from the tree center and if it is above they will point straight up.
For duplifaces on the other hand, the “leaf scale taper” will control distribution of faces between the inner part of the branches to the tips. A value of 1 will remove distribution from the tip and center the leaves. A value of 0 will give an even distribution and the closer to -1 we come the more the inner leaves get scaled down.
Let’s continue. The leaves setting control the number of leaves, this is per branch but splits also seem to get leaves. However, it is only the outermost level that gets leaves. If we input a negative number, the leaves grow only from the tip of the branches. Think palm leaves for instance.
The leaf distribution has several presets that we have seen in the geometry tab as well. Here they control how the leaves are distributed across the tree.
I will leave the rest of the leaf settings for you to discover. Most of them are scale and rotation related and if you have read the branch growth section above, you will be familiar with them. It is like another branch level but with leaves instead.
We covered the most important settings that may not be obvious at first.
Ok, it is now time to animate some wind in our trees. This has become much more accessible since 2.80 and Eevee got introduced into Blender. More people can now render animations without waiting months for them to finish.
Keep in mind as I stated in the pruning section of this article. We can’t use pruning and animation, or rather armatures together in the sapling add-on.
The armature is the skeleton that we actually animate. The tree is then parented to the armature to follow it. The tree will follow each bone based on the vertex group that is linked to the corresponding bone.

In Blender, the sapling add-on can do all this automatically for us except for one little detail. In most cases, we will want to convert the tree from curve to mesh. In the conversion process, we lose the information that ties a bone to a part of the mesh. We therefore have to un-parent the tree and parent it again after we convert it to mesh.
You can un-parent with “ALT+P”, choose “clear parent”. Then parent it again. This time with “CTRL+P”. Choose “with automatic weights”. This works without manual adjustments in most cases.
Let’s continue with the settings for this part of the interface.
We have the usual on/off toggle first followed by a “make mesh” checkbox. This will add the shrinkwrap modifier to the stack. You can try this if you have problems with the methods of un-parent and parent the tree above. But it generally gives us a harder mesh to work with.
Related content: How modifiers work in Blender, an overview
The rest of the settings unfortunately makes little sense to me. The armature level allow you to choose how many levels will have an armature, starting with the trunk.
A value of 0 will give all levels an armature.
The “bone length” reduces the number of bones making more geometry correspond to fewer bones. I guess that you may save on performance by doing this, but you may run into animations that become very stiff.
This is where we turn on and adjust our animation. Just like the interface says, make sure you are done with all other settings before you start here.
When animating, we consider the wind to come from the positive Y direction.
We can have animation for the tree by enabling “armature animation”. The leaves can be turned on or off separately. But we can’t have leaf animation only.
Fast preview will disable the geometry and leave the curve as a preview guide for lower end systems.

The animation speed is self-explanatory. Just slowing down or speeding up the animation. It does not change how the movement goes, just the speed.
The “loop frames” settings is cool. It allows us to loop the animation. Here we decide how many frames long the loop should be. If you plug a very short number in here, the animation will just jump around, but a value around 100 gives good seamless results.
Now the wind settings. The “overall wind strength” is the strength of the wind. If you set this to something high like 20 and change the animation speed to something like 0.1 you can witness something creepy.
Next we have “wind gust strength” and “wind gust frequency”. The frequency can be thought of as how fast the wind will wobble the tree and the strength can be though of how much it wobbles.
Something to keep in mind is that the wind settings affect both the leaves and the tree.
The leaf wind settings are similar. We can think of the amplitude and frequency as the gust strength and gust frequency but for the leaves only. Randomness in turn, will prevent the leaves from all moving in the exact same way, offsetting the noise pattern each is moving through to create the effect. If you set the randomness to 0, you see that they all move the exact same way.
If you don’t work with the sapling add-on regularly, it can be very hard to know what different settings do. Some settings even change functionality depending on other settings and yet other settings has no effect at all. It is a weird world we live in, that's for sure.
There are significant features missing from the sapling add-on, such as being able to grow trees around each other or around other objects. It can also be very hard to recreate certain tree types. But for basic trees, I think spending a day or two on creating a forest with different tree types to reuse in your projects can be a good idea.
In the rest of this article, I want to cover an example workflow. How we can go from empty scene to a tree with animation, twigs, shading and lighting.
Keep in mind that this is just one workflow for creating trees, but it is a workflow that I have tested and refined to create trees in Blender without external add-ons. Apart from this way of creating trees I also create trees manually, building them up with the skin modifier and going from there. Sometimes sculpting and combining with a displacement modifier among other things.
But my favorite tree creation tool for Blender is the grove. For freelancers and other professionals it is a no-brainer but for beginners, hobbyists and intermediate users that just want some trees in the scene, the sapling add-on is the fastest way. Let’s dive in to the workflow example. Feel free to follow along.
I will start by outlining the workflow we will use here:
I will not outline every single step, but I will include all the important parts together with details where there could easily be confusion or I think there are interesting takeaways.
Until now, creating the tree is all we have been talking about. Therefore, I will go the simple route here, using the standard settings and the callistemon preset with no leaves and 2 levels of branches.
Then I will enable the armature and animation. I will reduce the “animation speed” and “overall wind strength” to 0.5 respectively to create a somewhat calmer animation.
Feel free to experiment as much as you want with your tree. If you find settings you like, consider saving it as a preset. For more information on presets check further down towards the end of this article.
A tip when creating your own custom tree is to have a good reference image of what you want to achieve. The result becomes much better in every case where you use reference.
You can read more on managing reference images here:
Related article: The ultimate reference photos workflow in a nutshell
We need to convert our tree to a mesh for some better texturing control. At the same time we need to maintain the relationship between the geometry and the armature. To do this, start by converting the tree to a mesh. Right click in the 3D viewport in object mode and choose Convert to mesh.
Now we need to unparent the tree. Select the tree and press “ALT+P” and choose clear parent. Then select the tree and hold shift to also select the armature. The armature should be the active object with a lighter orange outline. Press “Ctrl+P” and choose with automatic weights.
Play the animation with “Shift+Space”. Observe the tree and make sure that there isn’t any major glitch in the animation.
If you have problems, you may fix some manually by doing some paintwork in weight paint mode for the problematic area. But for more severe problems you might have to look for another method. One way is to use the make mesh option in the armature settings for the sapling add-on and generate the mesh this way.
For the shading I have chosen a bark texture and several leaf textures. The bark texture is from texturehaven.com and the leaf textures come from cgbookcase. You can find them here.
For more texture resources check out the resource section here on artisticrender.
Related content: Texture resources
There are two challenges with texturing. The first challenge is that we are very likely to get repetition across the tree. The second challenge is that we are also likely to get seams visible where the branches connect.
We will deal with both issues at least to some extent. But let’s start with the UV Map.
To see what we are doing, I want to add a grid texture to the tree. I start by going to the shading workspace, add a new material and connect an image texture node to the base color of the principled BSDF shader. Press new on the image texture node and change the generated type to color grid.
Change to the UV Editing workspace and select everything in edit mode. In the 3D viewport select material preview shading mode to see the texture we applied. We have what looks like a mess of overlapping UV islands. But the UVs are pretty good.
In my case, I had to rotate the texture -90 degrees and scale it on the Y axis substantially. When the squares in the textures become squares, you know that you are close. The letters should also be readable. In my case they were flipped. To flip them back, scale on the X axis by -1. “S”, “X”, “-1”.
This is the result we want to see.

Now, let’s shade this thing, and this is where we solve our problems. The first problem we have to address is the branch connections.
To deal with this, we will use two different materials with two different mapping methods. We will use the UV Map to project the texture on the smaller curvier branches. We are less likely to see any seams here since the top of the tree will be filled with leafs. They will also be much smaller.
For the trunk and larger branches we will use box projection. This projects the textures from all six axis instead of using a UV Map. You can read all you need to know about it in my article on it here:
Related article: Blender box mapping workflow, a quick look
To faster manage box projection I also made an add-on that you can get by going to this article above.
The criteria for being a branch with the box projected version of our material the branch needs to be a relatively straight. The trunk and directly connected branches are often the ones we need to box project. In my case the selected branches in this image is the ones I box project.

To make this kind of selection, select a single vertex, edge or face in each branch then press “Ctrl+L” to select all connected vertices.
I create a new material and assign these branches to it. Then we create the material in the node editor.
If you need to learn more about the node editor and how to create materials for Cycles and Eevee I wrote this guide to get you started using texture images.
Related article: The complete beginners guide to Blender nodes, Eevee, Cycles and PBR
For the box mapped bark material I came up with this.
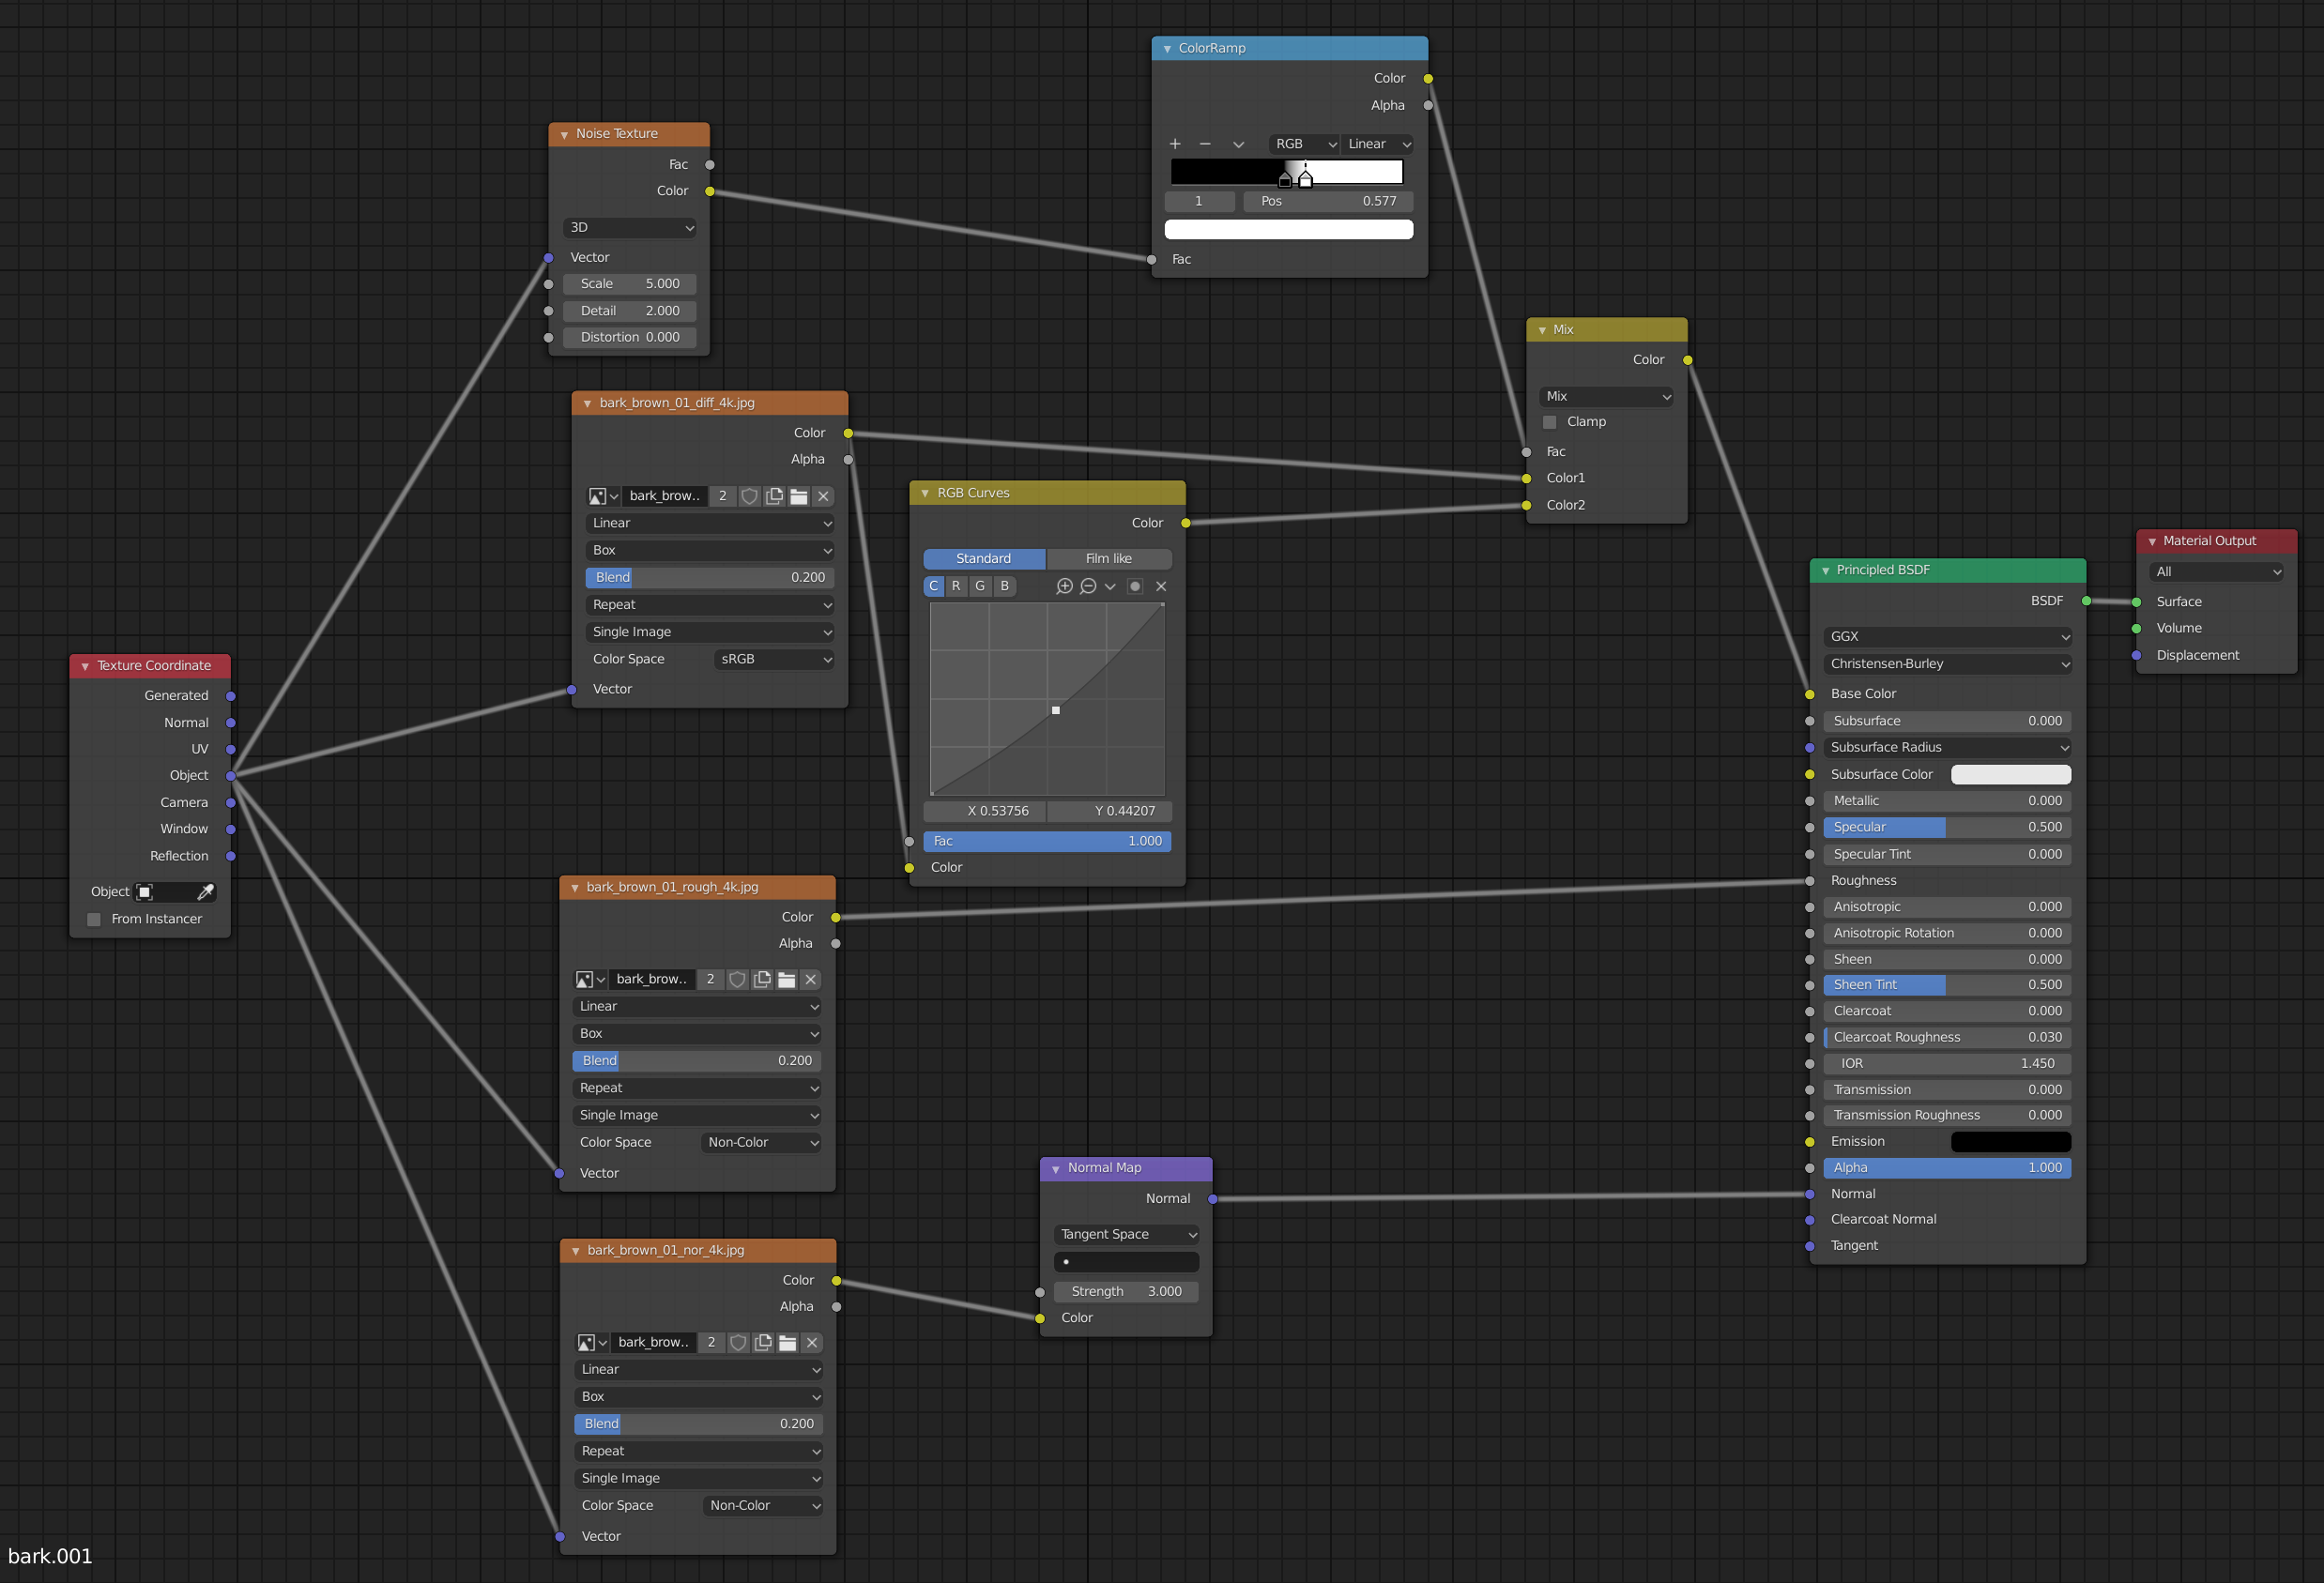
We start with a texture coordinate node and the object coordinates since we want to use box projection. We then set the image textures to box projection instead of flat. We get access to the Blend value that will blend the sides between different projections to some extent. I found 0.2 to be a good value most times.
The roughness map and normal map is set to non-color data and the normal map node is increased to 3, just because I felt that I didn’t get enough from it at the default value.
We also have some magic happening with the diffuse texture. We pipe it to an RGB curves node that slightly darken the image then we combine it with itself using a noise texture with high contrast as the mask. This gives us two color variations of the same texture and helps us break up that repetition that we may see as the bark texture is repeated across the surface.
Sometimes the original size of the texture might not be enough. In those cases we can add a mapping node between the texture coordinate and each image texture to adjust the scale.
It is a fairly simple material letting the image textures do the heavy lifting.
Now let’s look at the very similar UV Mapped material.
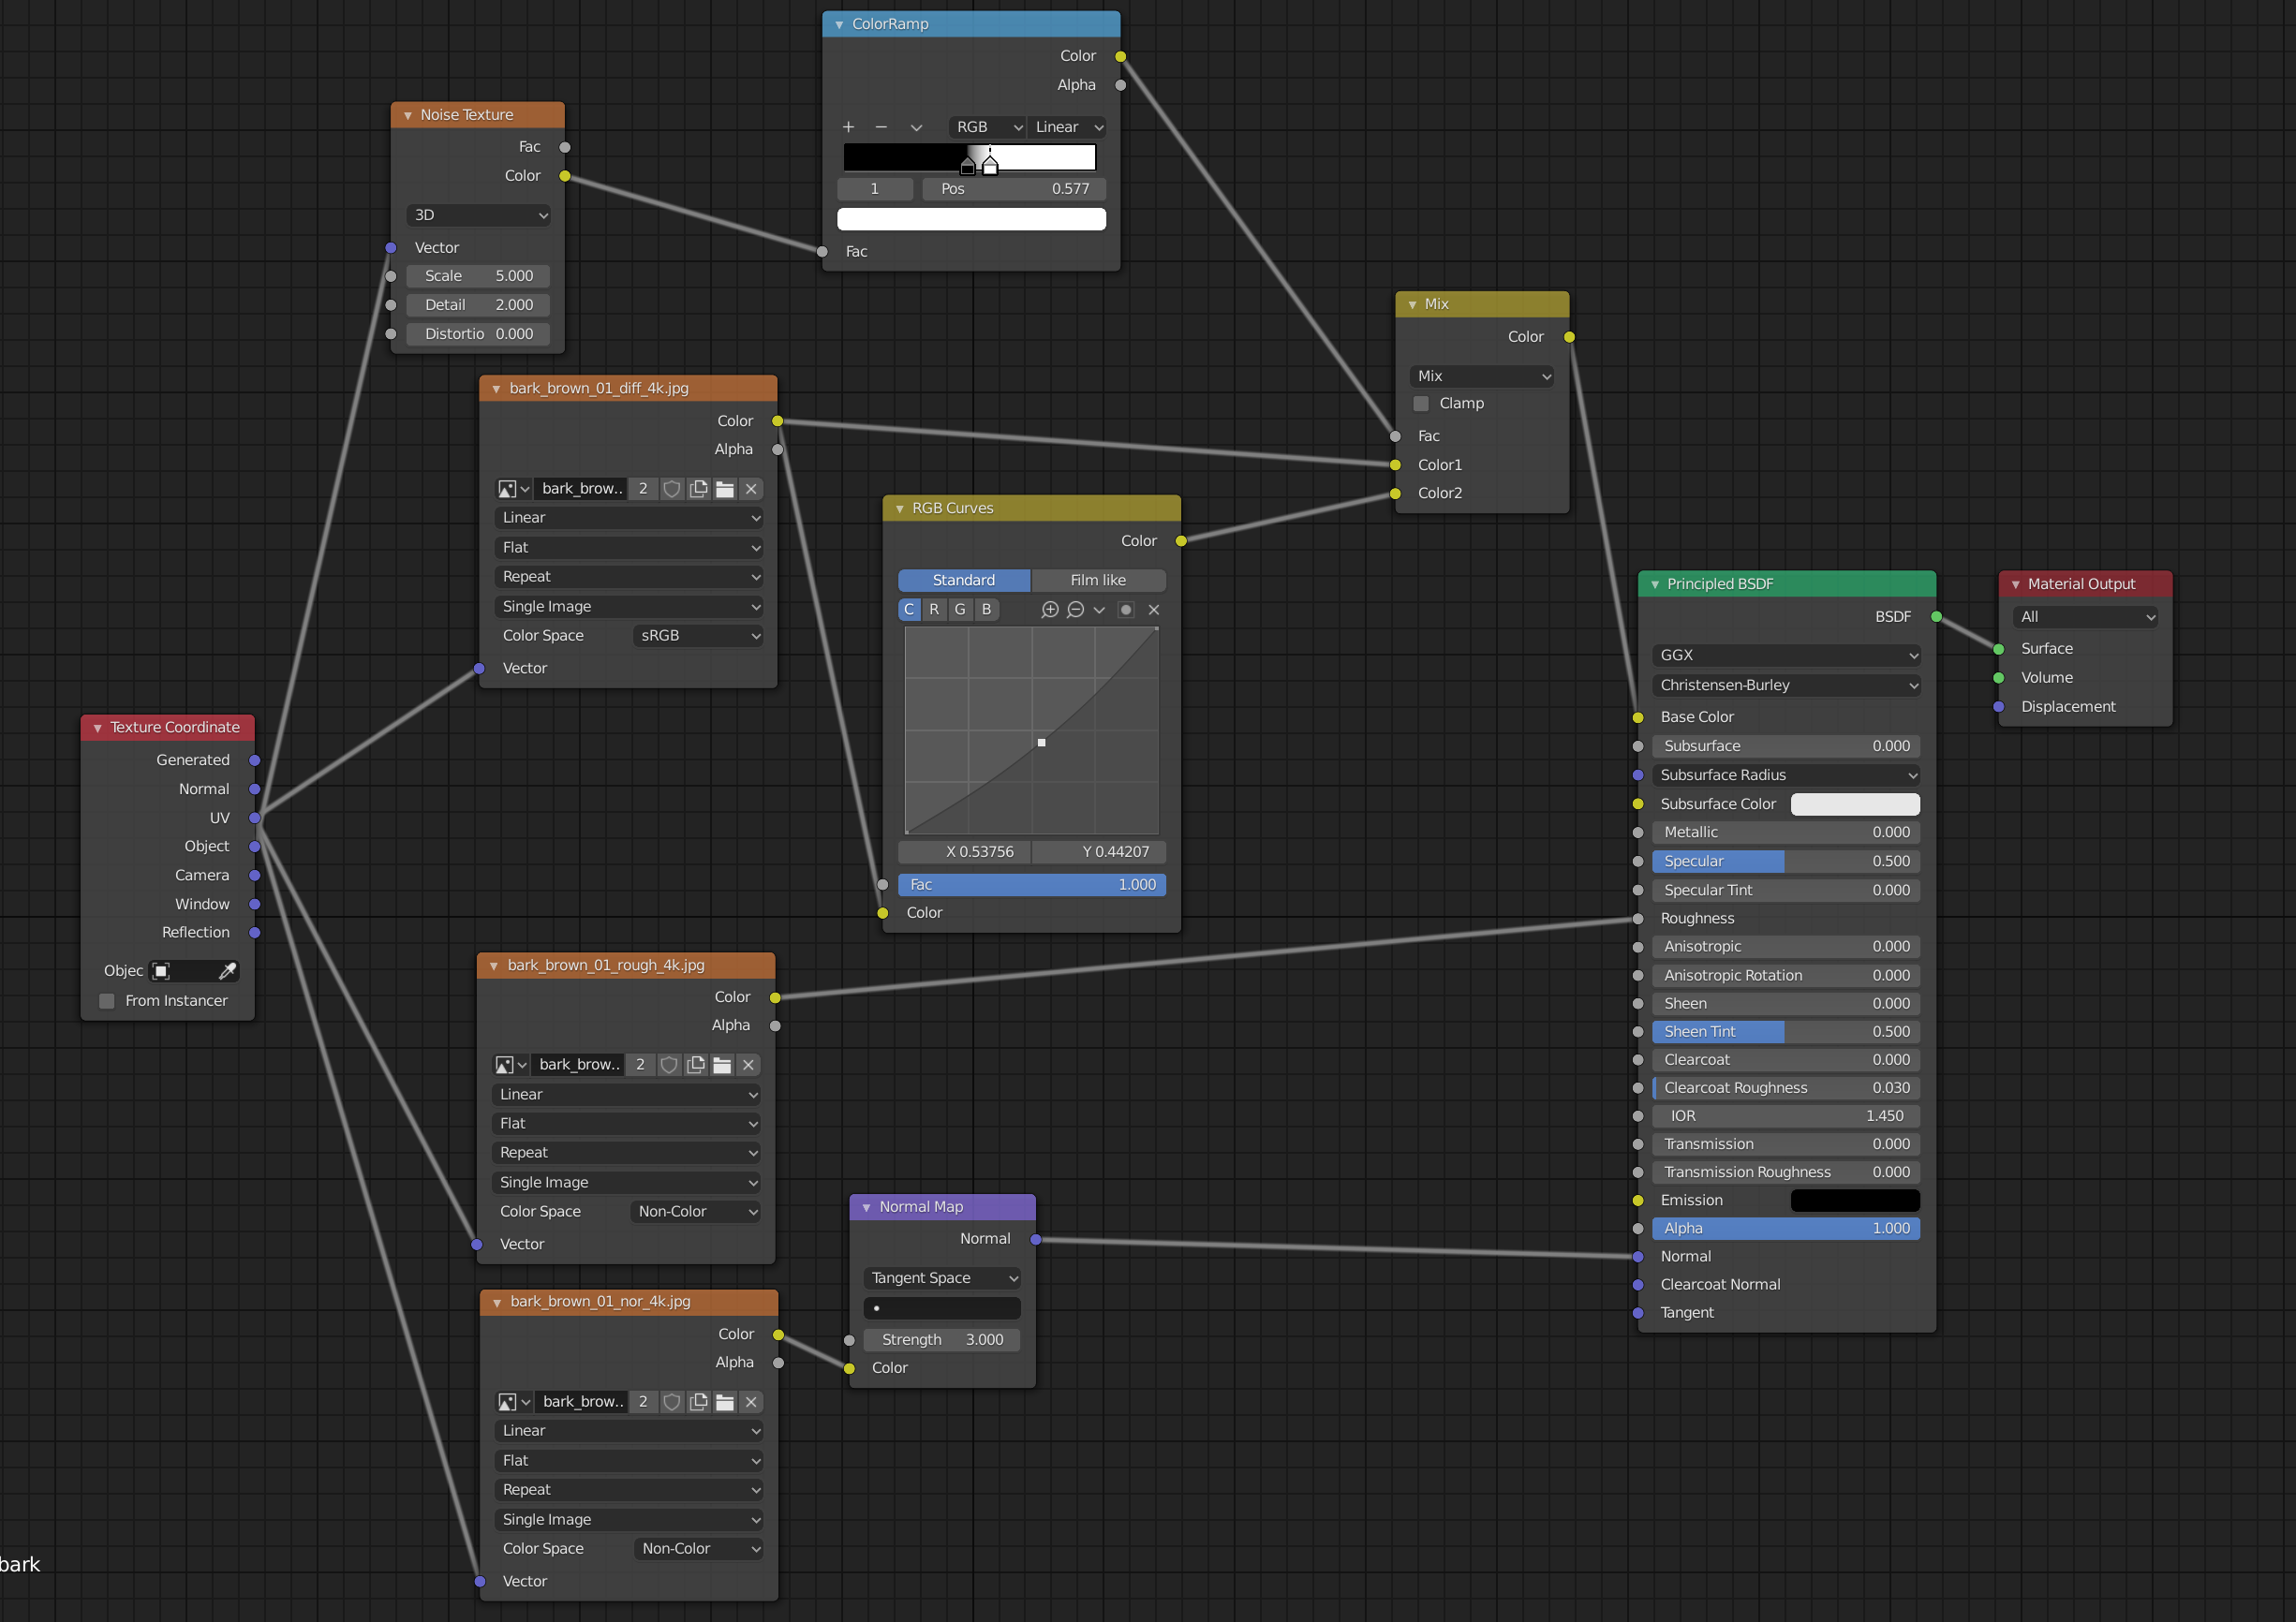
The material is essentially a duplication of the first. Only difference is that the image texture nodes use flat projection with the UV coordinates instead. However, note that the noise texture is still connected to the object coordinates. It can be hard to see in the image.
To easily create it you can select all nodes in the box mapped material and copy/paste it then just change the projection and texture coordinate output.
In this way we solved both the repetition issue and the seams at the branch connections in the shader editor. Let’s now look at how we can create the twigs and attach them to our tree with a particle system.
The first with we need is some twig references. These can be hard to find but I made a Pinterest board here of some images that could be useful, both for inspiration and reference.
External content: : Twig reference pinterest board
Another option is to go out and photograph your own reference images. This is a good way to get some unique images to work with. A good idea is to bring a large sheet that you can have in the background so that the branches you photograph stand out more.
Next drag and drop your main reference into the scene and start modelling with it as a background image. When I made the twigs for this test, I started with a circle with 8 vertices. Then I extruded them along a background image of a small branch.
At every intersection, where a new branch grows, I leave a loop cut. Once the longest branch is extruded I go back and slightly bevel this cut, then I duplicate one of the edge rings, put it in between the two beveled edges and extrude a new branch to the side.

An alternative is to select a handful of faces and inset, then use the loop tools add-on with the “circle” tool and extrude a connected banch.
To bend the twig, use proportional editing and select either end of the longest branch and bend it with the bend tool. Shortcut “Shift+w”.
If you are interested in other Edit mode tools you can read more here:
Related content: More than 30 Blender modeling tools explained
Then adjust the branch so that the beginning of it is at the origin point. You can select the first edge ring, use “shift+s” and choose “cursor to selection” Then tab to object mode, right click and choose “set origin”. Then use “origin to 3D cursor”.
This will make sure that when we distribute the branches with a particle system, the origin, and therefore the twig will start at the branch and not hang mid air.
For the leaves I did the same thing, but used the actual texture for each leaf in the background. To get the shape of the leaves I started with a plane and extruded it along the leaf, adjusting the vertices as I went. In this article you can read more on how to use background images.
Related content: How to set up background reference images in Blender
When the leaf outline is done, and we have the outer shape, I add 3 loop cuts along the leaf. This extra geometry will help us bend the leaf and create a convex shape.

But before we bend it, it is important to remember to UV unwrap the leaf. It is not a catastrophe if we forget, but it becomes easier if we do it now. You can use “project from view” or a normal “Unwrap”. Both fill work just fine. We will have to adjust the UV Map either way.
If you are unfamiliar with UV Mapping, here is an article I wrote on the subject.
Related content: The definitive tutorial to UV mapping in Blender
Also add a material slot on the leaves right now. Later we will join the leaves to the twig branches and if we forget this, we will have to select all the leaves once we joined the meshes together.

We can adjust the UV Map now or right before we shade, that is up to you. I prefer to just unwrap and adjust later since I am in the middle of modeling at this point.
To shape the leaf I turn on proportional editing and scroll the mouse wheel until it covers most of the leaf. Then use the bend tool with “shift+w” again. Move the mouse to shape the leaf. This tool can take a bit of getting used to, before you get the hang of how it bends. Just try it a couple of times.
When we have a good bend along the leaf, we need to adjust it so that the origin is at the stem of the leaf. This way it becomes easier to control in object mode.
Now I manually position copies of the leaves on the branch until I am happy with how it looks.
Normally I create at least two different branches to distribute. But between 1 and 4 variations are good.
When the branches are done I select all the leaves and last the corresponding branch and press “Ctrl+J” to join them together.
When the branch is joined, I create the UV Map for the twigs. I go to edit mode and in edge or vertex select mode I hold ALT and continually select an edge loop along each branch at the bottom. Then I mark them as seams and unwrap them separately.
To select a full length edge loop hold ALT and click it and to select all linked objects just before unwrapping, press “Ctrl+L” to select linked.
If you have not done so already, in object mode, right click and select smooth for the twig shading.
Once we modeled the twigs, prepared with materials and UV Maps, we can shade. If you created the leaf material but don’t have a material on the branches, you can select the branch, go to edit mode and in the material tab in the properties panel press “select” when the leaf material is active. Then press “Ctrl+i” to invert the selection. Then add a bark material to the twigs.
For the bark material I will use the same material as the UV Mapped bark above. Make sure that the UV Map islands are going in the right direction, following the bark in the texture. Then just scale the UV map to an appropriate size. It does not matter much if the texture is tiled many times since this most likely won't be visible in our tress.
For the leaf material. In my case, I used multiple images for each leaf. This means that I will have 1 material for each leaf, mapping one texture on each leaf. An alternative is if we have all the leaves on one merged texture, we can use the same material and just map the UV Map to each leaf in the texture.
I will show how one of those materials is set up, and you can set up the rest depending on your texture situation.
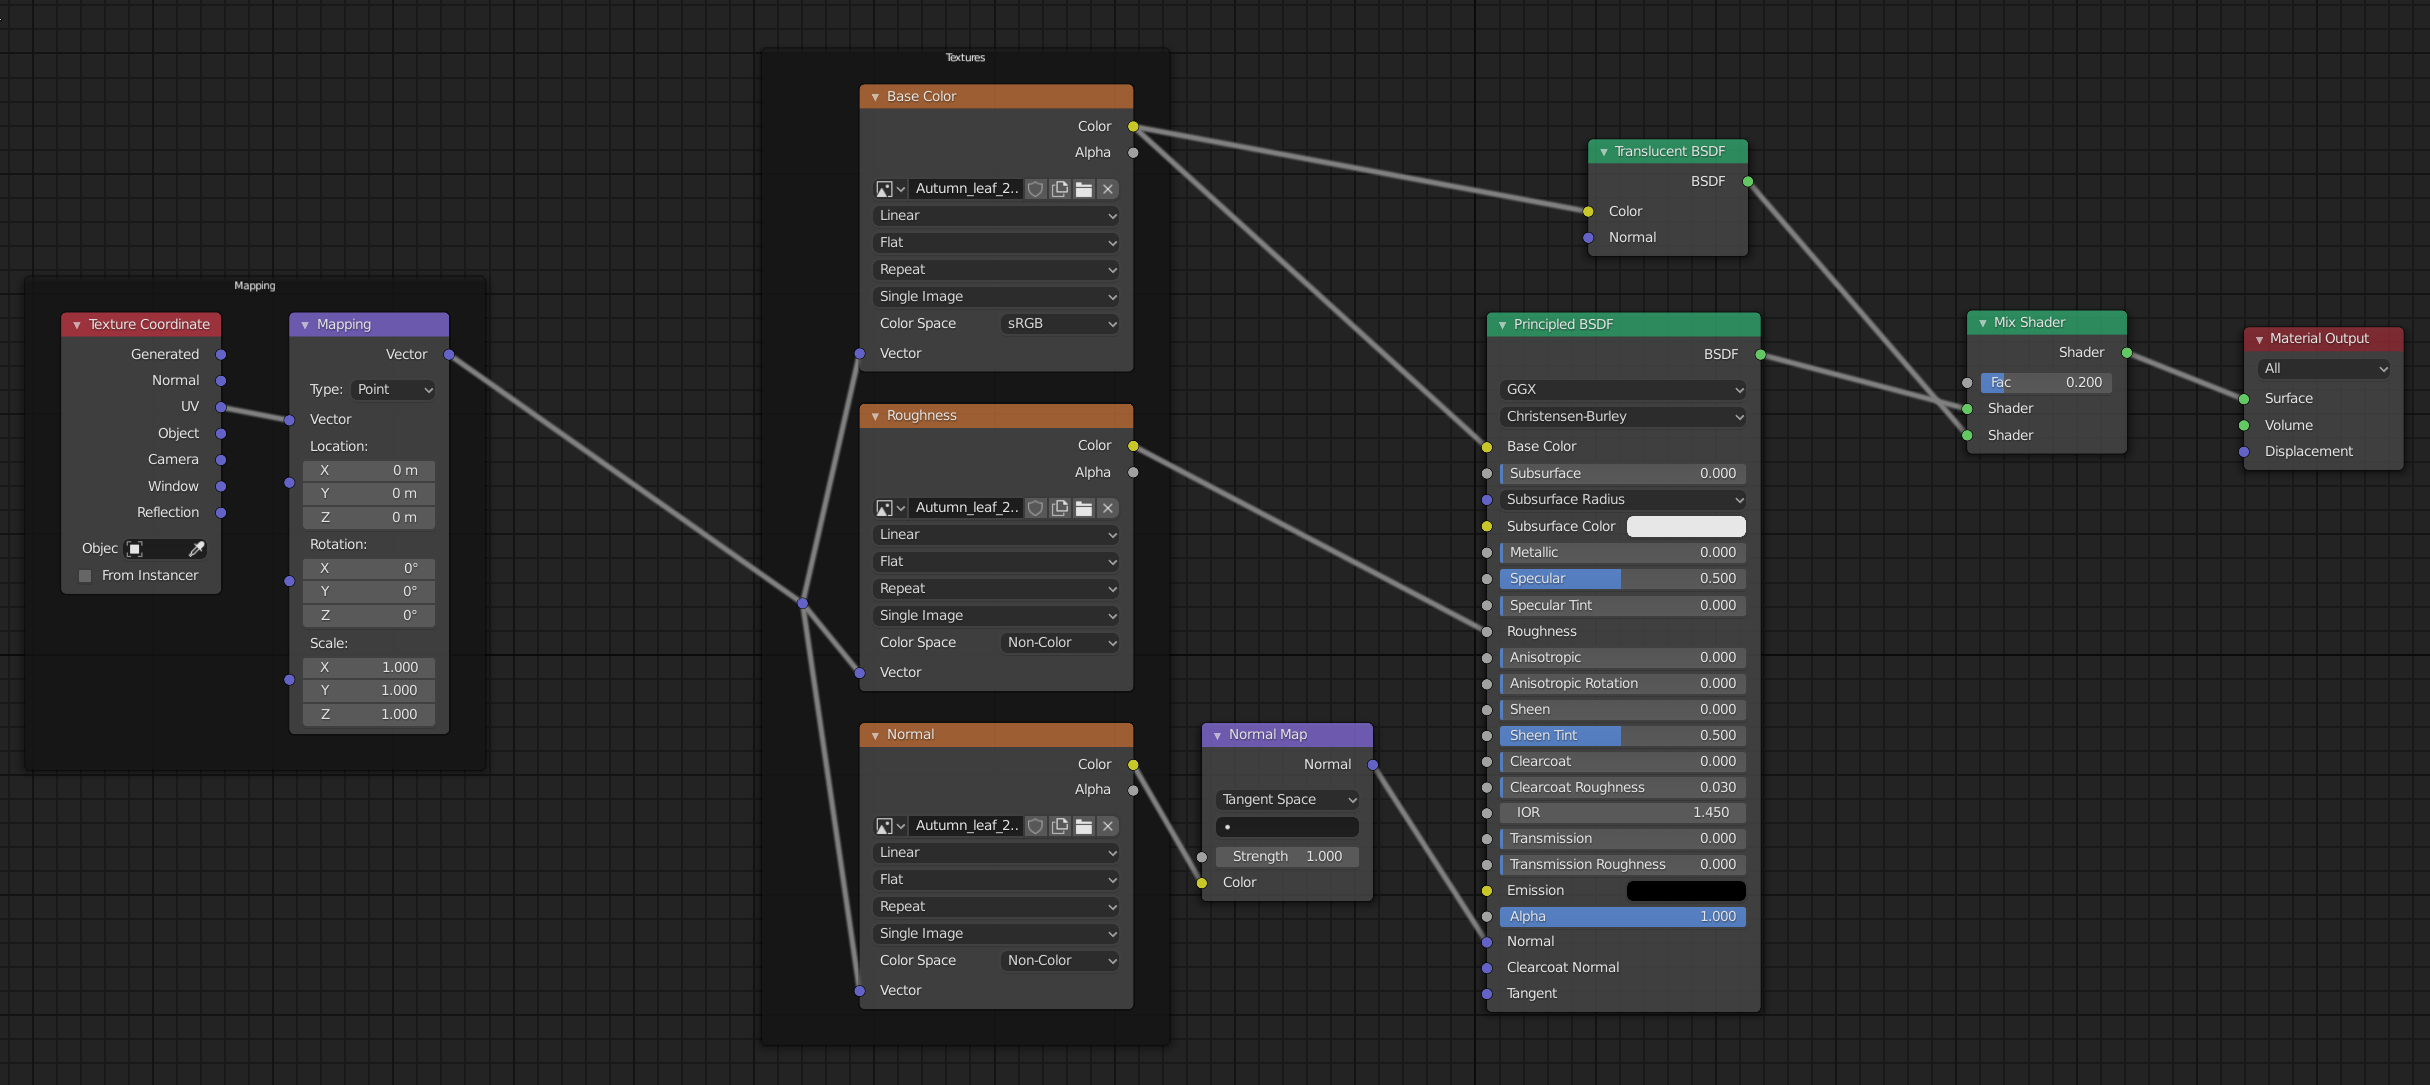
The difference in this setup is that we mix the Principled BSDF with a translucent shader. This node has the same color input from the diffuse texture as the Principled BSDF. Then we can adjust the mix shader to a sensible value. I keep this at around 0.2 with the translucent shader in the top slot.
We add the twigs with a hair particle system. A particle system in Blender can seem daunting at first thanks to the vast amounts of settings. Below we will look at the settings we need. They are not that many.
First, we will create a vertex group to mask away where our twigs will go. On most trees, the twigs go on the furthest most branches. Therefore, we will create a weight paint on the outer parts of the tree.
From the mode menu I select weight paint. A new group will be automatically created. Then I start to paint. Blue means no weight, and red means full weight.
We can adjust the weight and radius in the properties panel under the tools and workspace tab at the top.
I paint generously. Here is my result. Make sure to view the tree from all angles before you decide that it is done.

Next I take the branches and put them into their own collection in the outliner. Create a new collection by right clicking in the outliner and choose “new” then name it and put all the twig variations in the collection.
Now we have everything we need to distribute the twigs. A vertex group to tell where the twigs go and a group of twigs to place.
The rest is in the particle system. Go to the particle system tab on the tree and add a particle system. Select hair and check “advanced”. This enables more rotation settings for us.
These are the settings I change.
The rotation can be tricky. Generally, Normal or Normal-Tangent works well, if not try to adjust the seed in the “emission” tab to get a new distribution. If none of these works well we can have more control by using one of the global or object orientations and add more twigs with some different rotations in our collection. Then use the “Randomize”, “Phase” and “Randomize phase” values to create some variation.
To create a test render I like to go to hdrihaven and download a handful of hdris with different outdoor and indoor lighting setups to see if the colors of the tree are what I expect.
External content: CC0 HDRIs from hdrihaven.com
Then I set up an environment like this with any of the HDRIs I find there. When choosing an image, look at the shadows on the spheres that are rendered with each image. They will show what kind of shadow you will get with each hdri.

I then create a backdrop with an extruded plane that I shade smooth and add a subdivision surface level 2 to. Also make a render without a backplate to make sure that white light is not bounced up on the tree. This we can see both the silhouette and the somewhat correct color. This is my test result.
When we are happy with our test render we can use the tree in our scene or render a backdrop with multiple trees.
The sapling add-on can be used to create our own nice treeline backdrops. Thanks to the “transparent” setting in the render settings found in the film section. We can render a bunch of trees we create against the sky background and have it render transparent. This way we don’t have to use a photo and make selections in a photo editor around a complex tree structure. Instead, we just create a bunch of trees with the sapling add-on. We can set up the lighting, however we want for the treeline. Creating different angles or just straight on views.
Using a backdrop in a render can save a lot of render time and creating them ourselves we get full control over how they come out.
When we have spent time to set up our tree, we can save it as a preset. You can find the preset options in the geometry section.
At the bottom just above where you load presets you can enter a name and press Export preset.
The overwrite setting will of course overwrite any existing preset with the same name.
Blender saves presets as python files in this path on Windows:
C:\Users\<username>\AppData\Roaming\Blender Foundation\Blender\2.82\scripts\presets\operator\add_curve_sapling
If you are running Blender portable it is saved in this path from where you have it installed:
\2.82\scripts\presets\operator\add_curve_sapling
If you are on an earlier version of Blender, you may have an earlier version of the add-on. In that case Blender may try to save presets in the Program Files folder. This will fail if you didn’t run Blender as an administrator.
You may have similar problems if you run Blender portable and don’t have write permission in the file location.
Presets are saved permanently even if you close Blender.
When you load a preset you may see the “limit import” checkbox. What this does, is that it limit the “level” settings to 2 and disable leaves. If you want to bring these features, back just enable the leaves and increase the levels in the “branch splitting” section and all settings for higher levels is preserved.
Before I conclude this I just want to ask you to share this article with others if you want to see more articles like the ones here on artisticrender. It is essential that artisticrender grows if I shall be able to continue writing. Ok, conclusion time.
I kind of have this love, hate relationship to the sapling add-on. On one end it is so accessible and easy to use. You can just add a curve object, click a couple of buttons and what do you know, an animated tree.
On the other hand, there are many settings that can be easily confused, take such a simple thing as the branches vs splitting. It can be hard to know the difference and what settings happen to the branches and what is related to the splitting. It also lacks very important features such as being able to grow a tree around another object and better ways to give the branches more detail. Currently, there are only curves available.
The sapling add-on is always available in Blender and thanks to this accessibility it is well worth the time to learn about how to use it. With some imagination we can use it to create other things like flowers and bushes or alien tentacle things that move in creepy ways.
Thanks for your time.
