


The simple deform modifier is not as simple as it wants to make you think. But there are definitely some situations it can help. As you learn how it works you are likely to find yourself coming across more than one happy little accident.
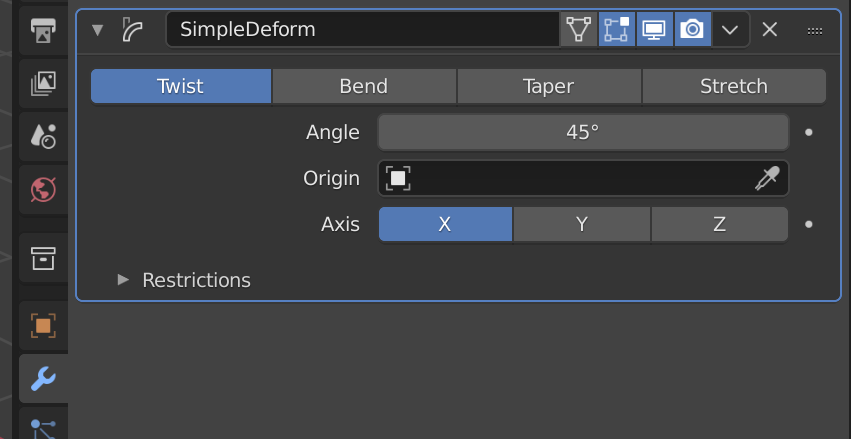
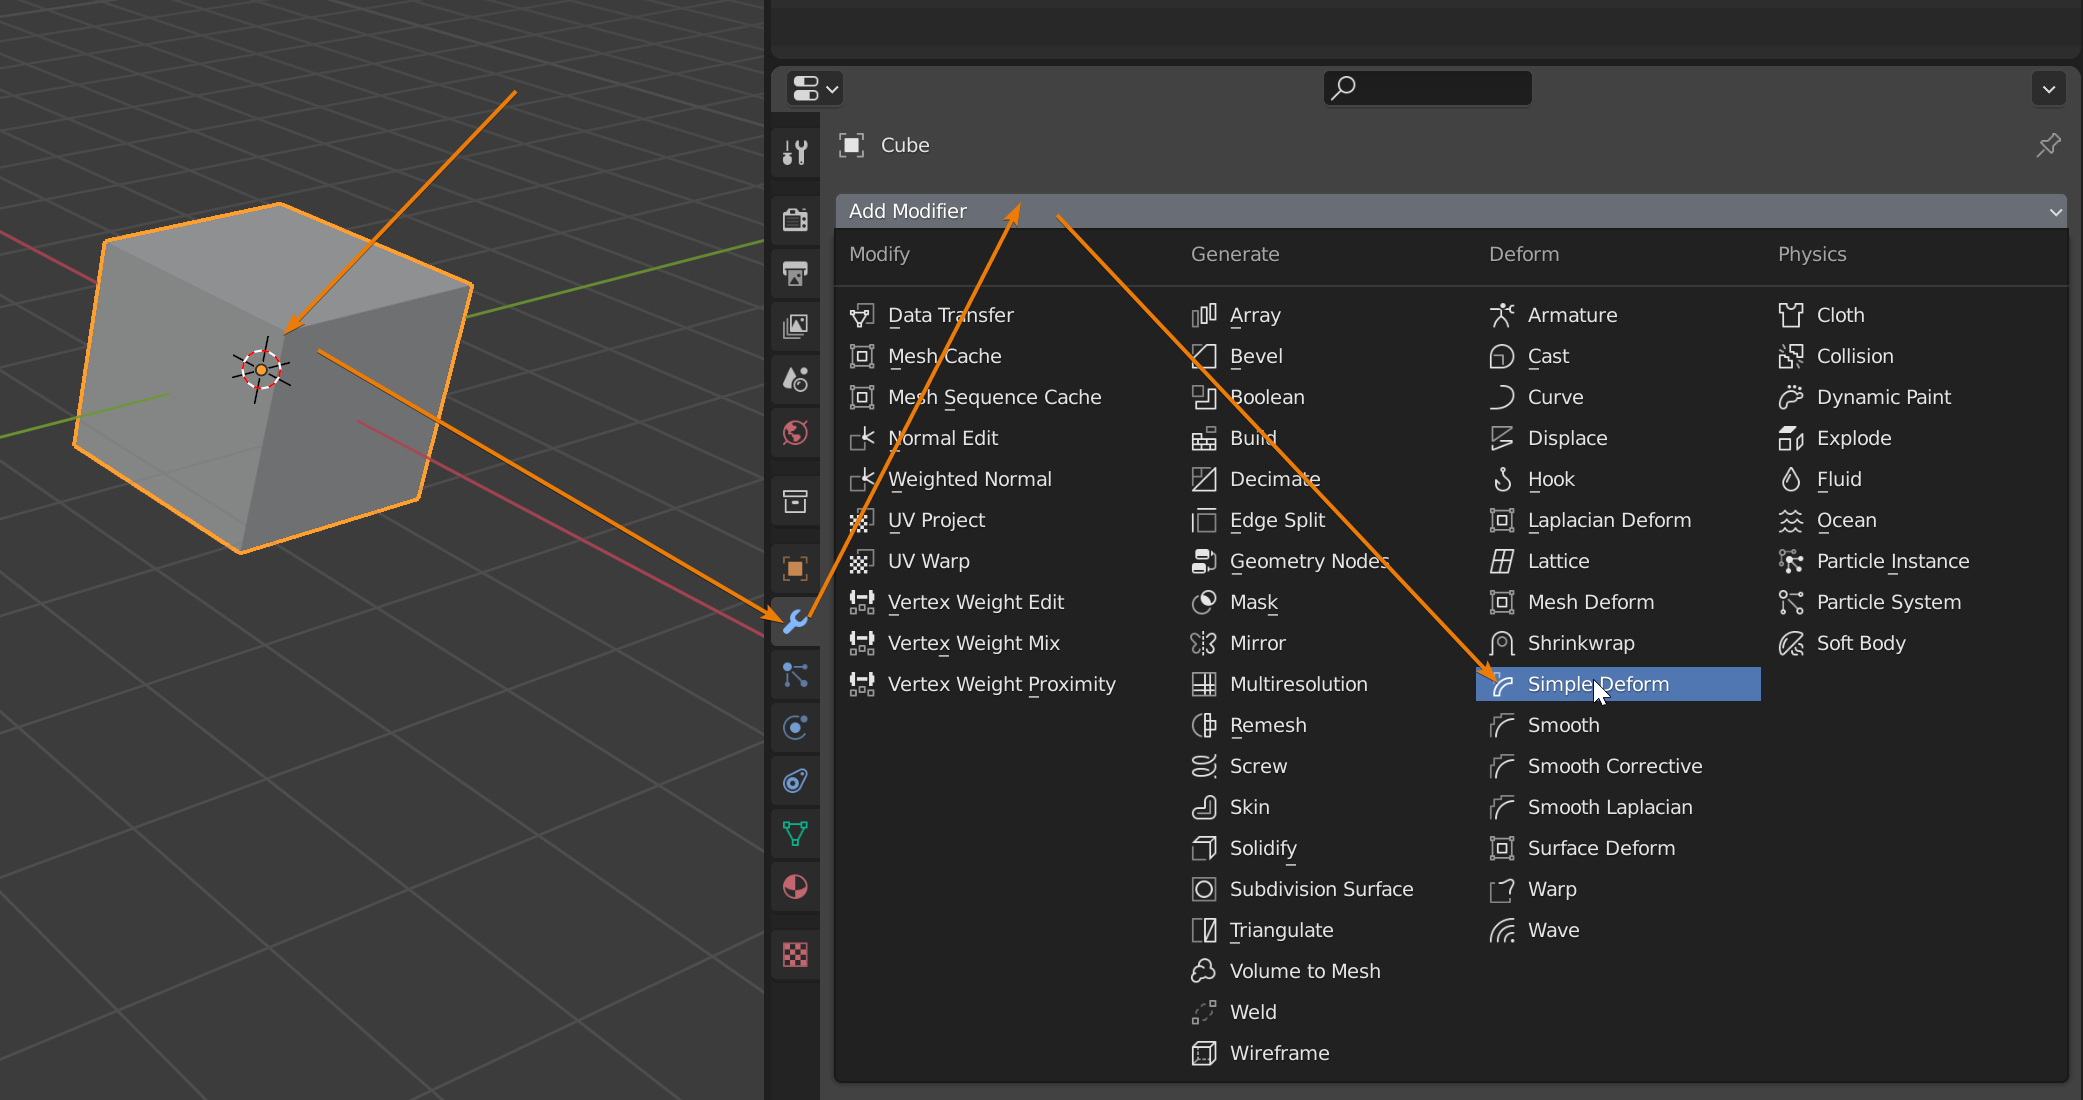
To use a simple, deform modifier, select your object, go to the modifier tab in the properties panel and add it to the modifier stack. The simple deform modifier has four operator modes, Twist and Bend that are based on rotation and Taper and stretch that are scale-based operations. It works by operating based on a pivot point and an axis to create the deformation.
Let's dive into some details and practical examples.
The simple deform modifier is a modifier in the deform category in Blender. We use it to make one of four possible deforms with it.
Each of these modes work a little bit different. The first two, twist and bend, are based on rotation of the object while taper and stretch will scale the object in different ways.
The simple deform modifier has many potential uses. But it is not always easy to use and is limited thanks to its implementation. Many times, we are better of using other tools to deform. But in a few cases the simple deform modifier can be quite useful.
For starters we can use it to make simple but exact changes to our mesh objects. Adding a bend or twist procedurally that we can change on the fly using the modifier settings. For instance, if we have an asset library of modular assets, we can bend them to create rounded versions. For instance, we can bend walls easily to extend the library into curved assets.
We can also animate the properties since we are dealing with a modifier. For instance, we could create a bouncy ball or have a simple character twist and turn.
Related content: How modifiers work in Blender, an overview
We can add the simple deform modifier to these object types.
Related content: How to set up and use a lattice in Blender
In this article, we will use mesh objects as examples since they are the easiest to visualize.
To use the simple, deform modifier on any of these object types, follow these steps:
It is important to note that the simple deform modifier does not add geometry to your object. So, if there is not enough geometry to support the deformation you want you won't get the result you want. A quick way to add geometry is to add a subdivision surface modifier above the simple deform in the modifier stack and set it to simple, so that it doesn't affect the shape of the object.
Any deformation that we do primarily relies on these parameters.
The origin acts as the starting point. If no origin object is set, the origin of the object itself is used as the origin point. With an empty object, we can set the origin anywhere. Inside or outside the object. For twisting and bending for instance, the origin is the point that the twist or bend will happen around.
The deform will happen along the given axis and use the furthest most vertices from the origin as the limits in the axis positive and negative direction.
It is important to note that the deformation is happening in the object's local coordinates, and these can differ from the global coordinates. For instance, if we rotated the object in object mode.
To see the local axis of the selected object, we can activate the gizmo in the viewport gizmo menu in the top right corner of the 3D viewport. Then in the menu, find the object gizmos section and set the transformation orientation to local and check move.

With the restriction subsection, found in the modifier settings, we can limit how far from the origin the deform will have an effect. The first limit value that default to 0 represents the vertex that is furthest away from the origin in the negative direction, while the second limit number set to 1 represents the furthest most vertex in the positive direction.
If we change the upper limit to something like 0.8, the deform will stop when it reaches 80% of the way towards the furthest point in the positive direction.
We can also lock one or both the axis we are not deforming along to not have any vertex movement in those directions. The exception is the bend deform option.
And last, we can limit the deform to a vertex group.
Related content: How to use vertex groups in Blender
A great place to find the technical details of how it works behind the scenes is the Blender manual page here:
External content: Blender manual, simple deform modifier
Let's now dive into and see what those settings do and how the simple deform modifier works.
Related content: How to apply modifiers in Blender
Twist is the default deform operator. We will use this extruded and subdivided cube to show how it works. We will also use an empty object to demonstrate what the difference is depending on if the origin is inside or outside the object.
To setup a twisting object with the simple deform modifier, follow these steps:
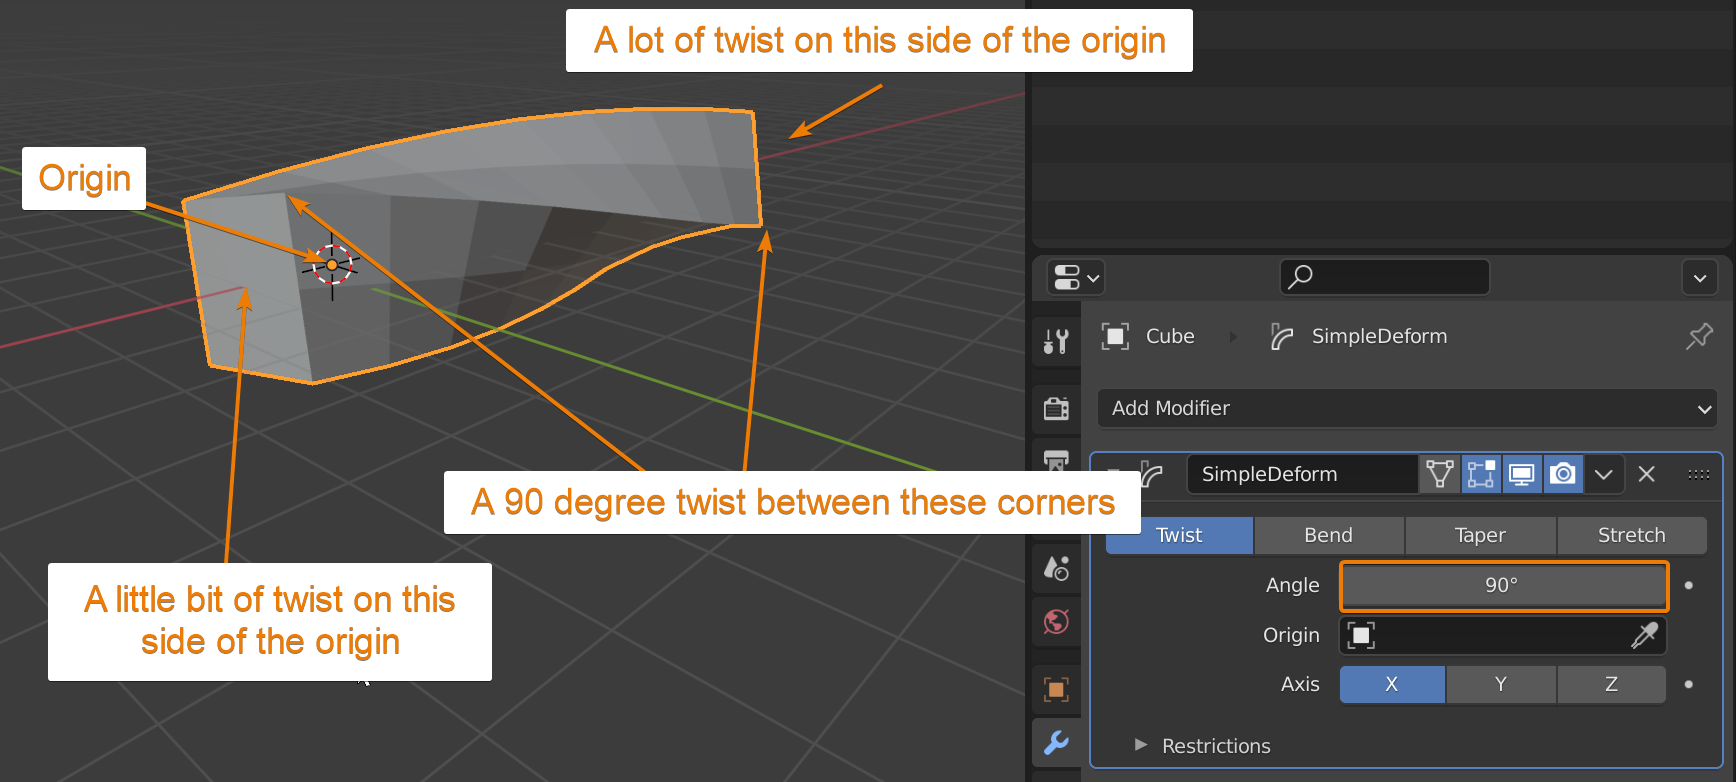
The twist happens from the origin point. If the origin is exactly at the end of the object, the twist will only happen in the other direction. If the origin is in the middle of the object, the twist will happen in both direction along the chosen axis.
Similarly, if the origin is, let's say 80% of the way from the last vertex in the positive direction and 20% away from the last vertex in the negative direction, 80% of the chosen angle degrees will happen in the positive direction and 20% in the negative direction.
If we move the origin to the end of the objects mesh, we can avoid this slight twist and keep an aligned bottom while twisting in only one direction.

In many cases we may not be able to move the origin point of the object though. In that case we use an empty object, place it at the end of the object we are deforming and select it in the origin slot in the modifier settings.
Here is an example where I use an empty as the origin. I have also moved it in the Y and Z direction to show how we can twist the object around something other than its own center.

You can see how it kind of bends and twist at the same time.
To also demonstrate the limits, I have changed the upper limit to 0.5 to have the twist only go halfway in the positive direction. Note though that the full 90 degrees are still being twisted. It is just twisted in a shorter distance before it stops.

Here is a quick example of what we can do with the twist option.
To achieve this effect, I used an array modifier and subdivision surface. Then I simply duplicated the object and messed with the position of the objects.
Related content: How to center objects, origins and pivot points in Blender

The bend operation is the one that I find most useful. Together with a custom origin object we can bend just about anything in exact 45, 90 180 or 360 degrees around the Z axis without destroying the original object.
An example is if we have a modular asset that we use to build larger objects. For instance, a wall segment can be bent to create a rounded corner on a house. Using the limits option and a custom origin we have great control.
To setup a bending object with the simple deform modifier, follow these steps:
Here is an example using the same object as before.

Here I changed the deform type to bend and set the angle to 180 degrees. I also changed the axis to the Z direction because this is likely to be the most frequently used axis for this kind of deformation.
Note that the origin is at the corner of the cube. The further down the positive Y direction we move the empty the larger the bend will be. We can use this transformation to dial in the ending point of the bending object.
Just like with the other deformation types, we can use the objects origin by not setting an origin object and we can use restrictions.
Something to keep in mind is that if we want to move the object without changing the deformation, we need to move the mesh object and the origin at the same time. One way to not forget this is to parent the empty to the mesh object so that it follows the mesh object around and keep its relative position to the mesh object.
You can parent one object to another by holding shift and selecting one object after the other then press Ctrl+P and choose object. The last object you select will be the parent object for all the other selected objects.
As opposed to bending and twisting the taper deform type is scale based rather than rotation based. Instead of an angle value we now have a factor.
To setup a taper object with the simple deform modifier, follow these steps:
Using our test object, this is how our example looks with the origin set to the end of the object.

Note that in this example, I have removed the empty origin object and use the objects default. If I switch to the empty object that is located at the corner of the object and happens to align with the world origin to easier see the difference, it looks like this.

Note how the edge of the object follow the X axis. This is because there are no vertices on the other side from the empty origin object. This means that the taper now only happens in the positive X and Y and Z directions since there is no geometry to deform in any of the negative directions of any axis from the origins point of view.
Note here that the deformation still happens in the local coordinates even if the object is aligned to the global coordinates and the world origin.
To setup a stretch for an object with the simple deform modifier, follow these steps:
Stretching is much like taper, but it adds a curve to the deformation. Also note that the factor is about, but not exactly 10 times smaller than with taper. So, to have a similar ratio between the end of a tapered object and the stretched object, we need to move the decimal point of the stretched deformation one step to the left, making a taper factor of 2 similar but not exactly the same as a stretch factor of 0.2.

In this example I duplicated our object to compare with the taper deform type. The taper is show in wireframe mode and the modifier settings is show at the top while the stretched objects modifier settings is at the bottom. The big difference here is the factor that is 0.2 for the stretched object instead of 2.0 for the tapered object.
Visually you can see that we get a curved stretching effect instead of the linear taper. With the origin in the middle of the object, we get an hourglass shape like this.

In this article we learned about the simple deform modifier. It can be hard to understand when you first try it out, but as you use it, you learn what the limitations are and what it is capable of.
If you find the content interesting, feel free to check out my E-Book. It contains a lot of valuable information about Blender, just like this article.
Thanks for your time.
